Installation Guide
This Document is part of the OpenDCS Software Suite for environmental data acquisition and processing. The project home is: https://github.com/opendcs/opendcs
See INTENT.md at the project home for information on licensing.
Overview
OPENDCS is a collection of tools for collecting hydrometeorologic data. It was developed originally for use with the GOES (Geostationary Operational Environmental Satellite) DCS (Data Collection System). These tools have been developed over the last decade (starting in 1999) and are used heavily by several U.S. Federal government agencies.
Included in OPENDCS:
LRGS (Local Readout Ground Station) – a background server process and collection of GUI tools for collecting raw data via satellite links and over the network from other LRGS systems.
Client-side GUI tools for LRGS – DCP Message Browser connects to any LRGS server, retrieve raw DCP messages based on a variety of search criteria. Display raw and/or decoded messages on the screen and/or save to file.
DECODES (DEvice COnversion and DElivery System) – A sophisticated collection of GUI and background process to decode data from any platform and reformat into a large number of standard formats.
OPENTSDB (Open Time Series Database) – will be released with OPENDCS 6.1, this is a powerful time series database engine modeled on CWMS (Corps Water Management System).
Computation Processor – Can be used with CWMS, HDB (USBR’s Hydrologic Database), or OPENTSDB. A collection of GUIs and background processes that perform real-time computations and validations on a time series database.
Glossary and List of Acronyms
CP Computation Processor – the background program that executes computations as new data arrives.
CCP CWMS Computation Processor – i.e. the CP configured for CWMS.
CWMS Corps Water Management System (pronounced ‘swims’) - A system for hydrologic data storage and analysis used by USACE.
DAS Data Acquisition Server – responsible for collecting raw DCP messages via a variety of satellite and internet links.
DBMS Database Management System
DCP Data Collection Platform – equipment in the field that collects and transmits raw environmental measurements.
DCS Data Collection System
DECODES DEviceCOnversion and DElivery System – A collection of software for decoding raw environmental data, and converting it to a time-series in a variety of formats.
ERD Entity Relationship Diagram
GUI Graphical User Interface
HDB Hydrologic Database – A system for hydrologic data storage an analysis used by USBR.
LRGS Local Readout Ground Station – This is synonymous with DAS. It is the legacy name for a Data Acquisition Server.
NWIS National Water Information System - A system for hydrologic data storage an analysis used by USGS.
SDI Site Data-type ID. In HDB this is used to denote a particular parameter at a particular site. It is stored as a numeric ID.
SQL (a.k.a. “sequel”) Structured Query Language
TSDB Time Series Database
USACE U. S. Army Corps of Engineers
USBR U. S. Bureau of Reclamation
USGS U. S. Geological Survey
XML Extensible Markup Language
Installing OPENDCS
There are two types of installations:
Single User Installation. Only one user will use OpenDCS. This user will own all the installation files and directories.
Multiple user Installation appropriate for Unix or Linux systems where multiple user accounts must use OpenDCS. A central designated user (we recommend user name “opendcs”) will own the installation files and directories. Other users may run OpenDCS from their own accounts.
Single User OPENDCS Installation
This is the simplest type of installation. It is appropriate for Windows and other systems where a single-user will run the software.
Install OpenDCS as the user who will run the utilities. This user owns OpenDCS files. This ensures there will be no issues with permissions. This user will have full access to all utilities and configurations.
Start the installation by executing the downloaded installer JAR (Java Archive) file. On Windows, you can likely double-click the file icon in the windows explorer. On other system, CD to the directory where you downloaded the file and execute the following command:
java –jar *downloaded-file-name*
The installer guides you through a series of screens:
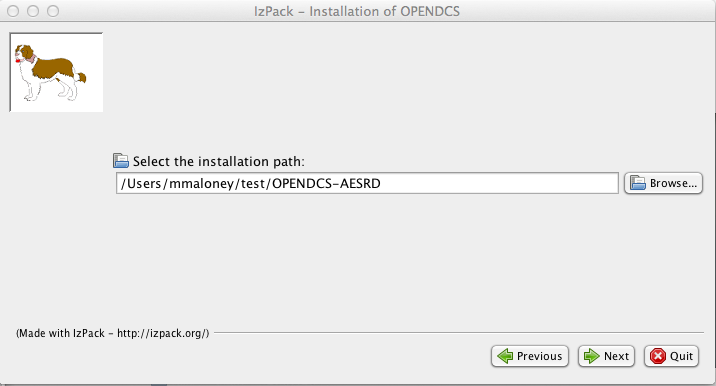
Welcome Screen:

Select an installation location. The installer will create a tree of files under the location that you specify.
For Unix/Linux installations, we recommend that you run the installer as the user that will own the installation files.
For Windows installations, we recommend that you avoid directory names that have embedded spaces. For example, do not place the software under ‘C:Program Files’.
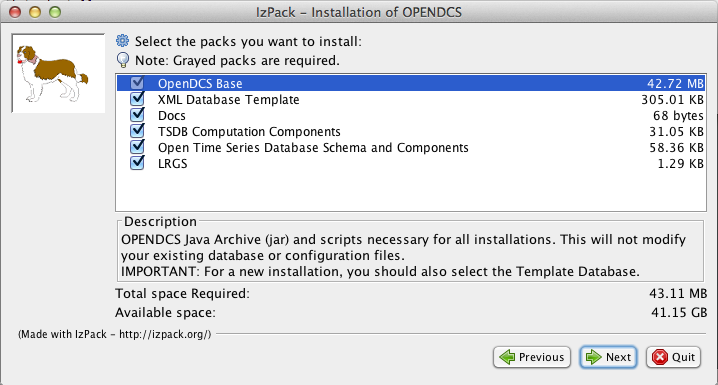
Select the packages that you want to install.
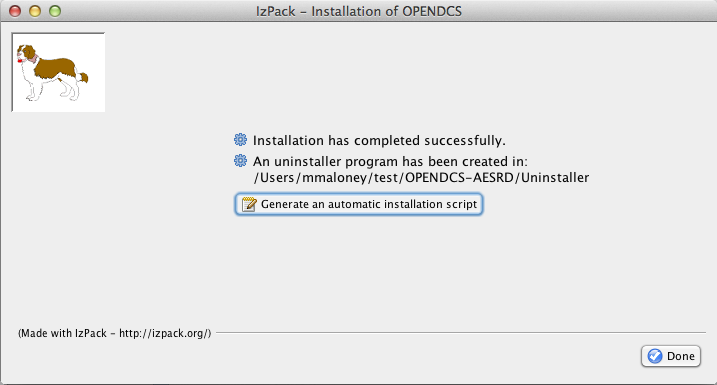
Allow the installation to complete:

Go all the way to the final screen and hit ‘Done’. Warning: Exiting the installer prior to the final screen may leave the software in an unusable state!
After installation we recommend that you establish an environment variable DCSTOOL_HOME pointing to the installation directory. Then place OPENDCS’s bin directory in your path.
So, for example, if you are running bash under a linux system, add this to your .bash_profile:
DCSTOOL_HOME=\ **insert complete path to installation here!**
export DCSTOOL_HOME
PATH=$DCSTOOL_HOME/bin:$PATH
After modifying this file, log out and back in so that the environment is now set.
Multiple User Installation (Unix/Linux)
OPENDCS may be installed on a Unix/Linux system in a multi user environment.
A designated user (typically “opendcs”) owns the installation. Follow instructions below for creating this account and installing OpenDCS as this user.
Other users must become members of the “opendcs” Unix user group. They then run a script to set their environment for running the software. These users may customize a subset of the software configuration. Log and other types of files are placed in a subdirectory under each user’s HOME directory. See subsections below for details.
Setup OPENDCS Owner and Group
An account must be designated as the OPENDCS toolkit owner. This should not be root! Also, a user group will be created allowing members read-only access to toolkit files and directories.
We suggest that the OpenDCS owner and group should both be called “opendcs”.
Before running the OPENDCS Toolkit installation, do the following:
Login as root.
Create the owner group account (e.g. “opendcs”)
Create owner user account (e.g. “opendcs”). For login shell, specify ‘bash’. (Note, ksh will also work or sh if you must. Do not specify csh.)
Ensure that the owner user’s primary group is the specified group account.
Set permissions on the directory such that members of the group can access files in this directory.
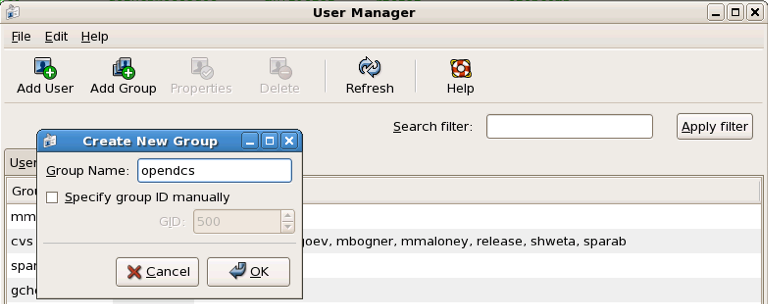 Figure 2‑1 shows the group and user creation screens under a
Red Hat Linux system. Similar menus are available under Solaris.
Figure 2‑1 shows the group and user creation screens under a
Red Hat Linux system. Similar menus are available under Solaris.
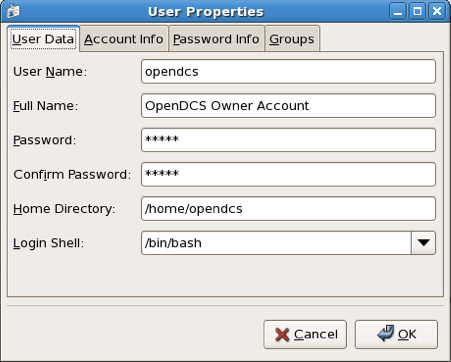
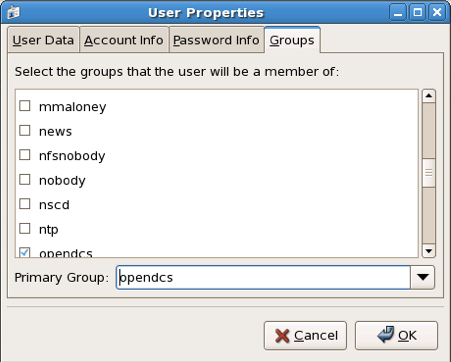
Figure 2‑1: “opendcs” User and Group Creation under Red Hat Linux.
Permissions on Installation Directories
The central user’s $HOME and the OPENDCS installation directories should have permissions: drwxr-x—. If not, login as the central user and type:
chmod 750 $HOME
mkdir $HOME/OPENDCS
chmod 750 $HOME/OPENDCS
Install OpenDCS
Use instructions in section 2.1 or 2.3 to install OpenDCS either from the GUI or a compressed TAR image. Install it as user opendcs at location $HOME/OPENDCS.
Giving a Normal User Access to OpenDCS
After the installation is complete, login as a normal user (other than opendcs, and of course never root) that needs to run toolkit programs.
In the new user account, before doing anything else, set an environment variable DCSTOOL_HOME pointing to the actual installation in the owner’s account. For example, if user “opendcs” owns OpenDCS at /home/opendcs/OPENDCS, set an environment variable in BASH like this:
export DCSTOOL_HOME=/home/opendcs/OPENDCS
A script called “opendcs_user_init” is included with OpenDCS to set up a user’s environment. The script will do the following:
Create a local directory for toolkit files.
Define a shell variable called DCSTOOL_USERDIR pointing to this directory.
Create a script $HOME/opendcs.init that you can run to set up your environment.
After running the script modify your .bash_profile in your $HOME directory to source the opendcs.init script by adding a line at the end:
. $HOME/opendcs.init
(Note the dot – space at the beginning of this line. This tells bash to make the variable settings part of your current environment.)
After running this script, your PATH variable now includes the OPENDCS bin directory, giving you access to all of the programs. To start the main toolkit launcher bar, type:
launcher_start &
Troubleshooting:
If you get some variation of “permission denied”, it probably means that you don’t have access to the OPENDCS bin directory.
Make sure you are a member of the “opendcs” group.
Check the permissions on the installation directories (see section 2.2.2)
If you get some variation of “command not found”, then your PATH is probably not set correctly. Did you source the “opendcs.init” file in your .bash_profile, as described above?
Type the command “echo $PATH”. You should see the bin directory under the OPENDCS installation (e.g. /home/opendcs/OPENDCS/bin) in the colon-separated list.
Customizing the User’s Configuration
The OPENDCS configuration is normally stored in the file “decodes.properties” found in the installation directory.
When you login as the central user and run the OPENDCS setup menu, you will have full access to all configuration variables. The values will be stored in $DCSTOOL_HOME/decodes.properties.
You can customize the configuration for individual users. Overrides to the shared settings are stored in $DCSTOOL_USERDIR/user.properties. When you run the OPENDCS setup menu as a normal user, your settings will be stored in your configuration file and will only apply to you.
Installing from a Compressed Tar Image
USACE requested that we prepare a compressed TAR (Tape Archive) image file for easy command-line installations.
NOTE:
We are not distributing this particular file anymore; however we are working letting the normal installer allow this type of installation.
The installation file will be called: opendcs-version-unix-install.tgz. For example release 6.0 is called: opendcs-6-0-unix-install.tgz. These files have been prepared by Cove Software, LLC, and delivered to USACE.
For a fresh install, first create the desired home directory, and then CD into it. For example:
cd $HOME
mkdir OPENDCS
cd OPENDCS
For an upgrade installation, the directory will already exist.
This directory will correspond to a required environment variable called DCSTOOL_HOME.
Un tar the file within this directory. For example if the tar file exists in the /tmp directory, you would type:
tar xvzf /tmp/opendcs-6-0-unix-install.tgz
For this type of installation, you MUST set the environment variable DCSTOOL_HOME. For example, if you are using the BASH (preferred) shell, edit .bash_profile and add a line like this:
export DCSTOOL_HOME=$HOME/OPENDCS
You will probably also want to add the OPENDCS bin directory to your path:
PATH=$DCSTOOL_HOME/bin:$PATH
The TAR file is meant to be used as either a fresh install or an upgrade. Therefore it cannot overwrite any configuration files you have customized. The config files in the release have modified filenames:
Operational Config File |
Name in the TAR file |
|---|---|
computations.conf |
computations.conf.sample |
ddsrecv.conf |
ddsrecv.conf.sample |
decodes.properties |
decodes.properties.sample |
drgsconf.xml |
drgsconf.xml.sample |
lrgs.conf |
lrgs.conf.sample |
edit-db (directory) |
edit-db.init |
users (directory) |
users.init |
For an upgrade install, you can just delete the samples that were included in the TAR file.
For a fresh install, rename the sample included in the TAR file to the operational name before starting the software for the first time.
Unattended Installation
After performing a normal install the final panel of the installer will have a button to generate an “installation script”:

If you need to perform the same install in several places with the same options, like which packs to use, you can use this file as follows (assuming you’ve called it auto-install.xml):
java -jar downloaded-file-name auto-install.xml
Upgrading Database for a Previous Release
As features are added to OpenDCS, it is occasionally necessary to modify the database schema to add new tables, columns, etc. Each new release of the software will come with schema files to build a new database, but what if you already have a working database with the old schema?
Option 1: Do nothing.
We always ensure backward compatibility with a new Java software release. The new Java code will work just fine with older versions of the schema. The only down-side is that you won’t be able to take advantage of any new features that require the schema changes.
Option 2: Update to Latest Schema
Run the command-line utility ‘dbupdate’ once after installing the new Java code.
The utility will ask you for the username and password of the database schema owner. It will make any necessary modifications to the database structure. Usually this involves defining new tables, or adding columns to existing tables.
The utility will detect the current schema version and make only the changes necessary to update to the latest. It will display all of the changes as they are made.
A sample run is shown below. User responses are in bold italic.
$ bin/decj opendcs.dbupdate.DbUpdate
Enter user name and password for the CP/DECODES schema owner account.
CP schema owner user name: **aesrd_adm**
Password:
Init DECODES DB: EU, Enum, DataType, Sources,
Site, Equip, Config, Platform List, Presentation Groups, Network Lists,
Routing,
Init done.
TSDB Database is currently 9
DECODES Database is currently 10
Executing: ALTER TABLE NETWORKLISTENTRY ADD COLUMN PLATFORM_NAME VARCHAR(24)
Executing: ALTER TABLE NETWORKLISTENTRY ADD COLUMN DESCRIPTION VARCHAR(80)
Executing: UPDATE TSDB_DATABASE_VERSION SET DB_VERSION = 10, DESCRIPTION = 'Updated on Wed Jun 04 13:07:45 EDT 2014'
Executing: UPDATE DECODESDATABASEVERSION SET VERSION_NUM = 11
Starting and Configuring OPENDCS
The release directory contains a file called “decodes.properties”. This file contains “name=value” pairs, one per line. The options are shown in Table 3‑1. “Default Value” is the value that will be used by the software if the property is missing from the file.
The installation procedure will create a “decodes.properties” file based on selections you made in the dialogs.
Note: if this is a multi-user installation, then your settings will be stored in $DCSTOOL_USERDIR/user.properties.
Also, new properties are added from time to time to control new features added to OpenDCS. For a complete list, see the Setup GUI available from the Launcher button panel.
Property Name |
Default Value |
Description |
|---|---|---|
SiteNameTypePreference |
NWSHB5 |
Specifies the “preferred” type for DCP names. By default this is the Handbook-5 standard used by the National Weather Service. |
EditDatabaseType |
“xml” |
The is the type for the Editable database. The same values allowed for the DatabaseType property are allowed here; viz “XML” or “SQL”. |
Edit DatabaseLocation |
N/A |
This is the location for accessing the editable database. The same values allowed for the DatabaseLocation property are allowed here. |
EditOutputFormat |
“Human-Readable” |
Output format to test decoding scripts within dbedit. |
EditP resentationGroup |
N/A |
Presentation group used to format samples when testing decoding scripts within the editor. |
EditTimeZone |
“UTC” |
Time zone used when decoding sample data within the editor. Using UTC makes it easy to correlate sample times with the DCP message time stamp. |
jdbcDriverClass |
org.postgresql.Driver |
Full Java class name of the JDBC driver here. |
SqlKeyGenerator |
Java Class Name |
Class name of SQL key generator. |
RoutingStatusDir |
Directory Name |
Default: $DECODES_INSTALL_DIR/routstat By default, your routing specs will periodically place their status in this directory. The “Routing Status Monitor” Web Application can be used to make this information visible via a web page. |
DefaultDataSource |
Data Source Name |
Default: “drot.wcda.noaa.gov”. This is used in the database editor (dbedit) to retrieve sample messages to test your decoding. |
TransportMediumTypePreference |
String |
Used in the database editor list panels to choose which of the (possibly several) transport media to display. |
DataTypeStdPreference |
String |
Used by editor and some output formatters to choose which of the (possibly several) data types to display. |
decwizTimeZone |
String |
Time zone used in the decoding wizard displays. |
decwizDebugLevel |
0, 1, 2, 3 |
Debug level in trace log 0=no debug info, 3= verbose. |
decwizOutputFormat |
String |
Default = “stdmsg”. |
decwizRawDataDir |
Directory |
Default location to move raw data files into. |
decwizDecodedDataDir |
Directory |
Default location to save decoded data in. |
decwizSummaryLog |
File Name |
Default file to append decoding summaries to. |
hdbSiteDescriptions |
True or False |
Default = false. True will automatically place the preferred name at the beginning of the description. HDB requires this. |
aggregateTimeZone |
Time zone name |
Name of time zone used to determine the start/end of aggregate periods for computations. If not set, it will default to the sqlTimeZone setting. |
DbAuthFile |
$HOME/.decodes.auth or authtype:config See below for more. |
For SQL Database connections, this file stores the database username and password. It is encrypted and should have protected permissions in the user’s home directory. Thus each user can have a different database role. |
language |
en |
For internationalization, “en” is the default (English). |
Country |
us |
Country abbreviation for internationalization. |
Agency |
String |
Name of agency that owns the database. |
Location |
String |
Sub-location of the agency that owns the database. |
archiveDataDir |
Directory |
Directory for archiving raw data and summary files. |
archiveDataFileName |
File Template |
File (template) for archiving raw data files. |
rememberScreenPositions |
true |
By default DECODES will remember the poisition and size of each GUI screen so that when a program is restarted it will appear in the same place. Set this to false to turn off this behavior. |
CwmsOfficeId |
String |
Set to override office ID determined at login. |
writeCwmsLocations |
true |
Boolean. If false, then DECODES will be unable to create CWMS Location records. |
showPlatformWizard |
false |
Boolean. If true, include the platform wizard button on the launcher. |
showNetlistEditor |
false |
Boolean. Show the legacy flat-file network list editor on the launcher. |
showTimeSeriesEditor |
true |
Boolean. |
showComputationEditor |
true |
Boolean. |
showGroupEditor |
true |
Boolean. |
showTestComputations |
true |
Boolean. |
showAlgorithmEditor |
true |
Boolean. |
showRoutingMonitor |
true |
Boolean. |
showPlatformMontiro |
true |
Boolean. |
datchkConfigFile |
$DCSTOOL_USERDIR/datchk.cfg |
For DATCHK CCP validations. |
retryFailedComputations |
true |
Set to false to disable all computation retries. |
maxComputationsRetries |
0 (meaning unlimited) |
Set to positive integer to control the maximum number of time a computation will be retried if it fails. Zero (the default) means unlimited. |
CpEffectiveStart |
String |
Can be set to a negative increment like “-3 days” to limit the age of data that CP will process. |
defaultMaxDecimals |
4 |
In the absence of a presentation group entry, this will determine the maximum number of fractional digits in various output formats. |
eventPurgeDays |
5 |
Number of days that data acquisition events will be stored in the database before they are purged. |
Table 3‑1: DECODES Property Values.
DbAuthFile can reference a file directly, or configuration for other auth sources. The full syntax is:
auth-type:configuration
If no auth-type + : is present, the normal user auth file is assumed.
UserAuthFile and env-auth-source are provided in the installation. See the developer Documenation for instructions on creating new sources.
Table 3-2: DbAuthFile values
Type |
Description |
Configuration |
UserAuthFile |
Traditional file Control by setDecodesUser command |
File name. Environment variables are expanded |
env-auth-source |
pull credentials from environment variables. |
Mapping of internal name to environment vars. For example if your environment creds are OPENDCS_USERNAME and OPENDCS_PASSWORD the line would be: env-auth-source:username=OPENDCS_USERNAME,password=OPENDCS_PASSWORD |
gui-auth-source |
|
Dialog title. |
The “decodes.properties” file is read when an OPENDCS program is started. Therefore, in most cases, after making changes you must restart the affected program(s).
You can edit the file directly with a text editor. The preferred way to make changes is through the GUI. Start the launcher with the command:
launcher_start
(Or on Windows, run Start – OPENDCS – Launcher).
Hit the “Setup” button. This brings up the DECODES Properties window as shown below.
Figure 4‑1: DECODES Properties Setup GUI.
All of the possible properties are shown, regardless of whether they have been set. You can hover the mouse pointer over the name for a tool-tip for each. To edit a property, select it from the list and hit ‘Edit’.
See the sections below for Database connection settings.
After you are finished, hit the Save Changes button at the bottom. Restart any affected program (including the Launcher GUI).
Configuring From the Database
This section applies to OpenDCS 6.2 RC13 and later.
In certain situations, usually having to do with security, you may need to be able to set the above-mentioned configuration parameters from the database. For example, if the data acquisition runs on a server that you do not have login privileges to. OpenDCS provides a mechanism for this.
The Computation Processor User Guide describes records that describe processes. You can use these process records to store configuration parameters in the database. Parameters stored and referenced in the way described here will override the settings in the decodes.properties or user.properties files described above.
To do this you will first need to create a new Application Type record. Start the reference list editor with the “rledit” command. On the Enumerations tab, select the Application Type enumeration. Create a new enumeration record as shown below.
Mnemonic Value must be “settings”
Executable Java Class must be (exactly): decodes.util.DecodesSettings
Before leaving rledit, be sure to hit File – Save to DB.
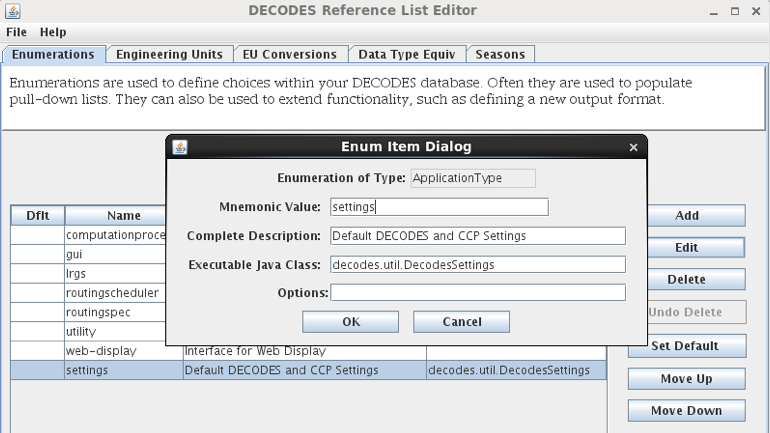
Figure 4‑2: Create the “settings” Application Type in the Reference List Editor.
Now we will create special process (a.k.a. Loading Application) records that store DECODES and CCP settings.
You can create/modify/delete process records in two ways:
From the computation editor on the “Processes” tab.
From the Processes button on the launcher screen.
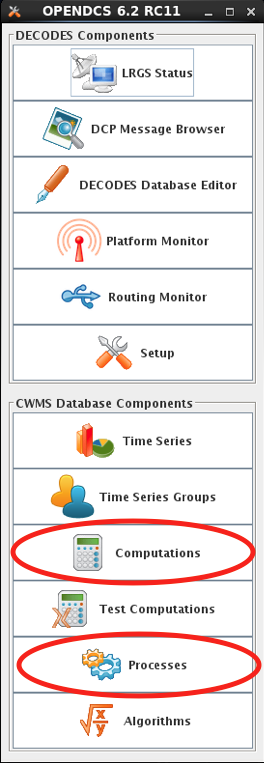
Figure 4‑3: Edit Processes from Two Different Apps.
Create a new process record. The example below shows a process record called “ServerSettings” because its intended for settings to control daemons on a remote server.
Under Process Type, select the “settings” record you created in rledit above. This will cause the Application Properties screen to fill in with a template of all available properties to control DECODES and CCP. These are the same properties listed in Table 3‑1 above.
Hover the mouse over a parameter name for a tool-tip help. Click the parameter and the Edit button to assign a value to the parameters. When you assign a value here, it will override any value from decodes.properties or user.properties. Leave properties blank if the default value is acceptable.
Thus a “process” record here is not really for a process. Rather it is a named set of overrides for the DECODES and CCP settings stored in the startup files.

Figure 4‑4: Create a “settings” Process Record to Store DECODES/CCP Overrides.
Command Line Args for Starting DECODES/CCP Programs:
Now, how do you start a DECODES or CCP program and tell it to use one of these named settings processes? Add a command line arg as follows:
-Dsettings=ProcessName
For example, to start the computation process I could do something like this:
nohup compproc –d1 –l compproc.log –a RatingComps –Dsettings=ServerSettings &
In the above example the “ServerSettings” process is referenced.
You can add this argument to any DECODES or CCP program.
Accessing Multiple Database Profiles from the GUI
As of 6.6 RC07 it is possible to run multiple profiles from the OpenDCS Launcher GUI. This is handy if you need to have several different OpenDCS configurations, each with a separate database.
By default, your local system configuration is stored in “decodes.properties” (for a single user installation) or “user.properties” (for a multi-user installation). This file specifies the location of your database and all other operational parameters.
The Multiple Profiles feature is normally hidden. To enable it, copy the “decodes.properties” file to a separate file with an extension “.profile”. For example, if I wanted to create a profile for my work with the NOS database, I might name the copy “NOS.profile”. Store it in the same directory as decodes.properties.
Then restart the launcher GUI and you will see a new pull-down list at the top:
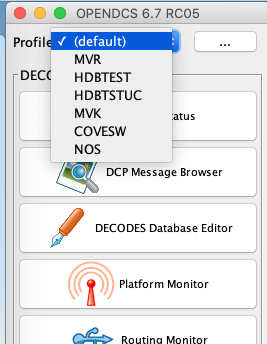
Select the profile you want to work with. Then click Setup. I selected HDBTSTUC. Note the Setup screen indicates the selected profile at the top:
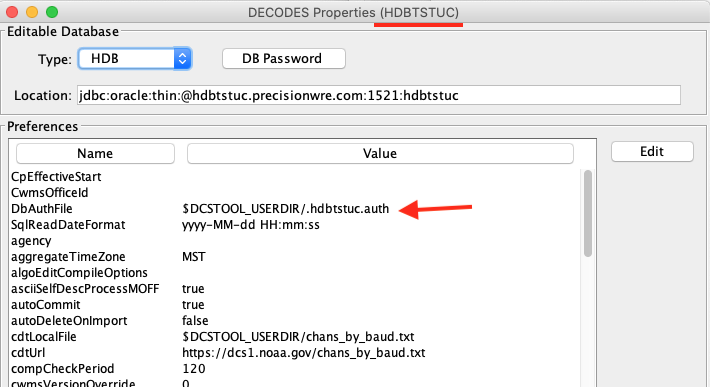
In this screen set the database type and location as needed.
Also note: If you access several SQL databases, you will likely need separate encrypted password files for each. Normally the file is simply “.decodes.auth”. Change it to something unique for each database. I used “.hdbtstuc.auth”.
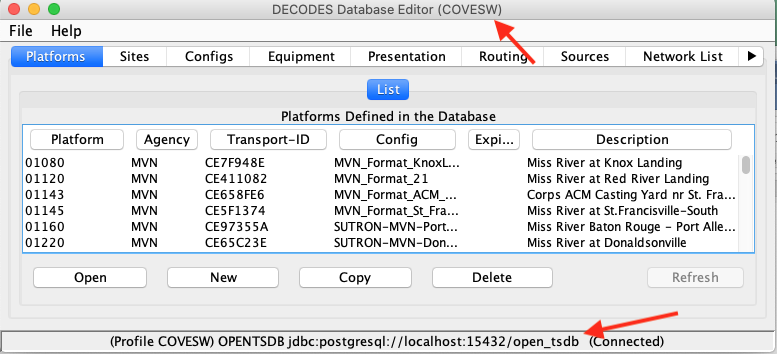
Now when you click any of the launcher buttons, it will open the GUI for the selected profile. You could, for example, have the DECODES database editor open for multiple profiles at the same time like this:
Select the (default) profile and click DECODES Database Editor. It will open the editor for the database defined in the normal “decodes.properties” file.
Then select a different profile (e.g. “COVESW”) and click the Editor button. It will open the editor for the database defined in COVESW.profile.
This could get confusing! What if I modify something in the wrong database?
Two items have been added to every GUI screen to avoid confusion. The header now shows the profile name, and the footer now shows the profile name and the database location:
Once you have created the initial profile by copying the decodes.properties file, the feature is now enabled. You can create additional profiles from within the GUI. Back on the setup screen, click the button labeled “…” to the right of the pull-down list of profiles:
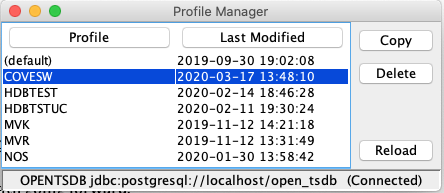
Here you can select a profile and copy it (giving it a different name).
You can delete a profile, except for the “(default)” profile. This corresponds to the “decodes.properties” file and may not be deleted.
Creating a DECODES Database
XML Database
The installer creates the tree ‘edit-db’ under the installation. It will install default versions of the necessary XML reference list files for enumerations, engineering units, data types, etc.
After a successful installation, your XML database is ready to go.
OpenDCS Database under PostgreSQL
OPENDCS comes with the required files to install the schema into a PostgresSQL database. Testing has been done with PostgreSQL 15; the minimum version required.
Previous versions of OpenDCS have made a distinction between the “DECODES” database and the Timeseries Database. For the Opendcs-Postgres version The schema now combines everything. You may set the NUM_TS_TIMESERIES and NUM_TEXT_TIMESERIES values to 1 to reduce the amount of space used and ignore the tables.
The actual schema install scripts are contained within opendcs.jar; if you need to review them you can open the jar with a zip tool or review them at https://github.com/opendcs/opendcs/tree/master/src/main/resources/db/OpenDCS-Postgres
The installation assumes you have already installed Postgres or otherwise have appropriate access to a Postgres instance. If you do not have full control of your Postgres instance and must go through an IT department you require the following:
A user to own the schema (this user should NOT be the application user.)
A named database (from createdb) owned by that user (e.g. DCS)
The credentials for said user.
The fully-qualified hostname of the database (e.g. mydb.example.local)
Create a decodes.properties, user.properties, or <name>.profile in the appropriate directory.
set the following properties:
editDatabaseType: OPENTSDB
editDatabaseLocation: jdbc:postgresql://mydb.example.local/DCS
Set other settings as appropriate to your environment and needs.
To start the initial schema installation:
manageDatabase -I OpenDCS-Postgres -P full_path_to.properties
# enter the Schema owner username and password when prompted.
# You will be prompted for the number of numeric and text time series tables
# enter appropriate values for you're expected data volume.
# On a fresh install the schema installation will just happen.
On a fresh installation you will be prompted to create an admin user. This user will be able to create new users and assign them appropriate roles, such as a user to run compproc or routesched processes (additional details in <./cp-userguide.rst> and <./routesched-guide.rst> ).
To update to the latest schema run the manageDatabase command again. A list of updates will be provided and you will be prompted if you wish to continue.
Instead of creating the properties file manually you can start the launcher to begin the configuration process:
launcher_start &
(Or on Windows, run Start – OPENDCS – Launcher).
Hit the Setup button in the upper part of the launcher. This brings up the DECODES Properties window as shown below.
From the pull-down list of database types, select OPENTSDB. In the Location field enter the string in the format shown:
jdbc:postgresql://**DBHOST**/**DBNAME**
Use the DBHOST and DBNAME for your provided database
Select an administrative user name and password. This is different from the postgres superuser name that you specified above. Write it down and remember it!
Hit the DB Password button. Type in the administrative user name and password that you selected.
Use this username and password combination when prompted by the manageDatabase for an admin user.
You may want to peruse the other settable properties. You can hover the mouse pointer over the name for a tool-tip for each.
After you are finished, hit the Save Changes button at the bottom and exit OpenDCS completely.
You are now ready to run the migration tool as shown above.
You should now run run dbimport in the following order:
export DH=PATH_TO_THE_DECODES_INSTALLATION
# if you are using user.properties or decodes.properties you can leave the -P
# portion off and dbimport will load the appropriate default file.

$DH/bin/dbimport -P path_to_your_properties -r $DH/edit-db/loading-app/*.xml
$DH/bin/dbimport -P path_to_your_properties -r $DH/edit-db/enum/*.xml
$DH/bin/dbimport -P path_to_your_properties -r $DH/edit-db/eu/EngineeringUnitList.xml
$DH/bin/dbimport -P path_to_your_properties -r $DH/edit-db/datatype/DataTypeEquivalenceList.xml
$DH/bin/dbimport -P path_to_your_properties -r $DH/edit-db/presentation/*.xml

# if using computations
$DH/bin/compimport -P path_to_your_properties $DH/imports/comp-standard/*.xml
NOTE: we know this is a bit of a pain. Future work will simplify the processed in a similar way as the database schema install.
Database roles created by the script:
OTSDB_ADMIN – These users have full administrative privilege in the new database. This is needed mainly for installing the software and updates.
OTSDB_USER – Grants read-only access to all OpenTSDB tables. This would be used by report generation and other display programs.
OTSDB_DATA_ACQ – Used for data acquisition. It grants write access to the time series tables but not meta-data.
OTSDB_COMP_EXEC – Used by the daemon process that will execute computations. Read access is granted to all tables, write access to time-series data, and read/write access is granted to the special tasklist tables used for computations.
OTSDB_MGR – Grants full read/write access to all tables, including metadata. These are users who maintain the decoding and computation definition metadata.
Creating OPENDCS DECODES Database under Oracle
OPENDCS comes with scripts needed to create an Oracle database instance with the entire schema to support DECODES and a fully functional time series database.
The instructions below were tested using Oracle RDBMS 11.2 running under CentOS 6.5. We assume you have a working Oracle installation and environment.
Install the OPENDCS Package
Create the Oracle Database Instance
Create the database instance with Oracle’s Database In accordance with your organizations rules.
OpenDCS is tested with the https://hub.docker.com/r/gvenzl/oracle-free images. No features beyond Oracle 19c are currently used.
Create a user to own the schema, ostdb_adm is recommended, some script may not correctly substitute the name at this time.
Apply, or have your DBA’s apply the following SQL to this user
GRANT ALTER ANY TABLE,CREATE ANY TABLE,CREATE ANY INDEX,CREATE ANY SEQUENCE,
      CREATE ANY VIEW,CREATE ANY PROCEDURE,CREATE ANY TRIGGER,CREATE ANY JOB,
      REATE ANY SYNONYM,DROP ANY SYNONYM,CREATE PUBLIC SYNONYM,DROP PUBLIC SYNONYM,
      CREATE ROLE, CREATE USER TO ostdb_adm;
GRANT CREATE SESSION,RESOURCE,CONNECT TO ostdb_adm WITH ADMIN OPTION;
ALTER USER ostdb_adm DEFAULT ROLE ALL;
Warning
DBAs will likely complain about the requirement to grant create user. This can be removed; the create user step from the manageDatabase script will not complete. This permission is only required during the initial setup, and may be removed afterwards.
If your DBAs refuse, allow that step to fail, the schema installation will complete and you will need to create any users by your organization process. At least one user needs the “OTSDB_ADMIN” role.
Note
As OpenDCS introduces the rest_api (https://github.com/opendcs/rest_api) we will be getting away from a model of creating actual database users.
Now that you have:
A user to own the schema (this user should NOT be the application user.)
Database name (e.g. DCS)
The credentials for said user.
The fully-qualified hostname of the database (e.g. mydb.example.local)
Create a decodes.properties, user.properties, or <name>.profile in the appropriate directory.
set the following properties:
editDatabaseType: OPENTSDB
editDatabaseLocation: jdbc:oracle:thin://mydb.example.local:1521/DCS
editDatabaseDriver: oracle.jdbc.driver.OracleDriver
sqlKeyGenerater: decodes.sql.OracleSequenceKeyGenerator
Note
Example assumes a pluggable database, set the JDBC url as appropriate to your database setup.
Set other settings as appropriate to your environment and needs.
To start the initial schema installation:
manageDatabase -I OpenDCS-Oracle -P full_path_to.properties
# enter the Schema owner username and password when prompted.
# You will be prompted for the number of numeric and text time series tables
# enter appropriate values for you're expected data volume.
# On a fresh install the schema installation will just happen.
Configure the DCS Toolkit
Part of the installation will be to run an XML importer to initialize various lists within the database. For this reason you must configure OpenDCS for the new database before running the schema creation script.
If running background processes, make sure the “Decodes” User is set.
setDecodesuser $DCSTOOL_USERDIR/.decodes.auth
# Use a user with OTSDB_PROC permissions.
Start OpenDCS with the command:
launcher_start &
Using OPENDCS with CWMS
HEC usually creates the complete CWMS database image for use at a USACE district, including the OPENDCS/DECODES schema.
Create OPENDCS DECODES Schema (Done by HEC)
We begin after the CWMS is installed.
Install the OPENDCS 6.0 Installation in a directory on the Oracle Server. This can be done via the installer GUI (selecting all packages) or with the tarball release.
Select a reasonable installation path. E.g. /home/oracle/OPENDCS.
Set environment variable $DCSTOOL_HOME pointing to the installation location. (Or the location where the tarball was un-tarred.)
CD to $DCSTOOL_HOME/schema/cwms30.
Edit the file “defines.sh” in this directory. This is a bash shell script containing several definitions, which are passed to the SQL creation scripts. See the comments in this file and make appropriate settings for your environment. Add the necessary passwords. (You can remove them after the schema is successfully created.)
While still in the schema/cwms30 directory, run the script ./createDefinesSql.sh
This creates the file defines.sql which is included in all of the remaining SQL scripts.
To be done by ACE-IT, while still in this schema/cwms30 directory, run the script ./createTableSpaces.sh.
To be done by HEC Personnel: run the script ./createDb.sh
WARNING: This script drops, and then recreates the entire CCP schema. It will delete any existing CCP database objects.
After the script completes, peruse the file “createdb.log”. Search for the string ERROR. The only acceptable error is in dropping the CCP user near the beginning of the script.
Create CCP User Accounts (Done by HEC)
HEC or your local CWMS administrator will create Oracle database accounts for every user. In order to use CCP, the user must be granted the Oracle CCP_USER role. It must also have one of the following CWMS office privileges:
“CCP Mgr” – A Manager has full read-write access to CCP objects in this district. This is used to modify DECODES and CCP meta-data records.
“CCP Proc” – This privilege is intended for background processes like a DECODES routing spec or the CCP Computation Processor. It has read access to meta data. It has write access to a few tables used for creating locks, etc. It is also able to write time series data into CWMS.
“CCP Reviewer” – A Reviewer can view data for a district and export it to XML, but cannot modify any tables.
Initialize the CWMS CCP Database for Each District
You must now initialize the DECODES database for each district by importing a few bootstrap XML files. First run OpenDCS:
cd $DCSTOOL_HOME
bin/launcher_start
Click the Setup button and make the following settings:
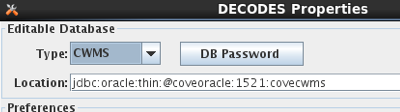
Editable Database Type must be CWMS
Enter the correct connection string for your database.
Click DB Password and enter the username and password for a CCP Database User with privilege in the office that you are trying to initialize.
Click Save Changes and exit.
Now:
cd $DCSTOOL_HOME/schema/cwms30
./importDecodesTemplate.sh
You must do this for every district that will use the database.
Configure the Operational OPENDCS Toolkit for CWMS
On the remote system where CCP is to run, install the OPENDCS 6.0 Toolkit:
Select a reasonable installation path. E.g. /home/oracle/OPENDCS.
Select all Packages
No need to create shortcuts (uncheck this)
Make sure you go all the way through the installation and click ‘Done’ on the final panel.
Set an environment variable DCSTOOL_HOME pointing to the installation. Then add the OpenDCS bin directory to your path. For example, in your .bash_profile
export DCSTOOL_HOME=<Install path>
export PATH=$DCSTOOL_HOME/bin:$PATH
Start the launch menu:
launcher_start&
Click the Setup button and make the following settings:
Editable Database Type must be CWMS
Enter the correct connection string for your database. See Below.
Click DB Password and enter the username and password for a CCP Database User with privilege in the office that you are trying to initialize.
Click Save Changes and exit.
The Location field is filled in with a URL pointing to your database. It must be of the form:
jdbc:oracle:thin:@\ **HostName**:**PortNum**:**SID**
Where
HostName is the host name of your database server
PortNum is the port number on which the server listens (typically 1521)
SID Is the unique identifier for your database on the server
You can now use dbimport and compimport to import DECODES and computation settings from a previous installation.
Using OPENDCS with USBR HDB
For HDB, in the Setup menu, select HDB for database type. Under location provide a URL pointing to your HDB database. It should be of the form:
jdbc:oracle:thin:@\ **HostName**:**PortNum**:**SID**
Where
HostName is the host name of your database server
PortNum is the port number on which the server listens (typically 1521)
SID Is the unique identifier for your database on the server
In HDB, the REF_DB_PARAMETER table contains a setting with the label “TIME_ZONE”. This determines how to interpret all the date/time values stored in Oracle DATE objects within the database. The CP software will automatically read this parameter so you do not have to set SqlTimeZone as you did in previous versions.
Many HDB tables contain a column DATE_TIME_LOADED, which records the time that a given record in the database was last modified. These columns are typically set automatically (e.g. within a trigger) from the Oracle “sysdate” value.
Since “sysdate” returns the date/time in the time zone of the underlying operating system, we recommend that the Unix server’s time zone be set to the same as the TIME_ZONE setting in REF_DB_PARAMETER. This will ensure that all DATE values in HDB are consistent.
Encrypted Password File for Database Connection
Note the decodes.properties parameter listed above labeled “DbAuthFile”. The CP software stores an encrypted version of the database username and password in this file.
When you hit the “DB Password” button in the settings GUI, the software will save your responses in this encrypted file.
For HDB, this is used by all OpenDCS utilities. For CWMS, it is only used for background (daemon) processes. GUIs always prompt the user to enter username and password.
Initialize from an Export of Another Database
If you are upgrading from a previous version of OpenDCS or CWMS, you will likely want to initialize your DECODES/CCP data from your existing database.
First make an XML image of the existing database. On the old system, type these commands into the old toolkit release:
dbexport > DecodesImage.xml
compexport > CompImage.xml
Now transfer these files to the new installation, and:
dbimport –r –W DecodesImage.xml

*You will be asked for confirmation. Be aware that the –W argument
tells the program to DELETE any existing DECODES records in your
database. Only use this argument if you want the new database to be a
true mirror of the old one.*
compimport CompImage.xml
Reference List Editor
The DECODES database contains information to populate pull-down lists. You will probably never need to modify this information.
However, if you need to expand DECODES functionality you will need to use the Reference List Editor.
To start the program, type ‘rledit’ at the command prompt. The initial screen is shown in Figure 13‑6‑1. Along the top, you see four tabs for the four types of reference lists:
Enumerations: Used to populate pull-down lists in the database editor, and also to expand DECODES functionality in some cases.
Engineering Units: This tab contains the units known to DECODES.
Engineering Unit Conversions: This tab contains the conversions between units.
Data Type Equiv: This tab contains the known data types, and assertions as to equivalence.
Seasons: This tab allows you to define seasons for conditional processing.
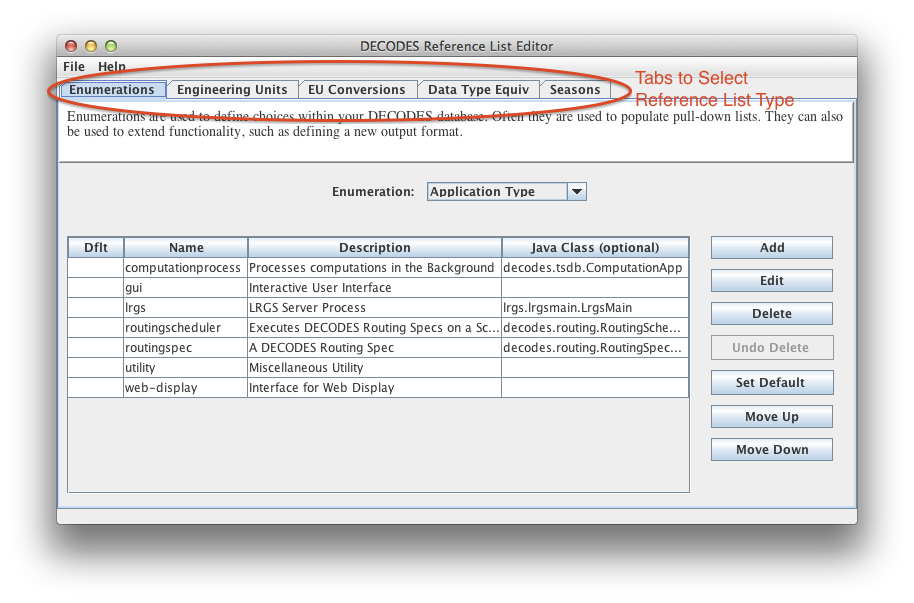
Figure 13‑6‑1: Reference List Editor Enumerations Tab.
Enumerations
There are several enumeration sets within DECODES. Select one from the pull-down listed labeled “Enumeration”. Notice that when you select a different enumeration, the table below is populated with the values in that set.
Each set has a particular purpose:
Application Type – DECODES allows multiple types of named processes. Features are enabled/disabled depending on the process type.
Data Consumer – These are shown in the dbedit routing spec panel. This set associates a name like ‘pipe’ with a Java class that implements the consumer, like ‘decodes.consumer.PipeConsumer’.
Data Source Type – These values are shown in the dbedit Data Source panel. Each DECODES data source is associated with a type. This set tells DECODES which Java class to use for each type.
Data Type Standard – This set defines the data type coding standards that you use. Common values are ‘shef-pe’ used by USACE, and ‘epa-code’ used by USGS.
Interval Code – This is a list of interval codes understood by the time series manipulation an computation modules.
Measures – This is used for engineering units. Every EU measures some physical quantity like area, length, flow, volume, etc. This is a list of those physical quantities.
Output Format - These are shown in the dbedit routing spec panel where you select the format for output data. This set associates each name with its Java class.
Script Type – DECODES was designed to support several types of scripts, although currently only the ‘standard’ script is used.
Site Name Type – Sites may have many names, but only one of each type. This set defines the name type columns that appear in dbedit.
Statistics Code – These are typically used in time series naming.
Transport Medium Type – Each TM has a type like GOES-Self-Timed, or “Data-Logger”. This set determines the values shown in the pull down list in dbedit.
Unit Conversion Algorithm – currently contains four values for the different conversion types: none, linear, poly-5, and usgs-standard.
Using the buttons on the right you can add, edit, or delete enumeration values.
The ‘Set Default’ button places an asterisk next to the selected value. In certain cases, the default value is used in the absence of a user selection.
The order of values in the list determines the order they will appear in a pull-down list. Hence you can use the Move-Up and Move-Down buttons to change the order shown here.
Many of the enumerations are simple ordered lists with no other information required. Examples of this type are Data Type Standard, Site Name Type Standard, and Interval.
For other enumerations (e.g. Data Source Type) a Java Class Name must be carefully entered for each enumeration value. This provides a way to extend the software, by implementing new functionality in Java and then referencing it in an enumeration.
For example, the figure below shows the enumeration value for the FTP Data Source.
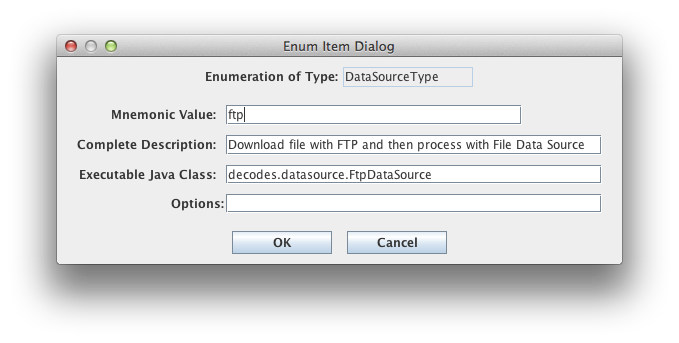
Figure 6‑2: Data Source Enumeration Value for FTP.
Engineering Units
The Engineering Units tab is shown in Figure 13‑6‑3. This list defines all of the known EUs in DECODES.
You can click on the column headers to sort by:
Abbreviation
Full Name
Family (i.e. English, Metric, or Universal)
Measures (the physical quantity being measured by the EU)
You can use the buttons to the right to add, edit, or delete an EU.
Abbreviations must not contain embedded spaces.
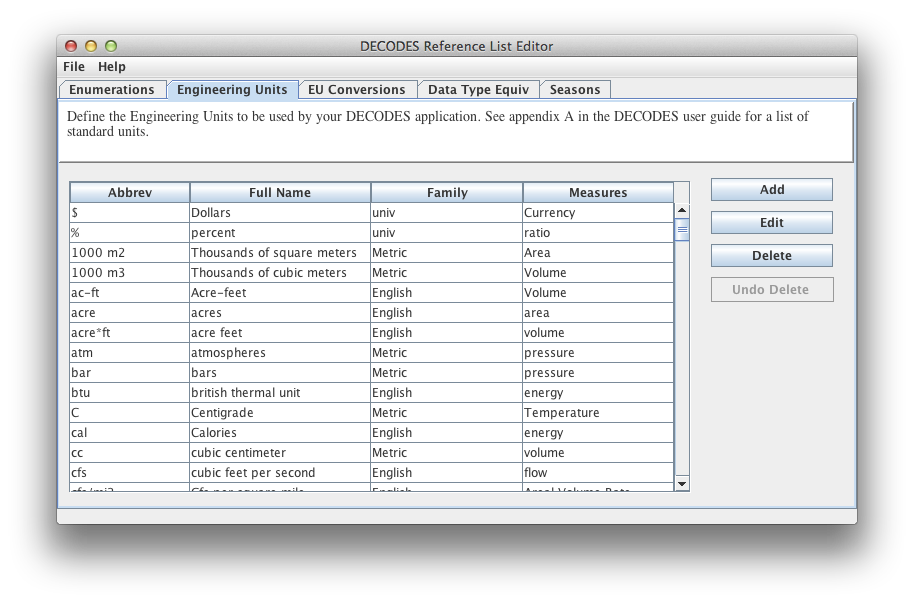
Figure 13‑6‑3: Reference List Editor Engineering Units Tab.
Engineering Unit conversions
The EU conversions tab is shown in Figure 13‑6‑4.
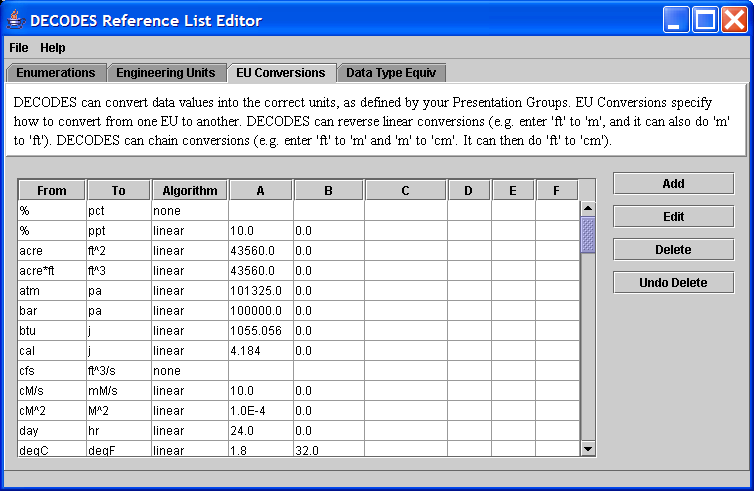
Figure 13‑6‑4: Reference List Editor EU Conversions Tab.
This list shows the standard conversions. Each line specifies how to convert from one EU abbreviation to another. There are four possibilities for Algorithm:
none – This means that the two units are to be considered synonyms. Examples: % is a synonym for pct, and cfs is a synonym for ft^3/s.
linear – Uses the equation y = Ax + B, where y is the EU we are converting to, and x is the EU we are converting from.
usgs – Uses the equation y = A * (B + x)^C + D
poly-5 – 5th order polynomial: y = Ax^4 + Bx^4 + Cx^3 + Dx^2 + Ex + F
To add, edit, or delete, use the buttons to the right of the table.
DECODES can invert “none” and “linear” algorithms. Hence if we specify how to convert from “cal” to “j”, we don’t need to specify how to convert from “j” to “cal”.
DECODES can also combine conversions. Suppose you specify:
in -> ft
ft -> m
m -> mm
Then DECODES can combine these if it needs to convert “in” to “mm”.
Data Type Equivalencies
Figure 13‑6‑5 shows the tab for Data Type Equivalencies. Recall that DECODES allows you to specify multiple data type codes for each sensor. So, for a stream stage sensor you might enter HG. Then, if you select USGS-STDMSG for your output format, DECODES must convert HG to the equivalent EPA numeric parameter code.
This feature is rarely used and should be considered a last resort. The problem is that mapping between data type systems is rarely one-to-one. For example, USGS (EPA) code 00065 may be represented in SHEF as HG, HP, HT, etc.
You are strongly encouraged to enter the specific data types that you want into each DECODES Configuration record for each sensor. Thus the automatic mapping will never be used.
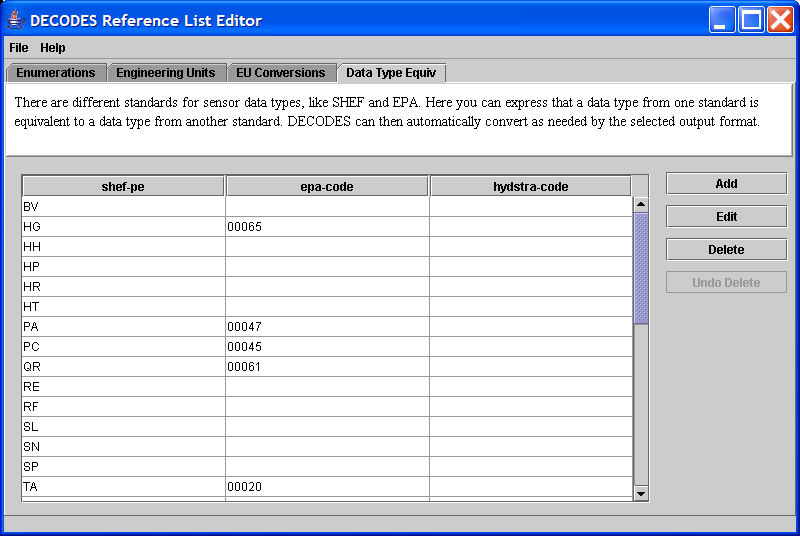
Figure 13‑6‑5: Reference List Editor - Data Type Equivalencies Tab.
Seasons
As of OpenDCS 6.1 you can define “Seasons” by name, and then use them for conditional processing. For example, a platform that should be ignored in the winter because it is iced-over.
The Seasons tab is shown below. You are not limited to the normal four seasons. You can define a season with any name and any date/time range. For example, “planting” is the planting season, “rainy” could be defined as the rainy season.
To add, edit, or delete seasons, using the buttons on the right. The figure below shows a season being edited.
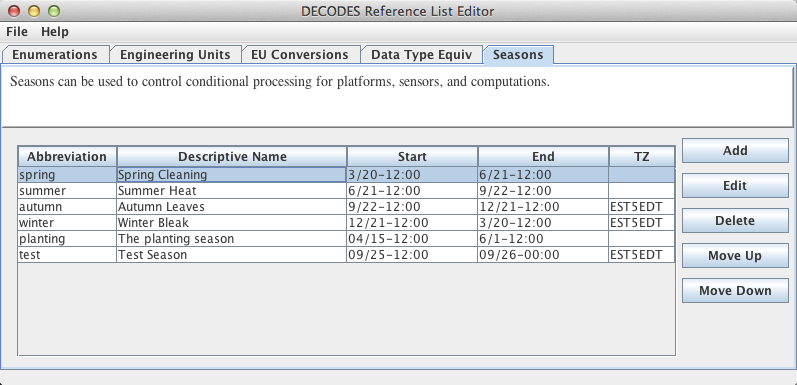
Figure 6‑6: Reference List Editor - Seasons Tab.
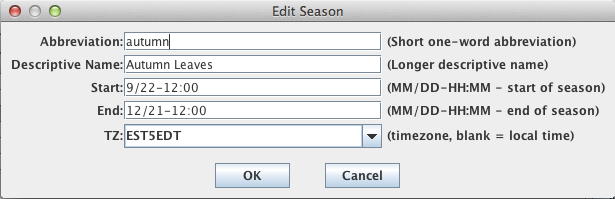
Figure 6‑7: A Season being edited.