OPENDCS CWMS Interface
Purpose of this Document
DECODES, LRGS and related tools were developed by ILEX Engineering, Inc. using funding from several U.S. federal agencies. This approach of sharing the software-development burden has benefitted all agencies in many ways. Most importantly, the overall cost is reduced, and there is a large community of users knowledgeable in using the software.
The U.S. Army Corps of Engineers has been a major contributor to the development efforts. They have funded several enhancements to make the software work well for the Corps mission.
This document describes these Corps-specific enhancements. We have also attempted to provide guidance for new Corps offices attempting to use DECODES and LRGS.
Revision History
Revision 2, Jan 2019:
Fixed information in the table regarding dbUri.
LRGS and DECODES Usage by USACE
Figure 2-1 shows data-flow for hydro-met data collection by a typical Corps office:
The LRGS receives data from a satellite link (NOAAPORT, DRGS, Internet, HRIT, etc.)
DECODES is a client application that pulls raw data from the LRGS and decodes it into engineering units. Many districts run DECODES on the same machine as the LRGS, but as shown, it does not need to be done that way.
DECODES feeds data into CWMS, RiverGages, DSS, and other database systems.
Figure 2‑1: Simplified Data Flow Diagram for LRGS, DECODES, & CWMS.
In the past, the interface between DECODES and a database system was done with files: DECODES would build a file in SHEF or SHEFIT format. The database system would ingest data from these files.
We now have a working interface directly to the CWMS Server so that data arrives in the database as soon as it comes over the satellite link. Chapter 6 describes this interface.
DECODES Configuration Options
DECODES does not need to run on the same machine as your LRGS. In fact there is an advantage to installing it on a different machine: If they are independent and your LRGS is down, your DECODES can continue to work by pulling data from another district.
DECODES now supports a variety of databases for storing its meta-data about your platforms:
XML – meta-data is stored in a tree of directories under the edit-db directory where you installed DECODES
PostgreSQL – a high-performance, open-source database server that runs on Windows, Linux, and Solaris. PostgreSQL is now officially supported by Sun Microsystems for Solaris 10.
MS SQL Server – We ported the DECODES database interface for a state-government customer. It is available for use by USACE as well.
ILEX currently has a contract with the Corps to support storing DECODES meta-data in the CWMS Oracle database. This will be complete in mid-2008.
XML verses SQL:
If you only run DECODES on one machine, XML is the easiest solution. You don’t have to install or maintain a SQL database.
If you have several people in your office that want to run DECODES components against a shared central database, then you should consider one of the SQL options. PostgreSQL is the most-tested and best-performing of the current options.
Decoding Conventions and Practices
Many Corps districts are trying to establish conventions for site-names, data-types, sensor-names, etc. so that data can be more easily shared. DECODES allows perhaps too-much flexibility in some cases.
Data Type Codes
Most districts use SHEF (Standard Hydro-Meteorologic Exchange Format) for data-type codes. This is a National Weather Service standard. Many DCPs are programmed to include SHEF codes in the message data, making the messages self-describing.
The first two characters of a SHEF code designate the Physical Element. Thus DECODES refers to these 2-character codes as ‘shef-pe’ codes.
A handy on-line reference for SHEF codes is maintained by NESDIS at:
Site Names
DECODES allows each site-location to have several names. Each name has two parts:
A ‘standard’
A name-value
National Weather Service publishes Handbook 5-character names for all sites that they monitor. DECODES refers to this name as NWSHB5. The NWS ‘HADS’ (Hydrometeorolgical Automated Data System) provides a web-application and various text files for looking up the NWSHB5 name for a site.
http://www.nws.noaa.gov/oh/hads/
If you use the ‘NWSHB5’ name type, please be sure that you are using valid NWS names.
Other naming conventions in common use are:
CBTT – Colombia Basin Teletype
USGS – The numeric Site Number assigned by USGS
Local – Your own local mnemonic name
dcpmon – The name for a site used by the DCP Monitor
cwms – The CMWS name for a site.
You can use the ‘rledit’ program to create new site name types, as described in DECODES User Guide section on the Reference List Editor.
Engineering Units
DECODES has an extensive library of known Engineering Units and conversions. See the appendix at the end of the DECODES User Guide for a list of known unit-abbreviations. You should use these in your scripts.
If you see ‘unknown’ in the output where the units normally would be, open the configuration, and then the decoding script. Assign a valid unit-abbreviation to each sensor.
Presentation Group for Automatic Unit Conversions
Presentation Groups are an under-used feature of DECODES. Open the Database Editor and then click on ‘Presentation’ and open the SHEF-English presentation group.
For each data-type you can specify the proper units and the maximum number of decimal points you want to see.
You then apply a presentation group to your DECODES routing-spec or DCS-Toolkit Retrieval Process. Thus, for example, suppose you get a decoding configuration from Canada that decodes gage-height into meters. You don’t need to change it. Just apply the SHEF-English presentation group to the routing spec and DECODES will do the conversion for you.
Take Backups!
We recommend that you take a zip backup of the following directories at least once per week, and more often if you have made a lot of database edits. $DCSTOOL_HOME is the directory where you installed the toolkit.
$DCSTOOL_HOME/edit-db – This is the XML database
$DCSTOOL_HOME/decodes.properties – DECODES configuration info.
$DCSTOOL_HOME/procs – Toolkit retrieval processes.
The first item above will backup the database only if you are using an xml database. If you use a SQL database, then you should use the dbexport tool:
dbexport > mybackup.xml
You can then zip or gzip the ‘mybackup.xml’ file.
In-Line Rating Computations
DECODES can do in-line rating as it decodes your DCP messages. It extracts the stage samples, then reads a rating table file, looks-up the discharge, and outputs both the HG (stage) and QR (discharge).
See the chapter in the DECODES User Guide on Rating Computations for details.
DECODES can currently handle two types of rating files:
USGS Rating Table (rdb) files
Plain ASCII CSV (comma-separated-value) or space-delimited table files.
We are currently working on the addition of stage/area ratings and a computation that takes area and average velocity to compute flow. This sometimes called a ‘velocity rating’.
USGS maintains a national web-repository of RDB files at:
http://nwis.waterdata.usgs.gov/nwisweb/data/exsa_rat/USGS-SITE-NUM.rdb
USACE CWMS Interface
The USACE (U.S. Army Corps of Engineers) CWMS (Corps Water Management System) stores uses a time-series database to store water-level and related data. The DECODES software suite has a module allowing it to place incoming data directly into the CWMS database. This obviates the need for intermediate flat-files used in the pass.
Figure 6‑6‑2: CWMS Interface Data Flow.
The “CWMS Consumer” is selected as the output (consumer) module in the routing spec. It receives the decoded data from the routing spec and stores it in the CWMS Oracle Database. The CWMS Consumer uses the new SQL API (Application Program Interface) published by HEC to write time-series data directly to CWMS.
We have tried to make the CWMS Consumer as automatic as possible. It has hard-coded defaults for time-series storage parameters that can be used in most cases. For special cases, the consumer allows you to provide properties in the DECODES database to override the defaults.
Control files tell DECODES how to connect and authenticate to the CWMS database.
This section will explain how to set up DECODES to store data directly into a CWMS database.
What You Will Need
In order to use the CWMS consumer, you must have a working CWMS database with the 1.4 HEC CWMS API Installed. You must have a valid CWMS username & password with permission to write time series data.
The Consumer uses the “STORE_TS” PL/SQL stored procedure to store the data. Refer to the CWMS Oracle API User’s Manual for more information about the “STORE_TS” procedure.
Oracle provides a JDBC driver that you will need. At the time of this writing, the latest version is a file called “ojdbc14.jar”. By default the CWMS Data Consumer uses the Oracle “thin” driver which does not require additional libraries besides the jar file. We have tested the consumer and verified that it works with the “thin” driver.
If for special reasons, you are required to use the “OCI” driver, then you will need additional native library files. You must install these files in the machine where DECODES will run. The native libraries are required for the Oracle JDBC OCI driver. Refer to the Oracle web site (http://www.oracle.com) to find the correct “oci” Driver libraries for your operating system.
You will also need to add this Jar file to your CLASSPATH variable. For example, on a UNIX system, if you place the file in /usr/local/lib, then in your shell startup file (.profile, .bash_profile, etc.) place the lines:
CLASSPATH=/usr/local/lib/ojdbc14.jar:$CLASSPATH
export CLASSPATH
On a windows system use the System control panel to set CLASSPATH.
Set up DECODES for CWMS
CWMS requires some additions to the DECODES Database:
New “CWMS” Site Name Type
New “CWMS” Parameter Data Type
Several Engineering Units (CWMS is very particular about what EUs it will accept).
Unit Converters to convert from other DECODES units to the ones that CWMS recognizes.
A new “CWMS” Data Consumer Type
A “Null” Output Formatter
We have prepared an XML file containing these items. To import these items into your DECODES database, open a terminal window. Then CD to the DECODES_INSTALL_DIR directory. Then:
bin/dbimport –r to_import/cwms-import.xml
(If you are working on a Windows machine, substitute backslash for slash in the above).
CWMS Connection Parameters
Two files are required: A Properties file stores the CWMS connection and default parameters. An encrypted file stores the username and password to use when connecting to CWMS.
The CWMS Properties File
Create a text file in the $DECODES_INSTALL_DIR called “decodes-cwms.conf”. This is a text file containing ‘name=value’ pairs, one per line. Table 8-6-1 explains the parameters, whether or not they are required, and what the default value is. The parameter name is not case sensitive.
Name |
Default Value |
Description |
dbUri |
No default value provided |
In the form: jdbc:oracle:thin:@Ho stName:1521:SID |
cwmsVersion |
Raw |
Optional: This is used as the default “Version” part of the time-series descriptor. |
cwmsOfficeId |
No default value provided |
This is the CWMS office ID passed to the API “store_ts” procedure. Typically this is your 3-character district abbreviation. Example: MVR Note: If you are using CWMS to store your DECODES info, you don’t need to specify this. It will pick it up from your DECODES properties. |
DbAuthFile |
$DECODES_INSTALL_DIR/.cwmsdb.auth |
Optional: Set this if you want to stored the database authentication file in a different location. Note: If you are using CWMS to store your DECODES info, you don’t need to specify this. It will pick it up from your DECODES properties. |
shefCwmsParamFile |
$DECODES_INSTALL_DIR/shefCwmsParam.prop |
Optional: Set this if you want to store the SHEF to CWMS mapping in a different file. |
Table 8‑6‑1: CWMS Connection Parameters.
Encrypted Username/Password File
The CWMS Consumer will look for a file called “.cwmsdb.auth” in the directory $DECODES_INSTALL_DIR. This file will contain the needed login information in an encrypted form.
A script called “setCwmsUser” has been prepared to facilitate creating or modifying the file. This script must be run in a terminal session:
cd $DECODES_INSTALL_DIR
bin/setCwmsUser
*(enter username & password when prompted).*
chmod 600 .cwmsdb.auth
If this is a Windows system, open a DOS (“cmd”) window and type:
cd %DECODES_INSTALL_DIR%
bin\setCwmsUser
The program will ask you for a username and password. These will be encrypted and stored in the file.
After creating the file for the first time, you should set its permissions so that only you have access to it:
chmod 600 .cwmsdb.auth
Note: The file should be owned by the user who will run the DECODES routing spec. The routing-spec will need permission to read this file.
Optional CWMS Parameter Mapping File
DECODES must build a time-series descriptor that contains a valid CWMS “Parameter Type”. Since most of the Corps is currently using DECODES with SHEF codes, we have provided a way to automatically map SHEF codes to CMWS Parameter Types.
Note: See section*`6.4.1 <#anchor-26>`__****for a more complete description on how DECODES builds the descriptor. You can specify CWMS data-types directly in the DECODES database, bypassing SHEF altogether.*
DECODES can do the mappings listed in Table 6-2 automatically. If these are sufficient for you, then you do not need to create a mapping file.
SHEF Code |
CWMS Param Type |
PC |
Precip |
HG |
Stage |
HP |
Stage-Pool |
HT |
Stage-Tail |
VB |
Volt |
BV |
Volt |
HR |
Elev |
LF |
Stor |
QI |
Flow-In |
QR |
Flow |
TA |
Temp-Air |
TW |
Temp-Water |
US |
Speed-Wind |
UP |
Speed-Wind |
UD |
Dir-Wind |
Table 6‑2: Built-in SHEF to CWMS Parameter Code Mapping
If the above defaults are not adequate, you may provide a mapping file to override or supplement them. Prepare a text file “shefCwmsParam.prop” and place it in $DECODES_INSTALL_DIR. This is a Java properties file, containing name=value pairs, one per line. For example, to have SHEF “HP” map to CWMS Param Type “Stage”, add a line as follows:
HP=Stage
How DECODES Uses the CWMS API
DECODES uses a stored procedure in the API called “STORE_TS”. This procedure requires several arguments to be passed. This section will explain how DECODES determines these arguments.
The CWMS Time Series Descriptor
A CWMS Time-Series descriptor has six parts. Each part is separated with a period:
*Location* . *Param* . *ParamType* . *Interval* . *Duration* . *Version*
We have designed the DECODES CWMS Consumer for convenience and flexibility: For convenience, DECODES can build the descriptor automatically, using information that it already has in the DECODES database. For flexibility, you can explicitly set part or all of the descriptor in special circumstances.
The following subsections describe each part of the descriptor.
Location
The Location corresponds to a DECODES site name. DECODES allows each site to have multiple names of different types. It also allows each site to specify which name-type to use by default (see the “SiteNameTypePreference” parameter in your “decodes.properties” file).
So, if you have CWMS set up with the same names that you use in DECODES, then you do not need to do anything else.
The consumer will build the location as follows:
If a site-name with type “CWMS” exists, use it.
Otherwise, use the default site name.
See section 6.4.3 below for instructions on creating an explicit CWMS site-name-type.
Param
The ‘Param’ part must exactly-match one of the CWMS parameter in your database. The preferred way is to specify an explicit “CWMS” data-type in the Config Sensor record, as shown in Figure 6-3.
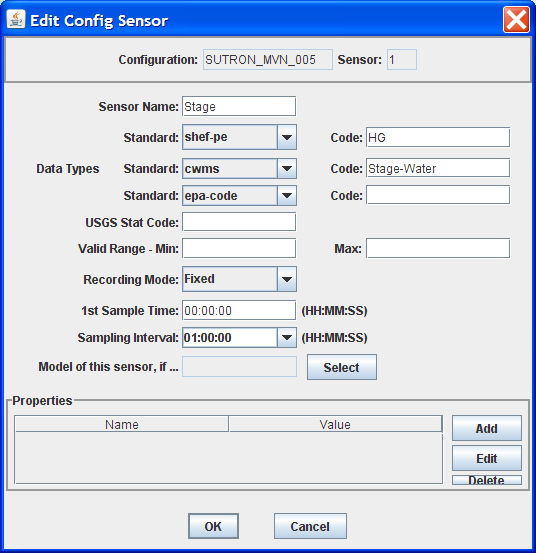
Figure 6‑3: Config Sensor with Explicit CWMS Data Type.
If no explicitCWMS data-type is specified, then the Consumer will attempt to map it from a SHEF code. The consumer will use the mapping specified in the file described in section 6.3.3, or a default mapping listed in Table 6-2 if the SHEF code is not found in the file.
ParamType
By default the consumer will set ParamType to “Inst”. You can override this by adding a sensor property to the DECODES database called “CwmsParamType”.
Set a Config Sensor Property if you want the value to be applied to all platforms using shared configuration. Use a Platform Sensor Property to apply the value to a single platform.
Other valid settings for ParamType include: “Ave”, “Max”, “Min”, or “Total”.
Interval
The Interval part specifies the period at which this parameter is measured. DECODES already has this information in each sensor record. It will build the appropriately-formatted string.
Duration
The Duration part should be “0” for data with a ParamType of “Inst”. DECODES will handle this automatically. For other types (specified by a sensor property), DECODES will build a duration string matching the sensor period. The user can override this choice by adding a sensor property called “CwmsDuration”.
Version
The Version is used by different districts in different ways:
Some districts always use a constant value like “Raw” for data ingested from DECODES.
Other districts use the Version component to denote the source of the data. That is, which LRGS, DRGS, or file provided the data.
Some districts need to use a different Version component for each parameter.
The CWMS Consumer accommodates all three situations:
To always use a constant value, set the “cwmsVersion” parameter in the CWMS Properties file as described above in section 6.3.1.
To have the Version denote the Source of the data: set up separate DECODES routing specs for each source. Add a routing spec property called “cwmsVersion” set to the appropriate value. A routing spec property, if supplied, will override the value in the CWMS Properties file.
To have a particular version for a particular parameter, add a sensor property called “CwmsVersion” containing the desired value. A sensor-setting will override any other values.
The CMWS Office ID
The value for the CWMS office ID is set in the CMWS properties file. See Table 8-6-1.
You can also specify this as a routing-spec property called “CwmsOfficeId”. This gives you flexibility: The properties file can contain the default. Individual routing specs may override the default if they process data from another office.
The “Store Rule”
The store rule value is used by the STORE_TS procedure to control how to handle the insertion of data samples that already exist in the CWMD database.
By default, the consumer will set the store rule to “Replace All”. You may override this by adding a routing-spec property with the desired setting. The valid values are:
Replace All
Delete Insert
Replace With Non Missing
Replace Missing Values Only
Do Not Replace
Refer to the API User’s Manual for more information on the store rule field.
Override Protection
This value determines how CWMS will override existing data in the database. By default, the consumer sets this to 1 (true). To set it to false (0), add a routing-spec property called “OverrideProt” set to a value of “0”.
Refer to the API User’s Manual for more information on the override protection field.
Version Date
NOT USED ON CURRENT CWMS DATABASE. Default value is null. Refer to the CWMS Oracle API User’s Manual for more information on this field
Create the Routing Spec
Open the DECODES database editor and create a new routing spec in the normal manner. For Consumer Type, select “cwms”. For Output Format, select “null”.
As stated above, the properties shown in Table 8-6-3 may be used to override the built-in defaults. Property names are not case-sensitive.
Name |
Description |
CwmsOfficeId |
Overrides setting in decodes-cwms.conf file. |
StoreRule |
Overrides built-in default of “Replace All” |
OverrideProt |
Overrides built-in default of 0 (false). Set to 1 for true. |
VersionDate |
NOT USED ON CURRENT CWMS DATABASE VERSION. Default value null. Refer to the CWMS Oracle API User’s Manual for more information. |
Table 8‑6‑3: CWMS Routing Spec Properties.
We also recommend that you select the “CWMS” presentation group. This will ensure that your data is converted into EUs that CWMS will accept.
Engineering Units
The sensor engineering-units need to be in compliance with the CWMS Oracle Database, otherwise the sensor data will not be accepted by CWMS. We have prepared a presentation group that will automatically convert your data into CWMS EUs. You simply have to select the presentation group in the routing spec.
Figure 6-6-4 shows the database editor with the CWMS presentation group open. See how the presentation group asserts which units should be used for each parameter type. When you apply the presentation group to a routing spec, DECODES will automatically convert the data into the correct units.
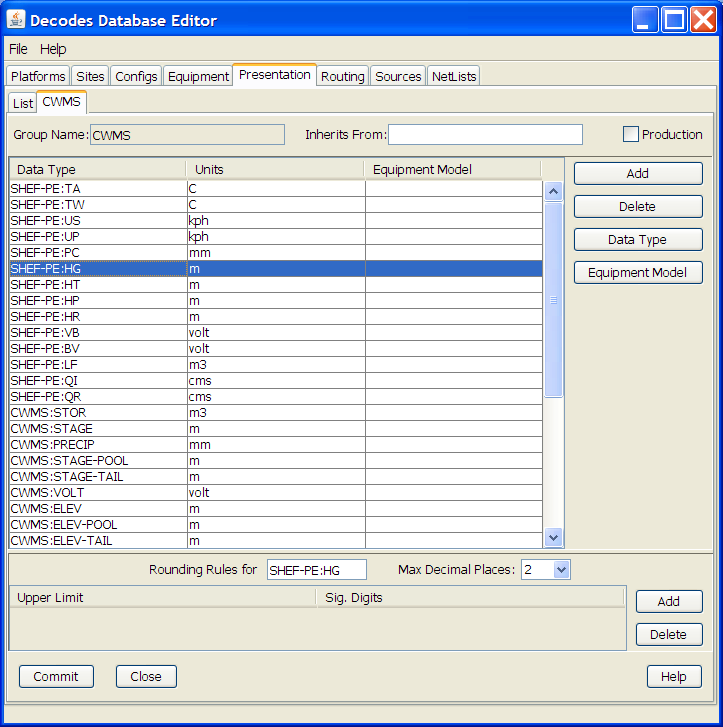
Figure 6‑6‑4: Database Editor Showing the CWMS Presentation Group.
Refer to the section on Presentation Groups in the DECODES User Guide. Recall that you can also use the presentation group to omit certain parameter types from the output. For example, if you do not store battery voltage in the CWMS database, change the units for VB to ‘omit’.
Troubleshooting
The DECODES Routing Spec sends log messages to a file in the “routstat” directory under $DECODES_INSTALL_DIR. Find the file there with the same name as your routing spec and an extension “.log”. For example if your Routing Spec is called “cwms_rs”, the log file name will be: cwms_rs.log.
The remainder of this section will provide examples of possible log messages, explaining what each means and what to do to correct the situation. A ‘FATAL’ message will result in the termination of the routing spec.
FATAL 03/06/07 16:56:46 CwmsConsumer Cannot load configuration from ‘$DECODES_INSTALL_DIR/decodes-cwms.conf’: java.io.IOException: CwmsDbConfig Cannot open config file ‘C:DCSTOOL/decodes-cwms.conf’: java.io.FileNotFoundException: C:DCSTOOLdecodes-cwms.conf (The system cannot find the file specified)]
This fatal message means that the decodes-cwms.conf file was not found under the required directory. Make sure that the decodes-cwms.conf file is located under the DECODES installed directory.
WARNING 03/06/07 16:31:26 CwmsConsumer Cannot read DB auth from file ‘C:DCSTOOL/.cwmsdb.auth’: java.io.FileNotFoundException: C:DCSTOOL.cwmsdb.auth (The system cannot find the file specified)
This warning message means that the authentication file, which contains the encryption of the username and password for the Database connection, is not on the right directory. Make sure that the .cwmsdb.auth file is located under the DECODES installed directory.
FATAL 03/06/07 16:31:26 CwmsConsumer Error getting JDBC ORACLE connection using driver ‘jdbc:oracle:thin:@’ to database at ‘155.76.210.137:1521:MVRT’ for user ‘’: java.sql.SQLException: invalid arguments in call
CWMS Data Consumer will log Database connection fatal messages if:
The wrong username/password was sent to it, which in this case make sure that the authentication file (.cwmsdb.auth) is on the right directory and contains the right username and password (this is the sample log shown above)
The wrong CWMS Database connection information was supplied; in this case make sure that the DbUri property on the decodes-cwms.conf file contains the right Database connection information
The CWMS Database server is down, in this case call the CWMS Database system administrator
WARNING 03/06/07 17:03:17 CwmsConsumer Cannot read properties file ‘C:DCSTOOL/shefCwmsParam.prop’: java.io.FileNotFoundException: C:DCSTOOLshefCwmsParam.prop (The system cannot find the file specified)
This warning message means that the shefCwmsParam.prop file was not found under the DECODES installed directory. However, this file is not required. If the user has decided not to use this file no action need to be taken. If not, make sure that this file exists under the DECODES installed directory.
WARNING 03/06/07 15:30:59 CwmsConsumer Platform Site Name nwshb5-STBI4, Platform Agency MVR, DCP Address CE2DC544, sensor HG Error while inserting sensor data in cwms_ts.store_ts CWMS procedure :java.sql.SQLException: ORA-20010: INVALID_OFFICE_ID: “tttMVR” is not a valid CWMS office id
This warning message means that the office that was set on the decodes-cwms.conf file is not valid for the CWMS Database. Make sure that the decodes-cwms.conf file contains the correct office value on the cwmsofficeid property.
WARNING 03/05/07 16:22:40 CwmsConsumer Platform Site Name nwshb5-STBI4, Platform Agency MVR, DCP Address CE2DC544, sensor VB Error while inserting sensor data in cwms_ts.store_ts CWMS procedure :java.sql.SQLException: ORA-20210: WARNING(cwms_loc.get_ts_code): STBI4.Volt.Inst.1Hour.0.raw FOR OFFICE: MVR NOT FOUND
This warning message means that the time-series descriptor does not exists in the CWMS Database. Make sure that the CWMS Database contains the time-series descriptors specified in the warning message. In this case ‘STBI4.Volt.Inst.1Hour.0.raw’ for office MVR.
FAILURE 02/23/07 15:20:13 RoutingSpec(CWMSTEST) Error on data consumer ‘cwms’: decodes.consumer.DataConsumerException: CwmsConsumer Error while inserting sensor data in cwms_ts.store_ts CWMS procedure :java.sql.SQLException: ORA-20103: Requested unit conversion is not available
This warning message means that the CWMS Database does not recognize the unit value that CWMS Data Consumer sent. Make sure that the sensor unit is accepted by the CWMS Database, you may need to create a DECODES presentation group to convert units if the CWMS Database does not handle the current senor unit. Refer to the DECODES Presentation group on the DECODES User Manual for more information.
WARNING 03/05/07 16:34:36 CwmsConsumer Platform Site Name nwshb5-CRVI4, Platform Agency MVR, DCP Address CE637FAC, sensor YA Cannot find CWMS or SHEF datatype – skipping.
This warning message means that the time-series descriptor was not created for that particular sensor. Change the sensor data type to cwms with the correct cwms code (this is done on the Edit Config Sensor dialog) or add the mapping of that sensor data type code on the shefCwmsParam.prop file.
Combining Multiple Databases into One
This is used by the USACE Mississippi Valley Division (MVD).
MVD runs an application called “River Gages” on a server at Rock Island. This server hosts a database hub, as described in this chapter. The hub exists in the directory ~lrgs/dbhub. See the DECODES Web-Apps User Guide section on DECODES Database Hub. MVD uses this to collect periodic snapshots of each district’s database.
The districts are, from north to south:
MVP – St. Paul, MN
MVR – Rock Island, IL
MVS – St. Louis, MO
MVM – Memphis, TN
MVK – Vicksburg, MS
MVN – New Orleans, LA
More districts from around the country have seen a benefit to RiverGages. It is no longer limited to MVD.
Now the RiverGages WIBS server also hosts a DECODES PostgreSQL database that combines platforms from each district’s database into one large SQL database. The RiverGages DCP Monitor and routing specs then run from this large, combined database, shown in Figure 7-5.
Figure 7‑5: Combining District Databases.
The two files labeled ‘PDT File’ and ‘HADS File’ are used to assign names and descriptions to platforms that are not in any database.
At the Rock Island WIBS server, the combined database is under the DECODES installation at ~lrgs/DECODES7.
Determining the Controlling District for each Platform
Recall that each district’s XML DECODES database contains that district’s platforms. It may also contain platforms of interest from other districts. So there may be platforms that are duplicated in more than one database.
The ‘controlling district’ is the one with primary responsibility for the DCP
An ‘observing district’ is a different district that observes data from a DCP.
This leads to a problem: When we merge, we should take each platform only from the controlling district. An observing district might not keep the record up to date with the latest decoding formats and names.
ILEX completed a contract in 2007 to correct this situation: We created a GUI to allow the administrator of the combined database to detect duplicate DCPs and then assign one district to be the controlling district.
The merge-script works off of each district’s DDD-RIVERGAGES-DAS network list, where DDDis the district abbreviation. RiverGages allows districts that don’t use DECODES to participate in the DCP monitor. These districts supply only an old-style “.nl” network list file. Thus the job of this new GUI is to detect duplications in network lists.
Create a directory under your toolkit installation called ‘dcptoimport’. In this directory we will prepare a file called ‘controlling-districts.txt’. The GUI below will edit this file.
Start the GUI with the following script:
dupdcps_start -f dcpmon-config-file -t pdt-file –w hads-file
where …
dcpmon-config-file is the path of the DCP Monitor Config file. This file specifies the groups, and indirectly the databases that take part in the DCP Monitor. The default if you don’t specify this argument is $DECODES_INSTALL_DIR/dcpmon/dcpmon.conf.
pdt-file is the downloaded PDT file from NESDIS. This is downloaded automatically by the LRGS and stored in the LRGS home directory. The PDT is used to fill out the PDT Description and PDT Owner columns. The default value if you don’t specify an argument is “$LRGSHOME/pdt”.
hads-fileis a text report downloaded from the National Weather Service, containing NWSHB5 names and descriptions for every platform. This file is used to fill out the NWSHB5 Code Description columns. The default value if you don’t specify this argument is “$DECODES_INSTALL_DIR/hads”
At the Rock Island WIBS, the complete command is:
cd $HOME/DECODES7
bin/dupdcps
This calls the generic ‘dupdcps_start.sh’ script as follows:
dupdcps_start –f dcpmon/dcpmon.conf –t $HOME/pdts_compressed.txt –w dcpmon/hads.txt
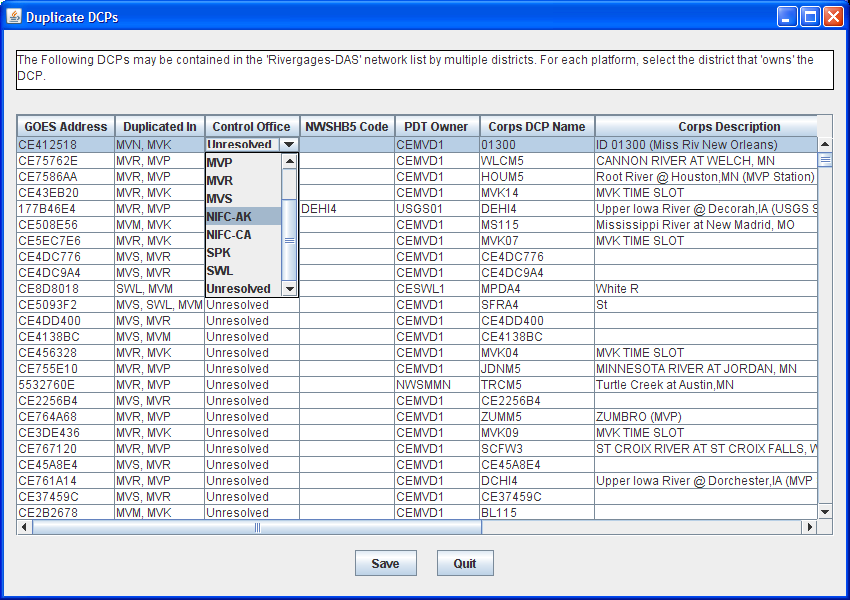
Figure 7‑6: Duplicate DCPs GUI.
The GUI shows a list of all platforms that are duplicated in multiple network lists. For each platform, you should select the district which has primary responsibility (i.e. ‘controls’) that platform. When you click the ‘Control Office’ column header, platforms that are unresolved are sorted to the top of the list. Notice that the District pull down menu shows the Districts that have platform records on the Combine SQL Database as well as Districts that use the LRGS Network List style.
Caveat: The Duplicate DCPs application expects the .nl files to be under the same directory as the dcpmon.conf file.
Once the “Save” button is pressed the Application will create a ‘controlling district file’ to be used by the merge-code and the DCP Monitor. In addition, the Duplicate DCPs Application will create network list files (.nl style) to be used by the combine-from-hub scripts to determine how to import duplicate platforms within the districts.
Note the following file locations:
This information is saved in the directory “$DECODES_INSTALL_DIR/dcptoimport”.
The list of controlling districts for each DCP is called “controlling-districts.txt”.
The network lists are called “DIST-TOIMPORT.nl”, where DIST is the 3-letter district abbreviation.
We recommend that you run this GUI periodically (e.g. once per day) to select the controlling district for any unresolved platforms.
As Platforms are resolved the combine-from-hub.sh script will take care of importing the right platforms for each district.
Running the Script to Merge Databases
The actual merge is accomplished by a script called combine-from-hub.sh. At Rock Island this is found in the DECODES7/bin directory. We set up the crontab to run this script at 5:15 Central Time every morning.
This script takes into account the control district that you defined in the GUI. It will only merge DCPs that each district controls, or that no district controls.
How to Add a New USACE District to the DCP Monitor
You will add a district to the DCP monitor so that it shows up as a selectable group at the top-level web page.
The ‘DCPMON directory’ for Rock Island is /u01/home/lrgs/DECODES7/dcpmon.
If the District Uses DECODES …
Add the district to the database hub mechanism so that you have a current copy of their database. Make sure the district has a network list in their database called:
DDD-RIVERGAGES-DAS
… where DDD is the 3-character district abbreviation.
Modify the ‘dcpmon.conf’ file in the DCP Monitor directory. Define a new group for the district with the name of the network list. For example, suppose you had 21 groups before and you are adding district SAJ. Add this line:
group_22=SAJ-RIVERGAGES-DAS
If the District DOES NOT Use DECODES …
Obtain a network list containing the DCPs used by the district. Name the list DDD.nl, where DDD is the 3-character district abbreviation.
Place this list into the DCP Monitor directory.
Modify the ‘dcpmon.conf’ file in the DCP Monitor directory. Define a new group for the district with the name of the network list. For example, suppose you had 21 groups before and you are adding district SAJ. Add this line:
group_22=file:SAJ.nl
Restart the DCP Monitor Server
After making changes to the configuration file stop and then restart the server. CD to the DCPMON directory and …
rm dcpmon.lock
(wait for about 20 seconds, then …)
start_dcpmon
CWMS-Compatible Excel Data Format
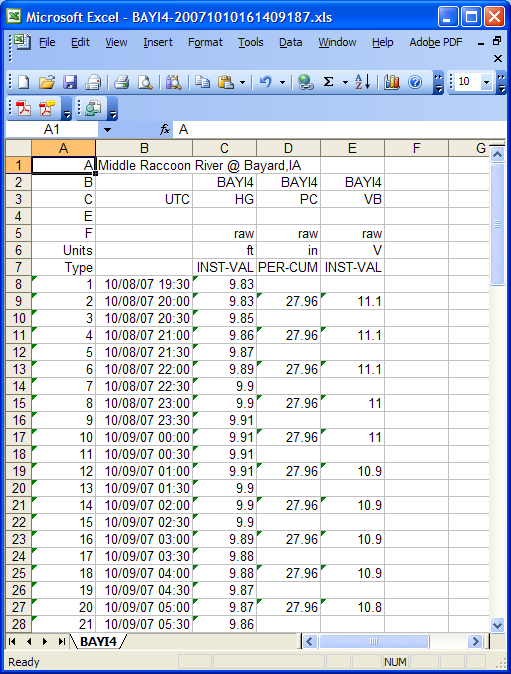
CWMS can import data from an Excel file provided that certain header rows and columns are provided. As of version 7.4, DECODES can produce files in this format.
DECODES modules which output data are called “consumers”. Thus the module which writes these files is called the “Excel Consumer”.
The Excel Consumer receives the formatted data created by a DECODES Routing spec or Retrieval Process. It then generates an Excel “xls” file for every DCP on the Network list.
The names of the files generated by this consumer are composed of site name plus current time in the format YYYYMMDDHHMMSSmmm. For example: “NADA4-20071010161409390.xls”.
Normally the consumer will create one file per DCP with all the messages for that DCP added to a single file. When you run a routing spec or retrieval process in real-time, you will want to have a separate file for each message.
To do this add a property: msgPerXlsFile = true.
This property will indicate to the Excel Consumer that the Routing Spec is running in real time and that it will generate an excel file for every decoded message received instead of an excel file for every Site on the Network List.
Add Excel Consumer to Your System
Use the Reference List Editor to add the consumer to the DECODES pull-down menus. Open a command window, and run the ‘rledit’ script in the bin directory under your toolkit.
Under the Enumerations tab:
Select “Data Consumer” from the Enumeration pull down menu
Click the Add button on the right and create the following entry:
Mnemonic Value: excel
Complete Description: Output to Excel file
Executable Java Class: decodes.excel.ExcelConsumer
Click ok button
Select “Output Format” from the Enumeration pull down menu
Verify that the Null Formatter is on the list, if it is not on the list, Click the Add button on the right and create the following entry:
Mnemonic Value: null
Complete Description: Null Formatter
Executable Java Class: decodes.consumer.NullFormatter
Click ok button
Select File – Save to DB.
Please be careful typing the Java class names above. They must be typed exactly as shown above. Upper/Lower case is distinct.
Set up a Routing Spec to Produce Excel Files
When setting the Routing Spec:
Select excel for “Consumer Type” drop down menu
Select null for the “Output Format” drop down menu
Set Consumer Args to the directory where the excel files will be created, if no directory (full path) is giving on the Consumer Args the Excel Consumer will create all Excel files in the DCSTOOL install directory.
The following property can be added to the Routing Spec dialog window:
Name |
Description |
msgperxlsfile |
This property is required when running the Excel Consumer on real time (meaning no until value is defined). Set the msgperxlsfile value to true. |
Control the DSS/CWMS Path Name F-part
The F-part of the path name is usually either “rev” or “raw”. If not specified, DECODES will output “raw”. You can control this by adding a property to either the configuration or platform sensor:
Name |
Description |
fpart |
This value is optional. This value is either rev or raw. If no value is given the Excel Consumer default the FPART to raw. |
Example of an Excel file generated by the Excel Consumer:
Using CWMS Oracle Database for DECODES Meta Data
As of version 7.5 you can store the DECODES meta-data inside the Oracle database used for CWMS. This offers the following advantages:
Automated backups
Your CWMS location-records and data-types are automatically included in DECODES.
This chapter will explain how to configure DECODES for operation with the CWMS database.
Configure DECODES for CWMS Database
Table 9-4 shows the “decodes.properties” file settings that are appropriate for CWMS. Note that if you set them in “decodes.properties”, you do not need to set them in the CWMS-specific configuration file discussed in section 6.
Name |
Value for CWMS |
Description |
editDatabaseType |
CWMS |
Specifies that your editable database will use the CWMS extensions to the standard SQL database. |
editDatabaseLocation |
host:portnumber:SID |
Required parameter that specifies the location of the ORACLE CWMS database. |
jdbcOracleDriver |
Default = |
Optional Oracle JDBC Driver String. The default driver is “thin” but you can change it to “oci”. If “oci” is used native code will have to be installed. No need to modify this property. |
DbAuthFile |
$DECODES_INSTALL_DIR/ .decodes.auth |
Optional: Set this if you want to stored the database authentication file in a different location. |
sqlTimeZone |
Required Time-Zone Abbreviation. Default=UTC |
Specifies the time-zone in which the CWMS database displays and accepts date/time strings. |
Table 9‑4: DECODES Properties File Settings for CWMS.
Show snapshot of decodes properties panel for setting time zone.