OpenDCS DECODING - Introduction
A significant piece of setting up a routing spec is writing the DECODING script. This section is meant to help new users get familiar with the DECODING format statements.
A major bulk of the examples here are likely not typically full raw messages from sources. The sample messages are displayed for the purposes of providing examples of how the format statements DECODE when executed on certain input messages.
Further details and advanced topics on the DECODING can be found in the DECODING manual DECODES Guide
DECODING Statements - Fundamentals
Starting to write a DECODING script from scratch can seem overwheling at the start. To get started, users can use a few different strategies - including:
See if a script already exists for this type of messages
Break down or edit the message to something shorter and more manageable
Use the TRACE button to debug scripts
Overview of Operations
This section contains tables for reference. These commands or operations are essentially the building blocks or fundamentals of DECODING.
Skipping Operations
Jump and Repeat Operations
CSV Parser Operation
Check Operation
Scan Operation
Field Operations
Recall that each operation is in most cases, really doing one of two things:
Instructing the pointer where to go OR
Mapping the data in the message to a date/time or sensor.
The commands and operations in the tables below are expanded upon in the next sections with greater detail and include examples.
The following table includes the skip operations. These are commands used to instruct the pointer where to go relative to where the pointer is.
Command |
Description |
|---|---|
nX |
Skip n data characters |
nP |
Position to the nth character in the current line |
n/ |
Skip n data lines |
n\ |
Skip backward n data lines |
W |
Skip white space |
Table 1-1: DECODES Format Operations - Skipping
The following table includes very common operations including the jump to label command and also the repeat syntax.
Command |
Description |
|---|---|
> label |
Jump to the format with the specified label |
n(operations…) |
Repeat operations enclosed in parenthesis n times |
Table 1-2: DECODES Format Operations - Jump to Label & Repeat
The following table includes the csv parser operation. This command is useful for when data messages are in a comma delimited format. This command will instruct data in the csv to be mapped to either a sensor or date/time.
Command |
Description |
|---|---|
csv(sens#,…) |
Parse a series of comma separated values |
csv(delimiter=|,sens#,…) |
Parse a series of values separated by a specific delimiter In this example the pipe (|), character is used. |
The delimiter can be more than one character; if more than one character the sequence of characters much match entirely. The values \s and \t will be converted to a single space and tab respectively. Other values are used as is.
Table 1-3: DECODES Format Operations - CSV Parser
The following table includes check operations. Check operations or commands are used to instruct the pointer where to navigate to depending on whether certain criteria are met, immediately after where the pointer currently is in the message.
Command |
Description |
|---|---|
C(nN,*label*) |
Check if next n characters are N digit, decimal, or sign, if at least one is not switch to label or proceed to next statement |
C(S,*label*) |
Check if next character is a + or - if at least one is not switch to label or proceed to next statement |
C(str,*label*) |
Check if next n-length of string characters match ‘str’, if at least one is not switch to label or proceed to next statement |
Table 1-4: DECODES Format Operations - Check
The following table includes scan operations. Scan operations or commands are used to instruct the pointer where to navigate to depending on whether some criteria is met within the scan window. The scan criteria is slightly different than the check command. See their respective sections for further detail.
Command |
Description |
|---|---|
S(n,N,*label*) |
Scan n characters for N digit, decimal or sign |
S(n,S,*label*) |
Scan n characters for S sign + or - |
S(n,A,*label*) |
Scan n characters for A letter, upper or lower case |
S(n,P,*label*) |
Scan n characters for P pseudo-binary character or ‘/’ |
S(n,Xnn,*label*) |
Scan n characters for X hex value nn |
S(n,’str',*label*) |
Scan n characters for exact string ‘str’ |
Table 1-5: DECODES Format Operations - Scan
The following table includes the simple field operations. These statements will instruct certain data of a particular format to be mapped to a sensor or date/time. In some unique less common examples, other information is parsed out as well.
Command |
Description |
|---|---|
F(FT,DT,L,S,E) |
Generic Field Description |
F(D,DT,L,fld-ID) |
Date Field |
F(T,DT,L) |
Time Field |
F(S,DT,L,sensor#) |
Sensor Field |
Table 1-6: DECODES Format Operations - Fields
The following table includes the shef decoding command. This command is useful for when data messages or file is of shef format.
Command |
Description |
|---|---|
shefprocess() |
Parse a file that is of shef format |
Table 1-7: DECODES Format Operations - shefprocess()
In the examples in the sections below please make note a few items.
The header types are assumed to be “other”. More details about the various header types and assumptions about them will be expanded upon in another section.
Sample messages can be copied and pasted or loaded into the Sample Message Box. Depending on what header type is selected, the DECODING will assume the first lines is the header. If no header type is defined, then the header type is assumed to be a GOES self-timed DCP header. DECODES will by default skip the header and start where the messages start. In all the examples below (unless otherwise noted), the header type is “other”. If another header type is selected, the sample decoding scripts may not work because the Sample Messages below do not include these various headers.

Skip Operations - nX, nP, n/, n\
All of the following examples are for configurations with one sensor. In the examples below, skipping operations are demonstrated to help a new user understand how the statements work. To start, consider that statements are commands telling the curser what to do as if starting from the top left of the file (message pasted in the browser). Recall that statements are separated by commas. In the examples below, it is not necessary to delineate and have multiple labels, but this is done for the sake of keeping the statements as simple as possible. The field sensor label is the part that extracts the variable information once the curser is at the data location in the file, and attributes the information to a sensor.
Skip Characters
Command |
Description |
|---|---|
nX |
Skip n data characters |
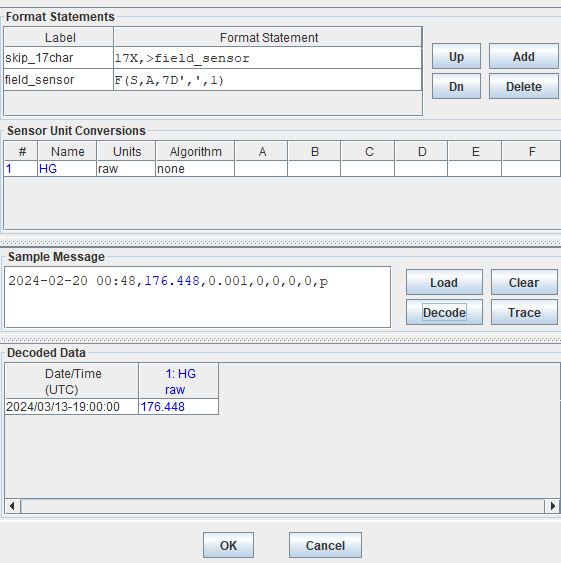
Sample Messages where the sensor data is at 18 characters from where the cursor is. Cursors or pointers, by default start at the top left of the message (excluding header). To test out the decoding, copy ONE of the lines below into the Sample Message browser. To navigate to the 18th position, the operations will tell the cursor to skip 17 characters.
2024-02-20 00:48,176.448,0.001,0,0,0,0,p
2024-02-20 00:54,176.443,0.001,0,0,0,0,p
2024-02-20 01:00,176.445,0.002,0,0,0,0,p
skip_17char |
17X,>field_sensor |
field_sensor |
F(S,A,7D’,’,1) |
When the message is pasted into the Sample Message browser and DECODED, ignore the Date/Time since by default that will populate with the latest hour. Also, in the example above the statement is only set to run once. That is why only the first level is displayed. Note that the > or jump statement is used, see later sections for more details on the field operation.
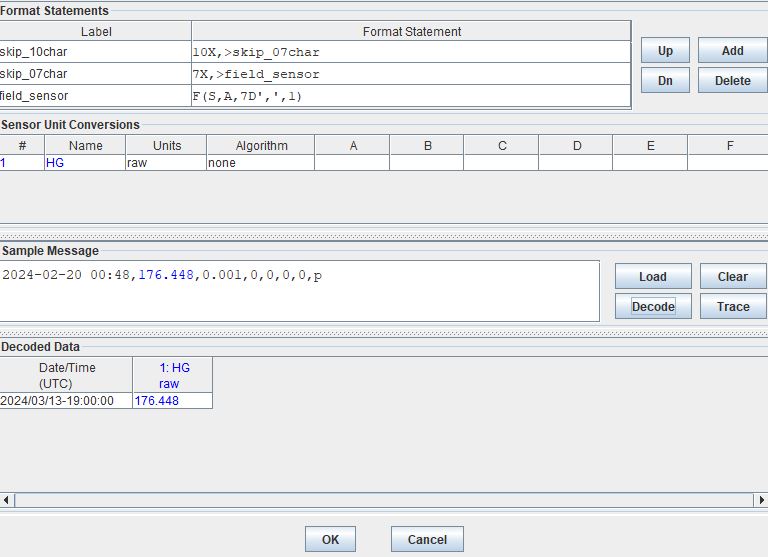
Recall that the skip characters will run from where the operations is. So in the following statement, first the curser will skip 10 characters from the start of the first line, then proceed to the next label, which instructs the operation/curser to skip another 7 characters. The result is the same as the statements above, just divided into two statements to convey how the skip characters operate from the position the operation is at.
skip_10char |
10X,>skip_07char |
skip_07char |
7X,>field_sensor |
field_sensor |
F(S,A,7D’,’,1) |
Skip to Position in Line
Command |
Description |
|---|---|
nP |
Position to the nth character in the current line |
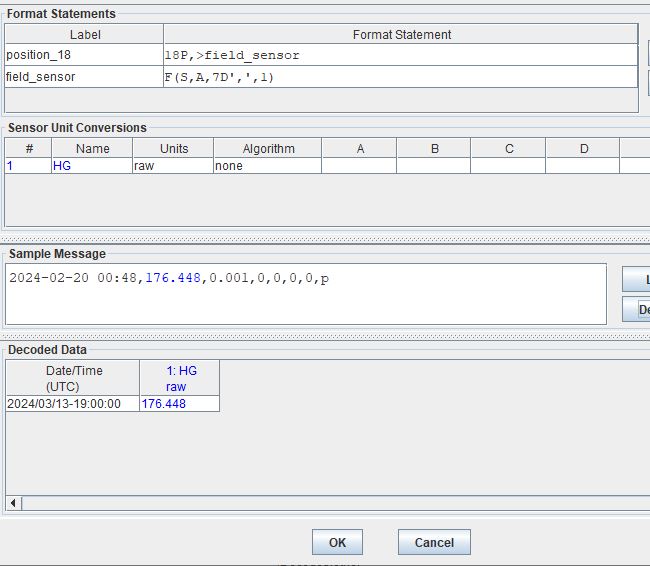
Sample Message where the data starts at position 18. The skip to position in line operations moves the curser exactly to the 18th position in the line, regardless of where the cursor is prior to this command. That is how it differs from the skip command.
2024-02-20 00:48,176.448,0.001,0,0,0,0,p
When the above lines are pasted into the Sample Message browser and DECODED, the position operation is used rather than the skip characters operation. The result will be the same as the skip character examples above. This statement is ideal for when messages are in a fixed format.
position_18 |
18P,>field_sensor |
field_sensor |
F(S,A,7D’,’,1) |
Skip Lines
Command |
Description |
|---|---|
n/ |
Skip n data lines |
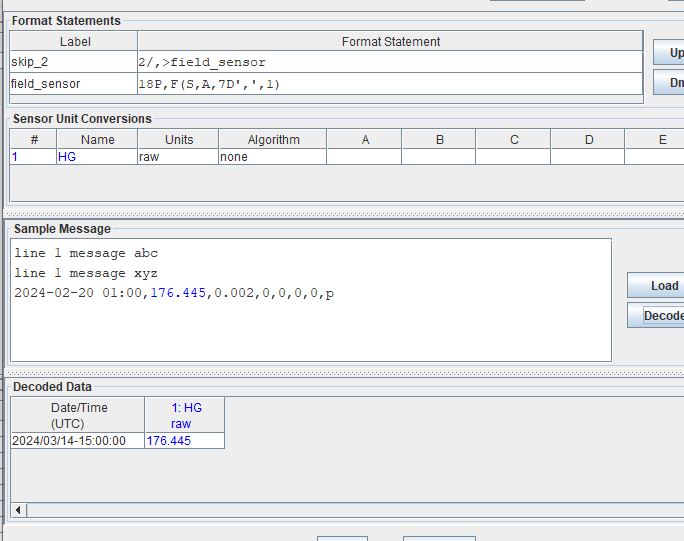
Sample Message where the first couple lines need to be skipped.
line 1 message abc
line 1 message xyz
2024-02-20 01:00,176.445,0.002,0,0,0,0,p
When the above lines are pasted into the Sample Message browser and DECODED the DECODING script will first skip the first 2 lines then proceed with the field_sensor label.
skip_2 |
2/,>field_sensor |
field_sensor |
18P,F(S,A,7D’,’,1) |
Skip Lines - Backwards
Command |
Description |
|---|---|
n\ |
Skip backward n data lines |
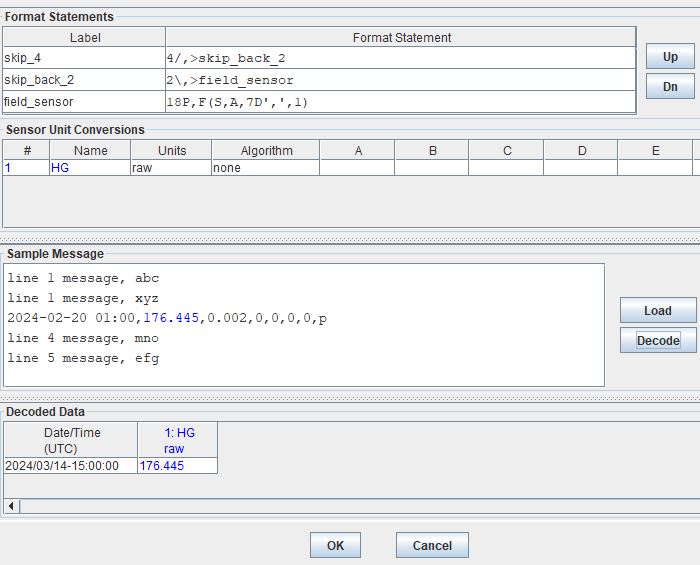
Sample Message where the first couple lines need to be skipped. In the example below instead of directly skipping 2 lines, the decoding will skip too many lines and then jump backwards the appropriate number of lines.
line 1 message, abc
line 1 message, xyz
2024-02-20 01:00,176.445,0.002,0,0,0,0,p
line 4 message, mno
line 5 message, efg
When the above lines are pasted into the Sample Message browser and DECODED the DECODING script will first skip the first 4 lines, then jump backward 2 lines and then proceed with the field_sensor label.
skip_4 |
4/,>skip_back_2 |
skip_back_2 |
2\,>field_sensor |
field_sensor |
18P,F(S,A,7D’,’,1) |
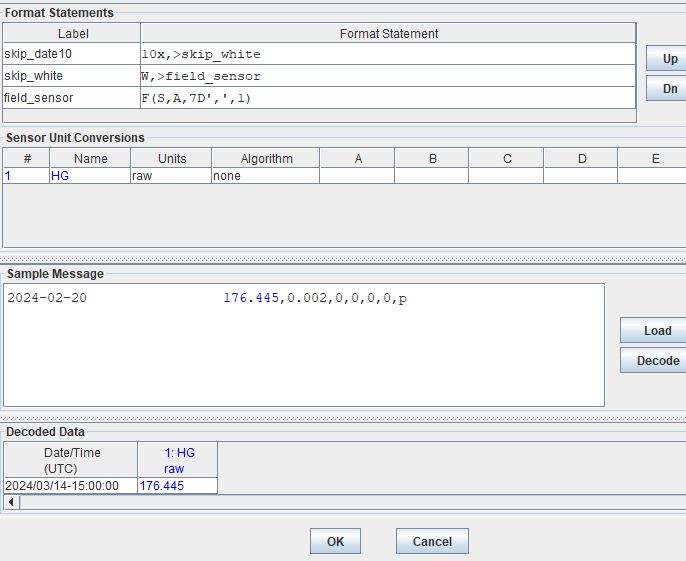
Skip Whitespace
Command |
Description |
|---|---|
W |
Skip white space |
2024-02-20 176.445,0.002,0,0,0,0,p
skip_date10 |
10x,>skip_white |
skip_white |
W,>field_sensor |
field_sensor |
F(S,A,7D’,’,1) |
In the above example, the first line will skip the first ten characters, then jump to the skip white space command and then skip the white space. Then the cursor should be right before the data for sensor one.
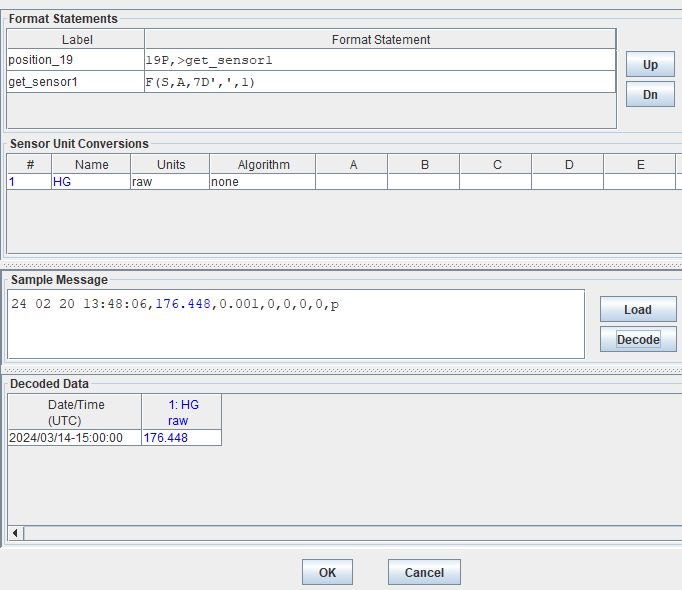
Jump and Repeat Operations - >, n(operations…)
Jump to Label
Command |
Description |
|---|---|
> label |
Jump to the format with the specified label |
Recall that DECODES format operations are separated by commas. So a number of format statements can be entered in one label so long as the commas are appropriately positioned. When getting started it can be helpful to separate the statements by labels. To jump from one label to another use the > label command. The jump label comes in handy when there are conditional statements or search criteria.
24 02 20 13:48:06,176.448,0.001,0,0,0,0,p
position_19 |
19P,>get_sensor1 |
get_sensor1 |
F(S,A,7D’,’,1) |
one_line |
19P,F(S,A,7D’,’,1) |
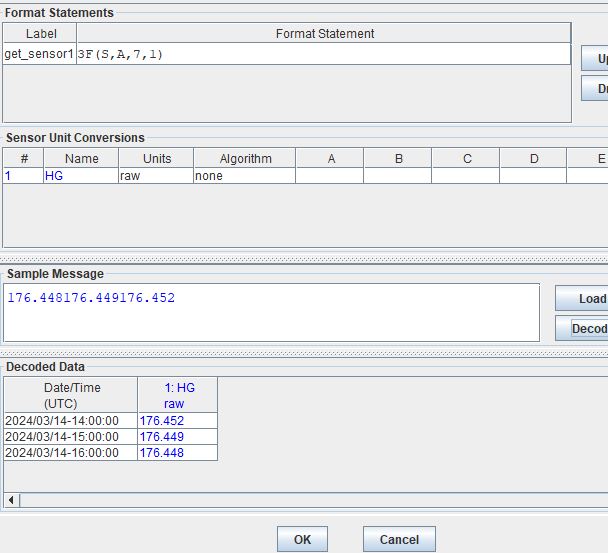
Repeating Statements
Command |
Description |
|---|---|
n(operations…) |
Repeat operations enclosed in parenthesis n times |
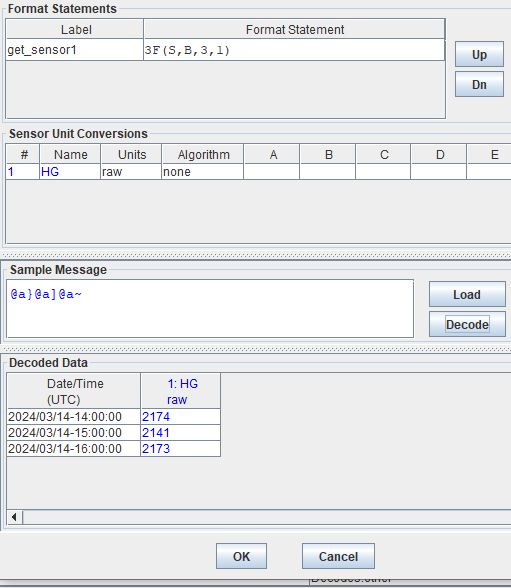
176.448176.449176.452
get_sensor1 |
3F(S,A,6,1) |
@a}@a]@a~
get_sensor1 |
3F(S,B,3,1) |
Field Operation - nF(FT,DT,L,S,E)
Field operations are used to extract time and sensor values from the message. The general form is:
nF(ft,dt,length,sensor # or fld-ID,E)
n is a repetition factor
ft defines the type of field
dt defines the type of data
length defines the field length with operational delimiters
sensor # the sensor number associated with this sensor-value field
fld-id is used with DATE and TIME fields to specify different representations
E is used with TIME fields to indicate that the recording of time is viewed as an event
Field - DATE
In the examples below, DECODING field operations are displayed to convey how the date can be extracted from the message. Ignore the time that is showing up in the Decoded Data box - all examples are by default showing 00:00. DECODING Time is addressed next.
There are four different fld-id options that can be used to extract date information versus parsing the date component individually (ie year, month day). The four fld-id’s are outlined below with examples of how to use them in DECODING statements.
The examples below outline how to extract the date from the line. Ignore the time displayed. Decoding TIME formats will be addressed further on. In the example below the following parameters are defined.
D for DATE
A for ASCII
2,3,4,6,7,8 or 10 is for the length of the date format
1,2,3 or 4 is for fld-id
Here is a list of potential date field operations:
F(D,A,8,1)
F(D,A,6,1)
F(D,A,10,1)
F(D,A,8,2)
F(D,A,7,2)
F(D,A,6,2)
F(D,A,5,2)
F(D,A,3,2)
F(D,A,2,2)
F(D,A,5,3)
F(D,A,4,3)
F(D,A,8,4)
F(D,A,6,4)
F(D,A,10,4)
DATE - Fld-id 1
Fld-id 1 should be used when the date is in one of the following formats:
fld-id |
statement |
date format |
date example |
length |
|---|---|---|---|---|
1 |
F(D,A,8,1) |
YY/MM/DD |
24/10/01 |
8 |
1 |
F(D,A,8,1) |
YY-MM-DD |
24-10-01 |
8 |
1 |
F(D,A,8,1) |
YY MM DD |
24 10 01 |
8 |
1 |
F(D,A,6,1) |
YYMMDD |
241001 |
6 |
1 |
F(D,A,10,1) |
YYYY/MM/DD |
2024/10/01 |
10 |
1 |
F(D,A,10,1) |
YYYY-MM-DD |
2024-10-01 |
10 |
1 |
F(D,A,10,1) |
YYYY MM DD |
2024 10 01 |
10 |
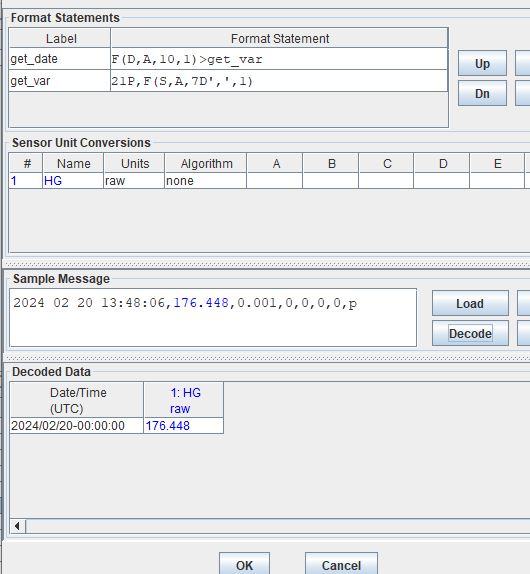
Sample Messages: Examples where the date is 8 characters long.
24/02/20 13:48:06,176.448,0.001,0,0,0,0,p
24-02-20 13:48:06,176.448,0.001,0,0,0,0,p
24 02 20 13:48:06,176.448,0.001,0,0,0,0,p
Decoding Labels and Statements for above Sample Messages.
get_date |
F(D,A,8,1),>get_var |
get_var |
19P,F(S,A,7D’,’,1) |
Sample Messages: Example where the date is 6 characters long.
240220 13:48:06,176.448,0.001,0,0,0,0,p
get_date |
F(D,A,6,1),>get_var |
get_var |
17P,F(S,A,7D’,’,1) |
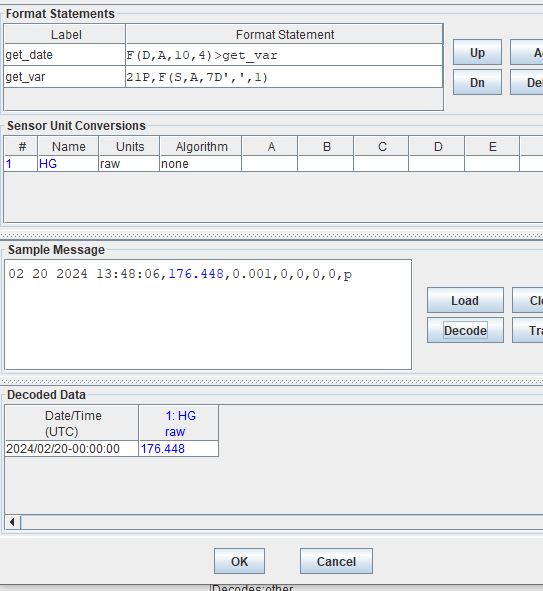
Sample Messages: Examples where the date is 10 characters long.
2024/02/20 13:48:06,176.448,0.001,0,0,0,0,p
2024-02-20 13:48:06,176.448,0.001,0,0,0,0,p
2024 02 20 13:48:06,176.448,0.001,0,0,0,0,p
Decoding Labels and Statements for above Sample Messages.
get_date |
F(D,A,10,1),>get_var |
get_var |
21P,F(S,A,7D’,’,1) |
DATE - Fld-id 2
Fld-id 2 should be used when the date is in one of the following formats:
fld-id |
statement |
date format |
date example |
length |
|---|---|---|---|---|
2 |
F(D,A,8,2) |
YYYY-DDD |
2024-275 |
8 |
2 |
F(D,A,8,2) |
YYYY/DDD |
2024/275 |
8 |
2 |
F(D,A,7,2) |
YYYYDDD |
2024275 |
7 |
2 |
F(D,A,6,2) |
YY-DDD |
24-275 |
6 |
2 |
F(D,A,6,2) |
YY/DDD |
24/275 |
6 |
2 |
F(D,A,5,2) |
YYDDD |
24275 |
5 |
2 |
F(D,A,3,2) |
DDD |
275 |
3 |
2 |
F(D,A,2,2) |
DD |
99 |
2 |
Sample Messages: Examples where the date is 8 characters long.
2024-051 13:48:06,176.448,0.001,0,0,0,0,p
2024/051 13:48:06,176.448,0.001,0,0,0,0,p
Decoding Labels and Statements for above Sample Messages.
get_date |
F(D,A,8,2),>get_var |
get_var |
19P,F(S,A,7D’,’,1) |
Sample Messages: Example where the date is 7 characters long.
2024051 13:48:06,176.448,0.001,0,0,0,0,p
Decoding Labels and Statements for above Sample Messages.
get_date |
F(D,A,7,2),>get_var |
get_var |
18P,F(S,A,7D’,’,1) |
Sample Messages: Examples where the date is 6 characters long.
24-051 13:48:06,176.448,0.001,0,0,0,0,p
24-051 13:48:06,176.448,0.001,0,0,0,0,p
Decoding Labels and Statements for above Sample Messages.
get_date |
F(D,A,6,2),>get_var |
get_var |
17P,F(S,A,7D’,’,1) |
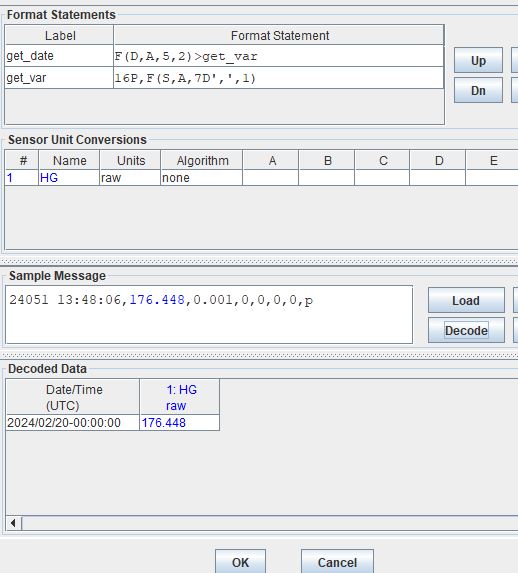
Sample Messages: Example where the date is 5 characters long.
24051 13:48:06,176.448,0.001,0,0,0,0,p
Decoding Labels and Statements for above Sample Messages.
get_date |
F(D,A,5,2),>get_var |
get_var |
16P,F(S,A,7D’,’,1) |
Sample Messages: Example where the date is 3 characters long.
051 13:48:06,176.448,0.001,0,0,0,0,p
Decoding Labels and Statements for above Sample Messages.
get_date |
F(D,A,3,2),>get_var |
get_var |
14P,F(S,A,7D’,’,1) |
Sample Messages: Example where the date is 2 characters long.
51 13:48:06,176.448,0.001,0,0,0,0,p
Decoding Labels and Statements for above Sample Messages.
get_date |
F(D,A,2,2),>get_var |
get_var |
13P,F(S,A,7D’,’,1) |
DATE - Fld-id 3
Fld-id 3 should be used when the date is in one of the following formats:
fld-id |
format |
date format |
date example |
length |
|---|---|---|---|---|
3 |
F(D,A,5,3) |
MM/DD |
10/01 |
5 |
3 |
F(D,A,5,3) |
MM-DD |
10-01 |
5 |
3 |
F(D,A,5,3) |
MM DD |
10 01 |
5 |
3 |
F(D,A,4,3) |
MMDD |
1001 |
4 |
Sample Messages: Examples where the date is 5 characters long.
02/20 13:48:06,176.448,0.001,0,0,0,0,p
02-20 13:48:06,176.448,0.001,0,0,0,0,p
02 20 13:48:06,176.448,0.001,0,0,0,0,p
Decoding Labels and Statements for above Sample Messages.
get_date |
F(D,A,5,3),>get_var |
get_var |
16P,F(S,A,7D’,’,1) |
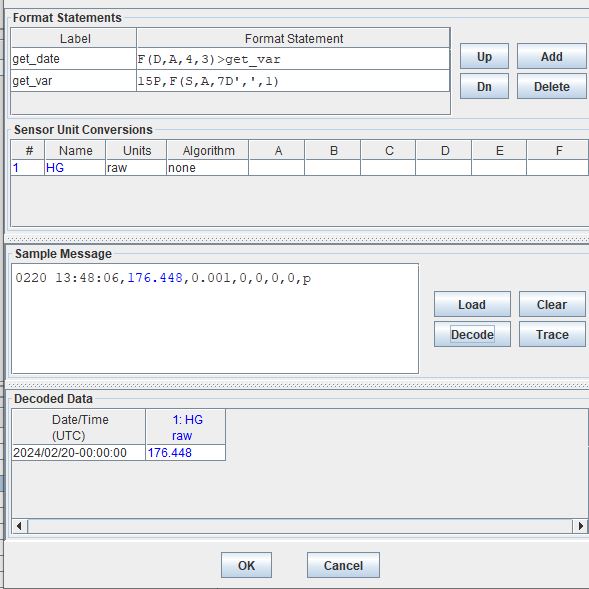
Sample Messages: Example where the date is 4 characters long.
0220 13:48:06,176.448,0.001,0,0,0,0,p
Decoding Labels and Statements for above Sample Messages.
get_date |
F(D,A,4,3),>get_var |
get_var |
15P,F(S,A,7D’,’,1) |
DATE - Fld-id 4
Fld-id 4 should be used when the date is in one of the following formats:
fld-id |
statement |
date format |
date example |
length |
|---|---|---|---|---|
4 |
F(D,A,8,4) |
MM/DD/YY |
10/01/24 |
8 |
4 |
F(D,A,8,4) |
MM-DD-YY |
10-01-24 |
8 |
4 |
F(D,A,8,4) |
MM DD YY |
10 01 24 |
8 |
4 |
F(D,A,6,4) |
MMDDYY |
100124 |
6 |
4 |
F(D,A,10,4) |
MM/DD/YYYY |
10/01/2024 |
10 |
4 |
F(D,A,10,4) |
MM-DD-YYYY |
10-01-2024 |
10 |
4 |
F(D,A,10,4) |
MM DD YYYY |
10 01 2024 |
10 |
Sample Messages: Examples where the date is 8 characters long.
02/20/24 13:48:06,176.448,0.001,0,0,0,0,p
02-20-24 13:48:06,176.448,0.001,0,0,0,0,p
02 20 24 13:48:06,176.448,0.001,0,0,0,0,p
Decoding Labels and Statements for above Sample Messages.
get_date |
F(D,A,8,4),>get_var |
get_var |
19P,F(S,A,7D’,’,1) |
Sample Messages: Example where the date is 6 characters long.
022024 13:48:06,176.448,0.001,0,0,0,0,p
Decoding Labels and Statements for above Sample Messages.
get_date |
F(D,A,6,4),>get_var |
get_var |
17P,F(S,A,7D’,’,1) |
Sample Messages: Examples where the date is 10 characters long.
02/20/2024 13:48:06,176.448,0.001,0,0,0,0,p
02-20-2024 13:48:06,176.448,0.001,0,0,0,0,p
02 20 2024 13:48:06,176.448,0.001,0,0,0,0,p
Decoding Labels and Statements for above Sample Messages.
get_date |
F(D,A,10,4),>get_var |
get_var |
21P,F(S,A,7D’,’,1) |
Field - TIME
In the examples below, DECODING field operations are displayed to convey how the time can be extracted from the message. The following example adds a time operations following a date operation.
There are some standard time formats for when the field type is ‘T’ and when the data type is ‘A’ (ASCII). These formats are outlined in the table below. Alternatively, a user could decode the time components individually (ie hour, min, sec, AM/PM). There are also two optional parameters for the field TIME. The ‘sensor #’ and ‘E’ parameter signify that the time recorded is an event. When DECODES encounters a field description for a time and it has a sensor number and ‘E’ parameter, DECODES will use the value 1 as the data value associated with that time.
statement |
time format |
time example |
length |
|---|---|---|---|
F(T,A,8) |
HH-MM-SS |
13-15-06 |
8 |
F(T,A,8) |
HH:MM:SS |
13:15:06 |
8 |
F(T,A,6) |
HHMMSS |
131506 |
6 |
F(T,A,5) |
HH-MM |
13-15 |
5 |
F(T,A,5) |
HH:MM |
13:15 |
5 |
F(T,A,4) |
HHMM |
1315 |
4 |
F(T,A,3) |
HMM |
115 |
3 |
F(T,A,2) |
MM |
15 |
2 |
The examples below outline how to extract the date from the line. Ignore the time displayed. Decoding TIME formats will be addressed further on. In the example below the following parameters are defined.
T for TIME
A for ASCII
6,7 or 8 is for the length of the date format
1 is for fld-id equal to 1
Here is a list of potential time field operations (not including optional parameters):
F(T,A,8)
F(T,A,6)
F(T,A,5)
F(T,A,4)
F(T,A,3)
F(T,A,2)
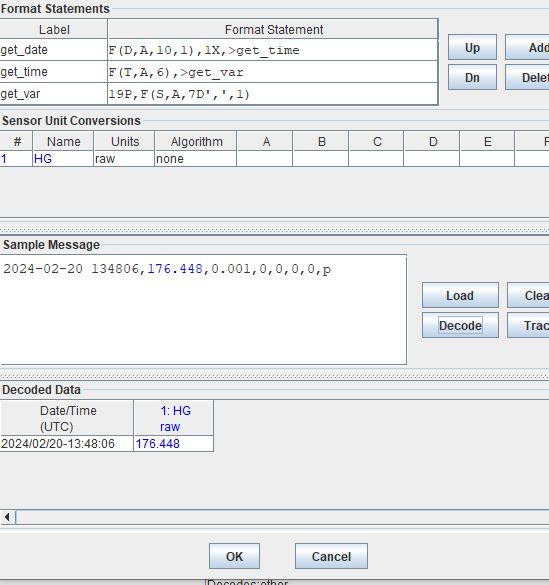
Sample Messages: Examples where the date is 8 characters long.
2024-02-20 13-48-06,176.448,0.001,0,0,0,0,p
2024-02-20 13:48:06,176.448,0.001,0,0,0,0,p
Decoding Labels and Statements for above Sample Messages.
get_date |
F(D,A,10,1),1X,>get_time |
get_time |
F(T,A,8),>get_var |
get_var |
21P,F(S,A,7D’,’,1) |
Sample Messages: Example where the date is 6 characters long.
2024-02-20 134806,176.448,0.001,0,0,0,0,p
Decoding Labels and Statements for above Sample Messages.
get_date |
F(D,A,10,1),1X,>get_time |
get_time |
F(T,A,6),>get_var |
get_var |
19P,F(S,A,7D’,’,1) |
Sample Messages: Examples where the date is 5 characters long.
2024-02-20 13-48,176.448,0.001,0,0,0,0,p
2024-02-20 13:48,176.448,0.001,0,0,0,0,p
Decoding Labels and Statements for above Sample Messages.
get_date |
F(D,A,10,1),1X,>get_time |
get_time |
F(T,A,5),>get_var |
get_var |
18P,F(S,A,7D’,’,1) |
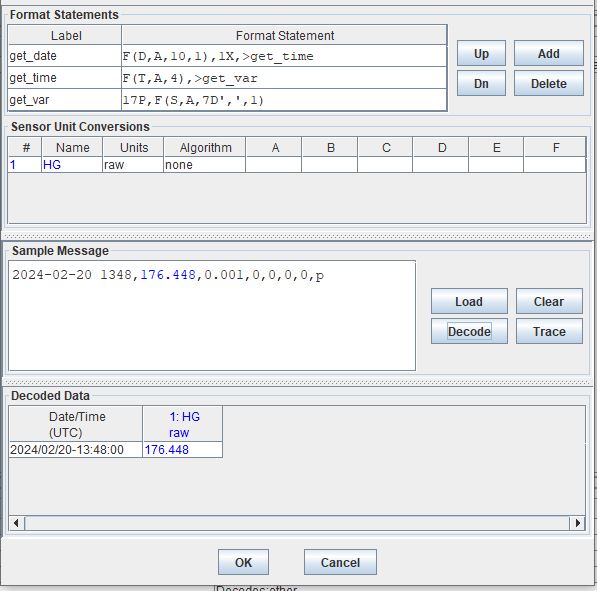
Sample Messages: Example where the date is 4 characters long.
2024-02-20 1348,176.448,0.001,0,0,0,0,p
Decoding Labels and Statements for above Sample Messages.
get_date |
F(D,A,10,1),1X,>get_time |
get_time |
F(T,A,4),>get_var |
get_var |
17P,F(S,A,7D’,’,1) |
Sample Messages: Example where the date is 3 characters long.
2024-02-20 948,176.448,0.001,0,0,0,0,p
Decoding Labels and Statements for above Sample Messages.
get_date |
F(D,A,10,1),1X,>get_time |
get_time |
F(T,A,3),>get_var |
get_var |
16P,F(S,A,7D’,’,1) |
Sample Messages: Example where the date is 2 characters long.
2024-02-20 48,176.448,0.001,0,0,0,0,p
Decoding Labels and Statements for above Sample Messages.
get_date |
F(D,A,10,1),1X,>get_time |
get_time |
F(T,A,2),>get_var |
get_var |
15P,F(S,A,7D’,’,1) |
Field - SENSOR Data Type
F(S,*,length,sensor #)
The field operation is what is used to extract the sensor values from the message. Like the DATE/TIME field operations, they are of a similar format. The field operation can be used with data types such as ASCII, Pseudo Binary, Pseudo Binary Signed Integer, amongst others. This section will go over how the Field operation can be used with ASCII data type.
Common data types include ASCII (A) and Pseudo-Binary (B or I). OpenDCS can DECODE all of the following data types.
data types |
data type description |
|---|---|
A |
|
B |
|
I |
|
L |
|
X |
|
S |
|
BC |
|
C |
|
BD |
|
BT |
|
BIN |
|
UBIN |
|
BINL |
|
UBINL |
|
Field - SENSOR - ASCII
F(S,**A**,length,sensor #)
The sensor number (denoted # in the table below) is the numeric sensor number specified in the configuration.
statement |
data |
about |
length |
delimiter |
|---|---|---|---|---|
F(S,A,6,#) |
123456 |
|
6 or less |
|
123.45 |
||||
0.1234 |
||||
1.234 |
||||
123000 |
||||
123 |
||||
F(S,A,6D’,’,#) |
123.45, |
|
6 or less |
, |
123.4, |
||||
12.2, |
||||
1.2345, |
||||
F(S,A,6D’:’,#) |
123.45: |
|
6 or less |
: |
123.4: |
||||
12.2: |
||||
1.2345: |
||||
F(S,A,6D’ ‘,#) |
123.45` ` |
|
6 or less |
` ` |
123.4` ` |
||||
12.2` ` |
||||
1.2345` ` |
||||
F(S,A,6D’ :,’,#) |
123.45: |
|
6 or less |
` ` or : or , |
123.45, |
||||
123.45` ` |
||||
123.4: |
||||
F(S,A,6DS,#) |
123.45+ |
|
6 or less |
+or - |
123456- |
||||
12.2+ |
||||
1.2345- |
Care must be taken in positioning the data pointer after a delimited field. The pointer will be left at the delimiter. Hence you will probably want to use a skip operation to skip the delimiter after parsing the field.
If the delimiter is not found, the pointer is advanced by length characters.
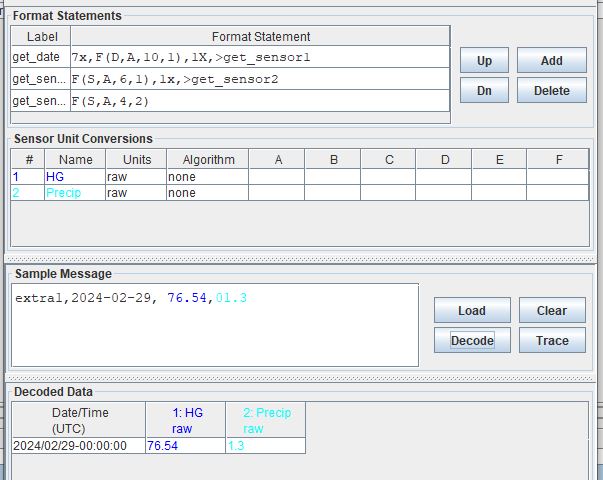
For the examples below copy any one of the lines from the code block below and see how the decoding statements work. In each example there are 2 sensors in the raw message.
Sample Messages: Example where the sensors are of fixed formats. Sensor 1 is 6 characters and sensor 2 is 4 characters long.
extra1,2024-02-29,176.54,1.2 ,
extra1,2024-02-29,176.54, .2 ,
extra1,2024-02-29,176.54,2   ,
extra1,2024-02-29, 76.54,01.3,
extra1,2024-02-29,76.5  ,01.3,
Decoding Labels and Statements for above Sample Messages.
get_date |
7x,F(D,A,10,1),1X,>get_sensor1 |
get_sensor1 |
F(S,A,6,1),1x,>get_sensor2 |
get_sensor2 |
F(S,A,4,2) |
Sample Messages: Example where the first sensor is comma delimited up to 6 characters and where the second sensor is of fixed format of 4 characters.
extra2,2024-02-29,176.54,1.2 ,
extra2,2024-02-29,76.540,1.2 ,
extra2,2024-02-29,76.54,1.2 ,
extra2,2024-02-29,76.5,1.2 ,
extra2,2024-02-29,9,1.2 ,
Decoding Labels and Statements for above Sample Messages.
get_date |
7x,F(D,A,10,1),1X,>get_sensor1 |
get_sensor1 |
F(S,A,6D’,’,1),1x,>get_sensor2 |
get_sensor2 |
F(S,A,4,2) |
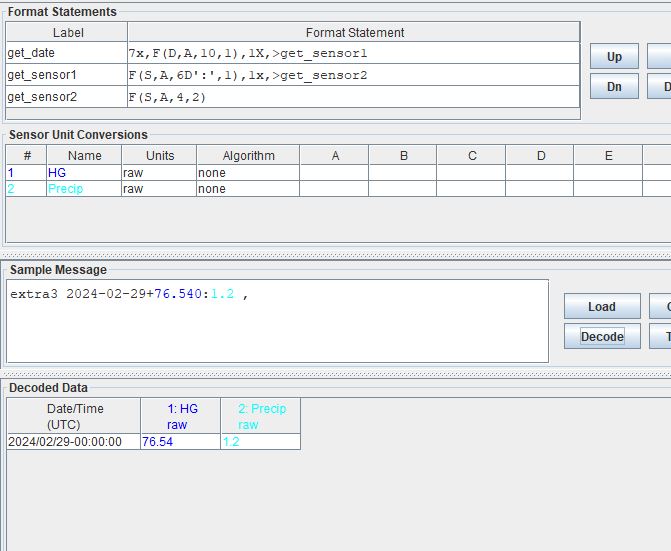
Sample Messages: Example where the first sensor is colon delimited up to 6 characters and where the second sensor is of fixed format of 4 characters.
extra3 2024-02-29+176.54:1.2 ,
extra3 2024-02-29+76.540:1.2 ,
extra3 2024-02-29+76.54:1.2 ,
extra3 2024-02-29+76.5:1.2 ,
extra3 2024-02-29+9:1.2 ,
Decoding Labels and Statements for above Sample Messages.
get_date |
7x,F(D,A,10,1),1X,>get_sensor1 |
get_sensor1 |
F(S,A,6D’:’,1),1x,>get_sensor2 |
get_sensor2 |
F(S,A,4,2) |
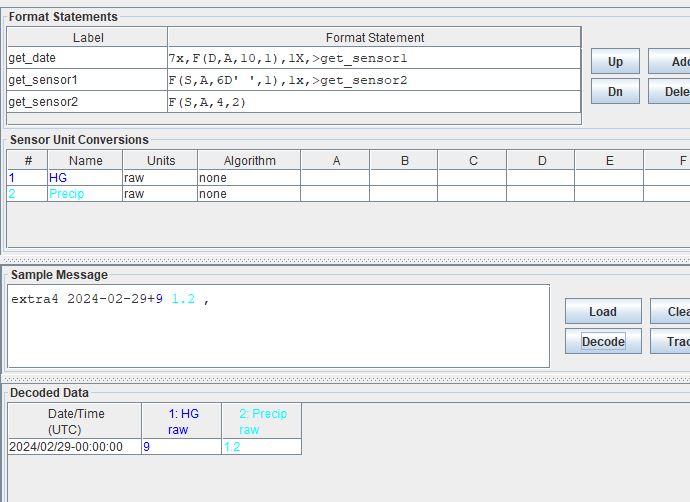
Sample Messages: Example where the first sensor is space delimited up to 6 characters and where the second sensor is of fixed format of 4 characters.
extra4 2024-02-29+176.54 1.2 ,
extra4 2024-02-29+76.540 1.2 ,
extra4 2024-02-29+76.54 1.2 ,
extra4 2024-02-29+76.5 1.2 ,
extra4 2024-02-29+9 1.2 ,
Decoding Labels and Statements for above Sample Messages.
get_date |
7x,F(D,A,10,1),1X,>get_sensor1 |
get_sensor1 |
F(S,A,6D’ ‘,1),1x,>get_sensor2 |
get_sensor2 |
F(S,A,4,2) |
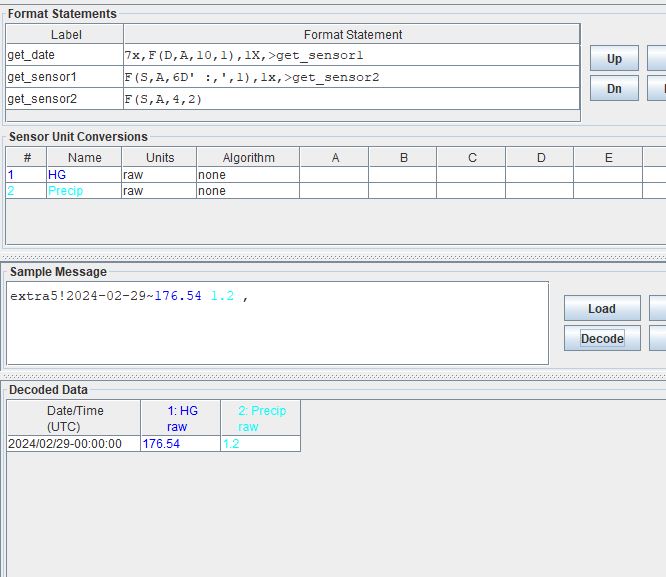
Sample Messages: Example where the first sensor is either comma delimited or colon delimited or space delimited or up to 6 characters and where the second sensor is of fixed format of 4 characters.
extra5!2024-02-29~176.54 1.2 ,
extra5!2024-02-29~76.540:1.2 ,
extra5!2024-02-29~76.54,1.2 ,
extra5!2024-02-29~76.5 1.2 ,
extra5!2024-02-29~9:1.2 ,
Decoding Labels and Statements for above Sample Messages.
get_date |
7x,F(D,A,10,1),1X,>get_sensor1 |
get_sensor1 |
F(S,A,6D’ :,’,1),1x,>get_sensor2 |
get_sensor2 |
F(S,A,4,2) |
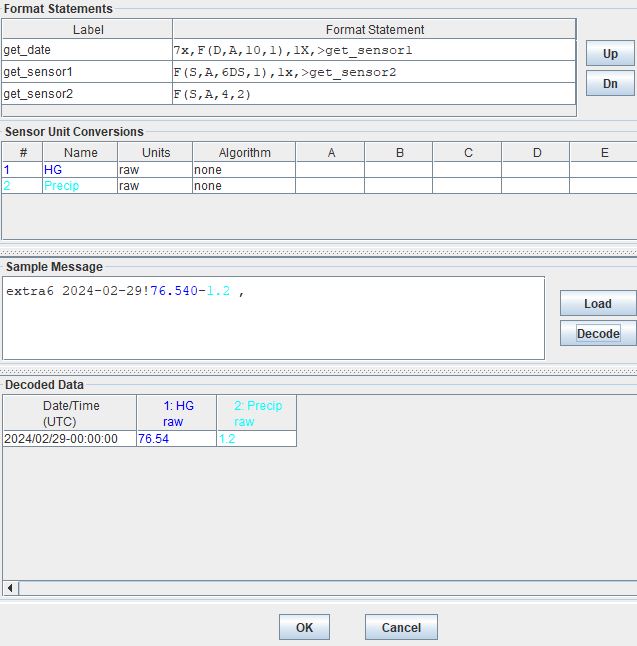
Sample Messages: Example where the first sensor is sign delimited up to 6 characters and where the second sensor is of fixed format of 4 characters.
extra6 2024-02-29!176.54+1.2 ,
extra6 2024-02-29!76.540-1.2 ,
extra6 2024-02-29!76.54+1.2 ,
extra6 2024-02-29!76.5-1.2 ,
extra6 2024-02-29!9-1.2 ,
Decoding Labels and Statements for above Sample Messages.
get_date |
7x,F(D,A,10,1),1X,>get_sensor1 |
get_sensor1 |
F(S,A,6DS,1),1x,>get_sensor2 |
get_sensor2 |
F(S,A,4,2) |
Field - SENSOR - Pseudo-Binary
B - Pseudo-Binary - unsigned
Unlike messages that are sent in ASCII characters, messages that are sent in pseudo-binary are not discernible to the human eye. Even if the date/time order of a ASCII messages type is not obvious, typically a human can tell which bits of a message are relating to a certain sensor or parameters. On the contrary, in pseudo-binary a numeric value is delivered in potentially all letter or non-numeric characters.
Encoding Steps (Going from a numeric number to pseudo-binary)
Start with decimal number
Turn decimal number into integer with multiplier
Encode the integer to binary
Tack on leading zeros if binary number is not multiple of 6
Divide (separate) the number into 6-bit chucks
Tack on high order bits 01 to each of the resulting 6 digit chunks
Result is 8-bit chunks
Encode each 8-bit chucks using ASCII characters.
Decoding Steps (Going from pseudo-binary to a numeric number)
Decode ASCII characters to 8-bit binary
Result will be binary number of multiples of 8 (ie 8,16,24, etc)
Remove preceding 01 of each 8-bit chucks
Result is binary number of multiples of 6 (ie 6,12,18, etc)
Decode the binary number to integer
Use sensor defined translations (ie multipliers, linear shift, other).
Examples
DECODING RECAP
@E} -> 381

CONVERT @E} TO BINARY
@ = 01000000
E = 01000101
} = 01111101

010000000100010101111101
**      **      **

REMOVE LEADING 01 FROM EACH 8-BIT BINARY NUMBER
000000000101111101

CONVERT 18-DIGIT BINARY NUMBER TO INTEGER
000000000101111101 = 381
DECODING RECAP
DSe -> 17637

CONVERT DSe TO BINARY
D = 01000100
S = 01010011
e = 01100101

010001000101001101100101
**      **      **

REMOVE LEADING 01 FROM EACH 8-BIT BINARY NUMBER
000100010011100101

CONVERT 18-DIGIT BINARY NUMBER TO INTEGER
000100010011100101 = 17637
DECODING RECAP
J^~ -> 42942

CONVERT DSe TO BINARY
J = 01001010
^ = 01011110
~ = 01111110

010010100101111001111110
**      **      **

REMOVE LEADING 01 FROM EACH 8-BIT BINARY NUMBER
001010011110111110

CONVERT 18-DIGIT BINARY NUMBER TO INTEGER
001010011110111110 = 42942
As an OpenDCS user it is not expected or assumed that one is familiar with the intricate methodology behind pseudo-binary encoding/decoding. It is however pertinent that users know the proper spacing and order for such messages to ensure that the proper message or series of characters gets decoded as pseudo-binary.
For those who wish to better understand the steps behind pseudo-binary encoding and decoding, it is recommended that users refer to an ASCII table that has the 7-bit (with a leading zero that makes it 8 characters) binary numbers with the corresponding ASCII symbols. Additionally, a user might want to use an online binary to decimal converter (or vica versa).
Sample messages in pseduo-binary (3 character length)
@E}
DSe
J^~
DECODING format statement for messages above.
get_sensor |
F(S,B,3,1) |

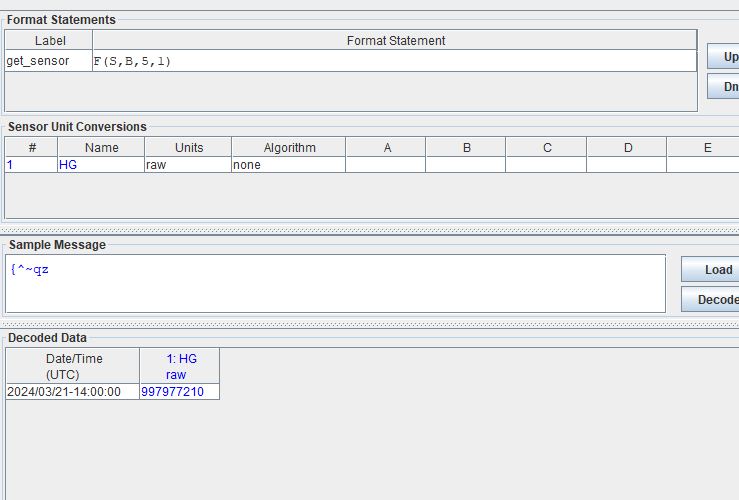
Sample messages in pseduo-binary (5 character length)
@E}DS
{^~qz
J^~qz
get_sensor |
F(S,B,5,1) |
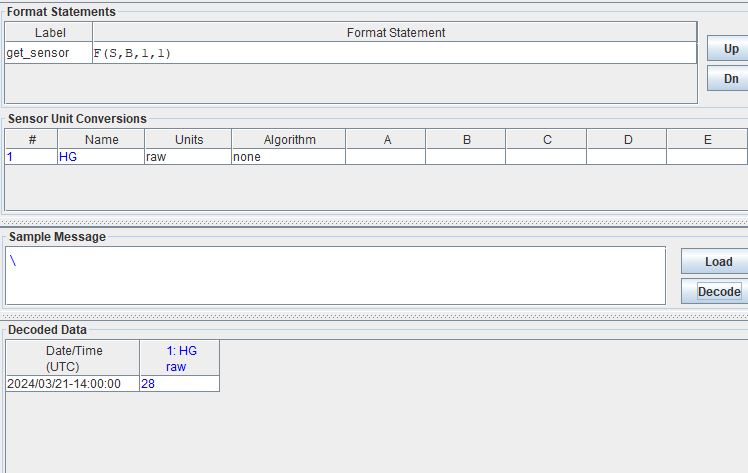
Sample messages in pseduo-binary (1 character length)
}
Z
\
]
get_sensor |
F(S,B,1,1) |
I - Pseudo-Binary - signed integer
… more content coming soon …
CSV Operations - (sens#,…)
Parse CSV
The csv function can be used to parse comma-separated values within a message. The arguments to the function are a series of DECODES sensor numbers. Use an ‘x’ if you want to skip a column.
The function will stop when it reaches a newline or when it runs out of specified columns. Therefore, if the messages has more than one line it is advised to add a / at the end of the statement and repeat the statement over.
The following images are examples of CSV file types that can be parsed using the csv operation.
Recall that by default the message browser will show date/time relative to current time, assuming the message is in descending order (ie most recent data slice is at the top, and oldest data slice is at the bottom of the message). Unless a header with date/time information is assumed and selected under the Header Type drop menu. In all of the examples below the Header Type is set to “other”.
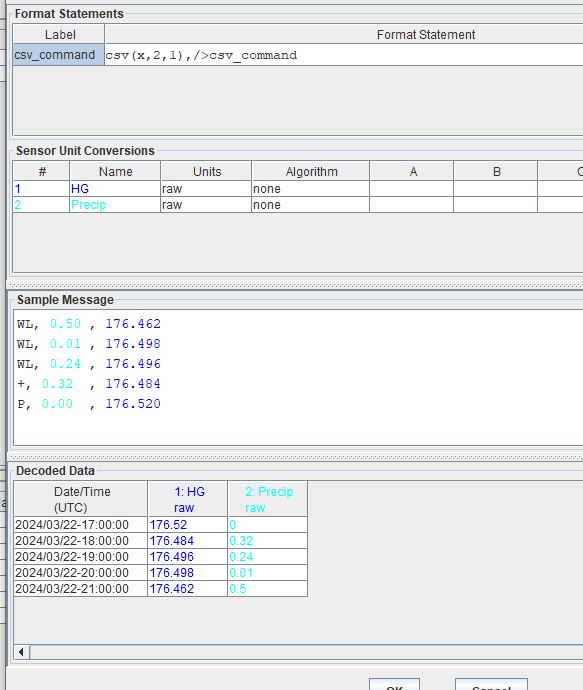
The following two examples show the CSV parser can be used when there are 2 sensors. The first example has no date or time included in the message.
WL, 0.50 , 176.462
WL, 0.01 , 176.498
WL, 0.24 , 176.496
+, 0.32  , 176.484
P, 0.00  , 176.520
csv_command |
csv(x,2,1),/>csv_command |
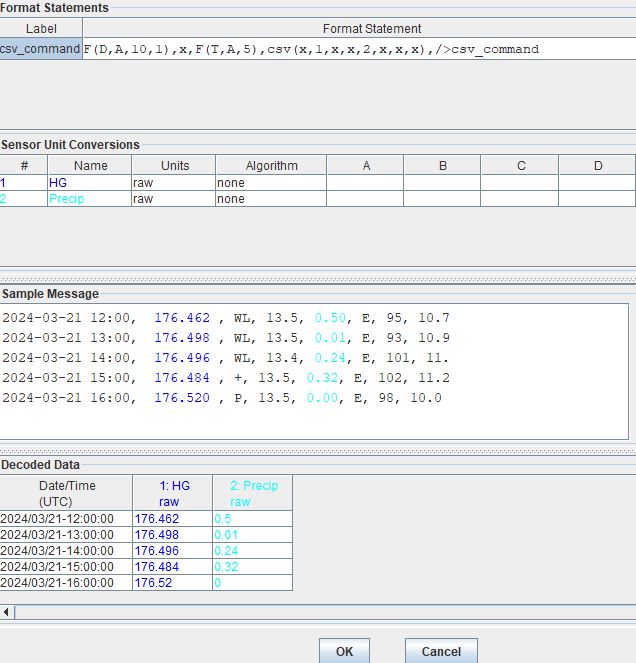
2024-03-21 12:00,  176.462 , WL, 13.5, 0.50, E, 95, 10.7
2024-03-21 13:00,  176.498 , WL, 13.5, 0.01, E, 93, 10.9
2024-03-21 14:00,  176.496 , WL, 13.4, 0.24, E, 101, 11.3
2024-03-21 15:00,  176.484 , +, 13.5, 0.32, E, 102, 11.2
2024-03-21 16:00,  176.520 , P, 13.5, 0.00, E, 98, 10.0
csv_command |
F(D,A,10,1),x,F(T,A,5),csv(x,1,x,x,2,x,x,x),/>csv_command |
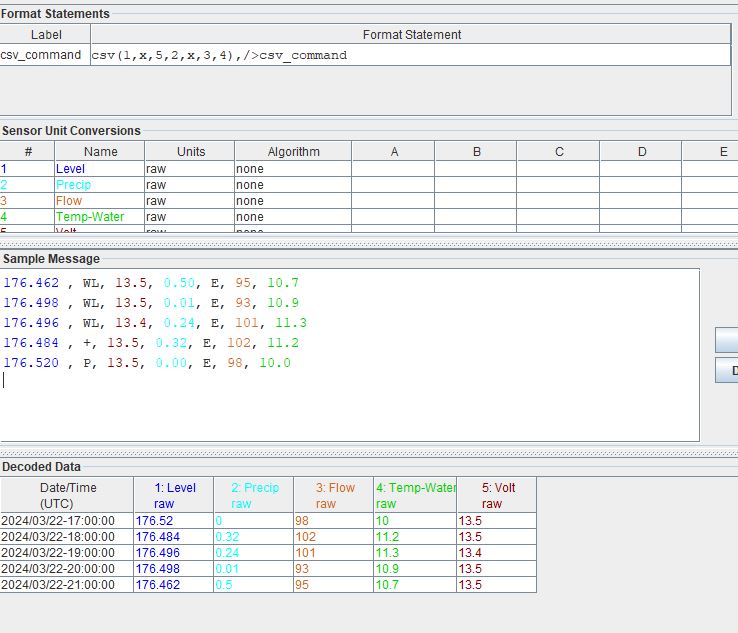
The following two examples show how the CSV parser can be used when there are 5 sensors. The first example has no date or time included in the message.
176.462 , WL, 13.5, 0.50, E, 95, 10.7
176.498 , WL, 13.5, 0.01, E, 93, 10.9
176.496 , WL, 13.4, 0.24, E, 101, 11.3
176.484 , +, 13.5, 0.32, E, 102, 11.2
176.520 , P, 13.5, 0.00, E, 98, 10.0
csv_command |
csv(1,x,5,2,x,3,4),/>csv_command |
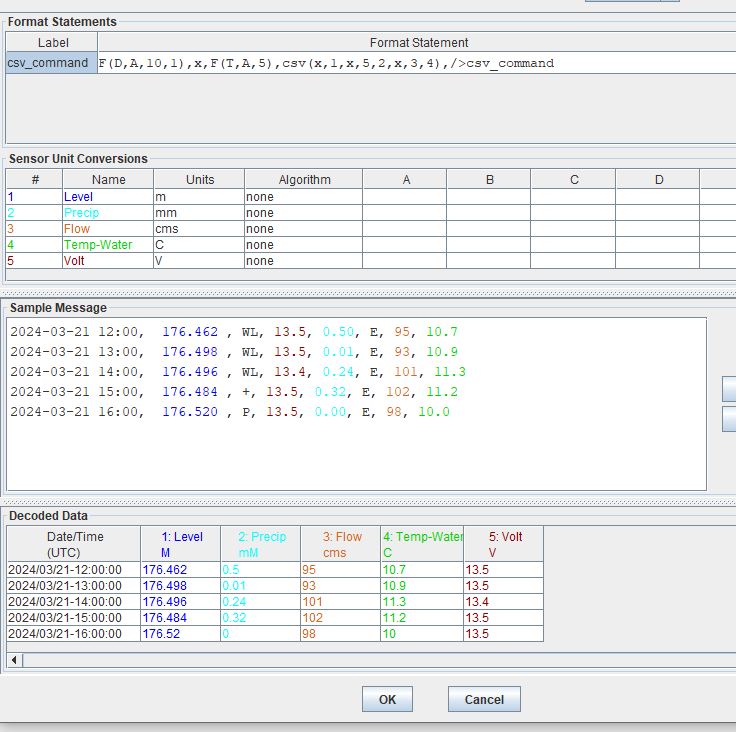
2024-03-21 12:00,  176.462 , WL, 13.5, 0.50, E, 95, 10.7
2024-03-21 13:00,  176.498 , WL, 13.5, 0.01, E, 93, 10.9
2024-03-21 14:00,  176.496 , WL, 13.4, 0.24, E, 101, 11.3
2024-03-21 15:00,  176.484 , +, 13.5, 0.32, E, 102, 11.2
2024-03-21 16:00,  176.520 , P, 13.5, 0.00, E, 98, 10.0
csv_command |
F(D,A,10,1),x,F(T,A,5),csv(x,1,x,5,2,x,3,4),/>csv_command |
Regex Function - regex(expression)
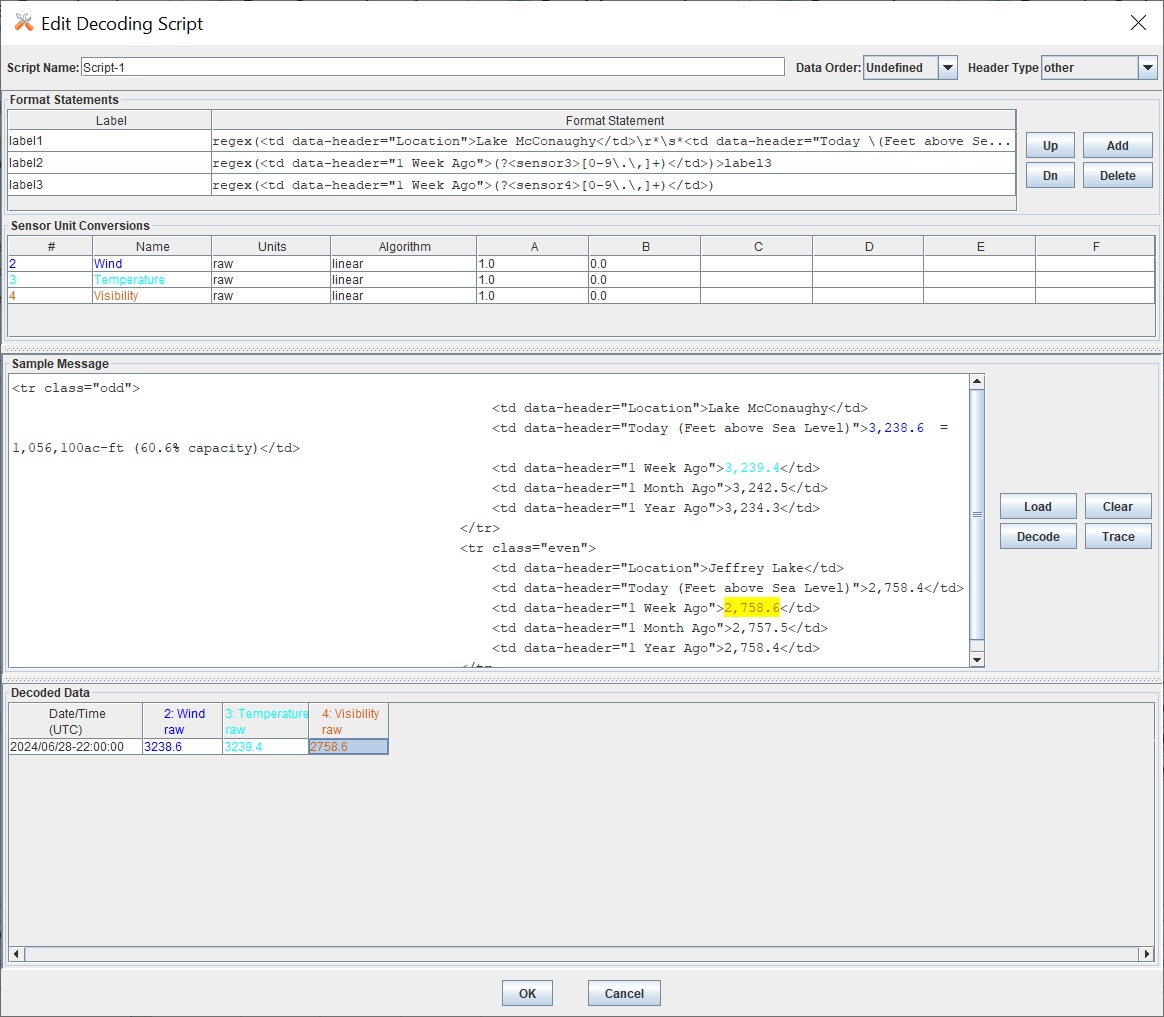
The regex function is used to capture specific parts of a message. For example the HTML message above has a value 3,238.6 that we can capture using:
regex(<td data-header="Location">Lake McConaughy</td>\r*\s*<td data-header="Today \(Feet above Sea Level\)">(?<sensor2>[0-9\,\.]+))
The regular expression needs one named capture group in the format sensor#. Where # is the sensor number. In this above example it is ‘sensor2’
The opening and closing parenthesis ( ) represent the group
Regex Sample |
Description |
|---|---|
( |
opening parenthesis for capture group |
?<sensor2> |
name the capture ‘sensor2’ |
[0-9,.]+ |
Matches a number that optionally includes a comma and period. |
) |
Closing parenthesis |
Any characters that have special meaning in regular expressions need to be prefixed with a slash ‘'. For example in the message the text:
(Feet above Sea Level)
was modified to \(Feet above Sea Level\) to remove the special meaning of parenthesis.
\r* in the expression was used to capture linefeed characters (blank lines)
\s* in the expression is used to capture white spaces
The asterisk (*) means zero or more linefeeds or spaces in the \r* and \s* examples.
Please consult regular expression documentation for more details. There are excellent online websites that allow testing your data and regular expressions.
<tbody>
                    <tr class="odd">
                    <td data-header="Location">Lake McConaughy</td>
                    <td data-header="Today (Feet above Sea Level)">3,238.6  =  1,056,100ac-ft (60.6% capacity)</td>
                    <td data-header="1 Week Ago">3,239.2</td>
                    <td data-header="1 Month Ago">3,242.5</td>
                    <td data-header="1 Year Ago">3,234.5</td>
                </tr>
Check Operation - C(,*label)
statement |
example |
data |
about |
|---|---|---|---|
C(nN, label) |
C(3N, other) |
123 |
|
1.3 |
|||
-3. |
|||
+13 |
|||
1,2 |
|
||
#23 |
|||
12! |
|||
23 |
|||
C(S, label) |
C(S, other) |
+ |
|
- |
|||
+12 |
|||
-24 |
|||
! |
|
||
3 |
|||
1+ |
|||
2- |
|||
C(‘str’, label) |
C(‘hi’, other) |
hi |
|
hi123 |
|||
hi#1~ |
|||
hi.+Z |
|||
1hi |
|
||
hello |
|||
bye |
|||
ih |
For the examples below - copy one line and see how the decoding works. A date and time format statement are not included in the script, therefor by default the date/time will show the latest hour and top of hour.
Sample Messages: Examples where the check will pass and the data will be decoded
line001 20240229 176.54,
line-43 20240229 176.54,
line4.3 20240229 176.54,
line+43 20240229 176.54,
Sample Messages: Examples where the check will fail and the statement will jump to the next line.
- ::
line 1 20240229 176.54, line1,2 20240229 176.54, line#23 20240229 176.54, line23 20240229 176.54,
Decoding Labels and Statements for above Sample Messages.
check_for_num |
4x,C(3N,jump_to_label),>get_sensor |
jump_to_label |
/ |
get_sensor |
18P,F(S,A,6,1) |
Sample Messages: Examples where the check will pass and the data will be decoded
ln+01 20240229 176.54,
ln-43 20240229 176.54,
ln+.3 20240229 176.54,
ln-43 20240229 176.54,
Sample Messages: Examples where the check will fail and the statement will jump to the next line.
ln0+1 20240229 176.54,
ln4-3 20240229 176.54,
ln33+ 20240229 176.54,
ln~1- 20240229 176.54,
Decoding Labels and Statements for above Sample Messages.
check_for_sign |
2x,C(S,jump_to_label),>get_sensor |
jump_to_label |
/ |
get_sensor |
16P,F(S,A,6,1) |
Sample Messages: Examples where the check will pass and the data will be decoded
prefMessage 20240229 176.54,
prefMessage 20240229 176.54,
prefMessage 20240229 176.54,
prefMessage 20240229 176.54,
Sample Messages: Examples where the check will fail and the statement will jump to the next line.
prefMESSAGE 20240229 176.54,
prefmessage 20240229 176.54,
prefixMessage 20240229 176.54,
pref 20240229 176.54,
Decoding Labels and Statements for above Sample Messages.
check_for_string |
4x,C(‘Message’,jump_to_label),>get_sensor |
jump_to_label |
/ |
get_sensor |
22P,F(S,A,6,1) |
Scan Operations - S(n,*,label)
The scan operation is slightly different than the check operation. The scan operation will scan the next N characters for a specified type of character (ie number, sign, alphabetic letter, or a string). If the character or string is found, then the pointer will navigate to where the specific condition has occurred. The command is used to position to a particular location based upon a specified location.
In all cases below the following will occur: Scan at most n data bytes until either the target of the scan is found or an end-of-line is found.
If the target of the scan is found, continue with the next operation in the current statement label. Otherwise switch to the label specified in the parentheses. After the operation is completed the current data pointer points to where the scan halted, i.e. if target character(s) is found, it points to that character. Otherwise, it is moved ‘n’ characters from the previous position.
A special case of the S operation results when n is 0. In this case the current data pointer remains unchanged. If the target of the scan if found continue with the next operation. Otherwise switch to specified format. This feature allows multiple tests on the same data character.
statement |
example |
data |
about |
|---|---|---|---|
S(n,N, label) |
S(3,N, other) |
HG1 |
|
G.5 |
|||
176 |
|||
HG. |
|||
abc |
|
||
HG# |
|||
!~a |
|||
@DT |
|||
S(n,S, label) |
S(3,S, other) |
+12 |
|
12- |
|||
1+2 |
|||
-12 |
|||
123 |
|
||
123+ |
|||
#~! |
|||
{3* |
|||
S(n,A, label) |
S(4,’h’, other) |
hi12 |
|
1hi2 |
|||
12hi |
|||
+#hi |
|||
Hi12 |
|
||
i123 |
|||
12H3 |
|||
ello |
In all of the SCAN examples, only copy one line at a time into the Message Browser.
Sample Messages: The following messages will DECODE the data for sensor 1. In other words the scan was successful in finding a number within the next 3 characters. Since a number was found, the pointer will jump to immediately before the number found, then proceed with the next statement.
scanHG176.54
scanHG.54
scan175.54
scanG176.54
Sample Messages: The following messages will jump to the label jump_to_label because the scan was unsuccessful in finding a number in the next 3 characters.
scanabc#176.54
scanHG#H176.54
scan!~a#175.54
scan@DT#176.54
Decoding Labels and Statements for above Sample Messages.
scan_for_num |
4x,S(3,N,jump_to_label),>get_sensor |
jump_to_label |
/ |
get_sensor |
F(S,A,6,1) |
Sample Messages: The following messages will DECODE the data for sensor 1. In other words the scan was successful in finding the sign within the next 3 characters. Therefore the pointer will navigate to immediately before the sign, and then proceed to the next statement. The next statement instructs the pointer to jump 1 character (the sign), then extract the sensor data.
scan+176.54
scan54-176.54
scan1+176.54
scan-176.54
Sample Messages: The following messages will jump to the label jump_to_label because the scan was unsuccessful in finding a sign in the next 3 characters.
scan123176.54
scan123+176.54
scan#~!176.54
scan{3*176.54
scan_for_sign |
4x,S(3,S,jump_to_label),>get_sensor |
jump_to_label |
/ |
get_sensor |
1x,F(S,A,6,1) |
Sample Messages: The following messages will DECODE the data for sensor 1. In other words the scan was successful in finding a letter ‘G’ within the next 4 characters. Since a ‘G’ was found, the pointer will jump to immediately before the ‘G’ found, then proceed with the next statement.
scan12hG176.54
scan4HG176.54
scanHG176.54
scan12G176.54
Sample Messages: The following 3 messages will jump to the label jump_to_label because the scan was unsuccessful in finding a letter in the next 3 characters. The last line will navigate to the first ‘G’ found, but then try to get the sensor from GG176. and therefore an error will occur.
scan12hg176.54
scang176.54
scan1234g176.54
scanGGG176.54
scan_for_letter |
4x,S(4,’G’,jump_to_label),>get_sensor |
jump_to_label |
/ |
get_sensor |
1x,F(S,A,6,1) |