OpenDCS Routing Spec - Introduction
A Routing Spec is a process that retrieves data, decodes it, formats it, and then puts it somewhere.
In other words, a defined routing spec is a set of instructions that do the following steps:
Identify a source to retrieve information from
Transform information to a time series based on pre-described set of rules
Match transformed information to a time series or group of time series in relevant database
Put information into database or alternative format
Do step 1-4 for multiple locations, in one defined routing spec
The GUI is built to help users set up a routing spec. Once a routing spec is set up using the GUI, it will have a name. The routing spec can then be executed by running the OpenDCS command “rs”. More information on the commands to run routing specs can be found Running a Routing Specification Manually
rs -d3 'routing-spec-name'
More details about how to run the routing spec are addressed at the end of this page.
Routing specs can also be set to run on a background scheduler called the Routing Scheduler. More information on this can be found Running the Routing Spec Scheduler.
The content below is focused on how to set up a routing spec.
How to Set-Up a Routing Spec?
There is not any one specific order to setting up a routing spec, but a recommended order is outlined below. Variations of such order are necessary when variations and unique applications within a routing spec are employed.
Ensure locations exist in database - review Sites tab
Ensure connections to LRGS’s are defined
Define a source or sources for the routing spec
Define a configuration or configurations for the routing spec
Define DECODING scripts
Create a platform or platforms
Create a network list or lists for the routing spec
Define the routing spec
Schedule routing specs using routing scheduler
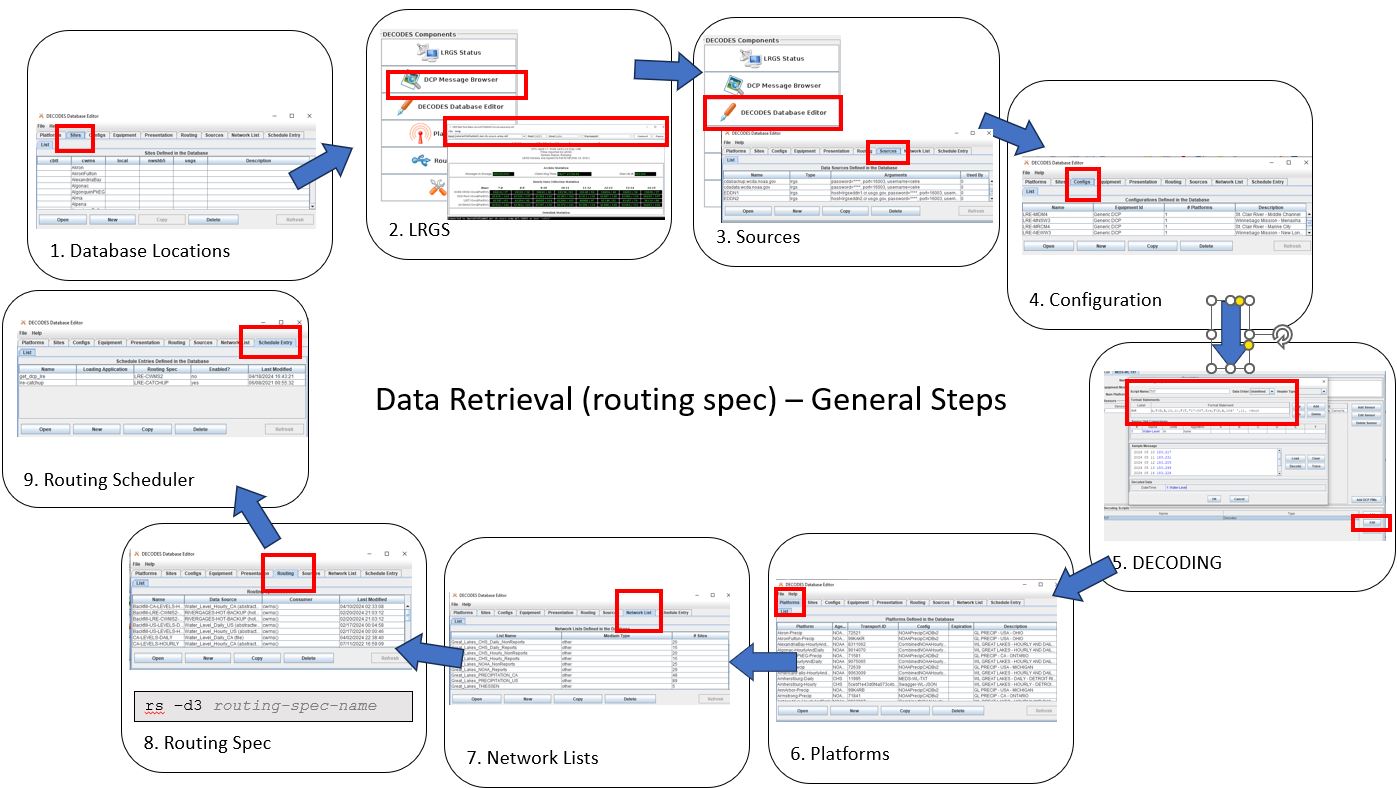
The steps below are intended to help guide a new user through the GUI and DECODES Database Editor tabs used for setting up the routing spec.
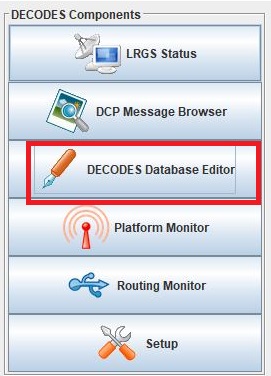
To get started, launch the DECODES Database Editor from the main menu.
A window will pop up prompted a user for log in information.
USACE users:
USERNAME: Username
PASSWORD: Oracle
1.Database Locations
Recall that a routing spec ultimately outputs time series data. Typically the time series data will be stored in a database. Depending on the set-up, the time series will ultimately be stored into a database. For more information about time series pathname parts, see the Time Series Introduction.
If the location name for the time series data does not exist in the database yet, then the location name will need to be added. To add or edit locations, see a system administrator or someone who has permissions to edit the database. OpenDCS can be used to add (or remove) a location in the database. To view the current locations in the database, navigate to the Sites tab. Location names can be sorted alphabetically.

If a new location or site name needs to be added, click the “New” button. Verify all the locations exist for which the time series are expected to be mapped to in the routing spec below. Note that the time series pathnames do not yet have to exist in the database, however there is no issue if they do exist.
2.LRGS Connections
The LRGS used to be its own software. It now comes packaged with OpenDCS. The LRGS is essentially a software/tool that is used for receiving data from satellite links or the internet. When running and operational, the LRGS is a continuous process that runs on either windows or unix servers. Typically the LRGS is set up and configured using the GUI LRGS Status, or for more experienced users, it is set up and configured by manually editing the configuration files.
The routing spec guide and steps below assume that a user already has an LRGS connection set up and is operational. In other words, that means that messages are being retrieved and are available for routing specs or using the DCP message browser. For more information about getting started with the LRGS see the legacy LRGS guide LRGS Guide.
A couple checks to see if the LRGS is running are outlined below.
Check |
Typical Location or Command |
What to Look For |
|---|---|---|
Check lock file |
<path>/opendcs_user/lrgs/ |
Existence |
Check archive folder |
<path>/opendcs_user/lrgs/archive/ |
Recently Files |
The following Unix command can be run to determine if the LRGS process is running:
- ::
pgrep -fl /opendcs/ | sed ‘s/.*///’ | sort | uniq -c
The LRGS must be running for a routing spec to work with a source of type lrgs. In other words, if a different source is selected below, then this step is actually not necessary to proceed with the following steps for setting up a routing step.
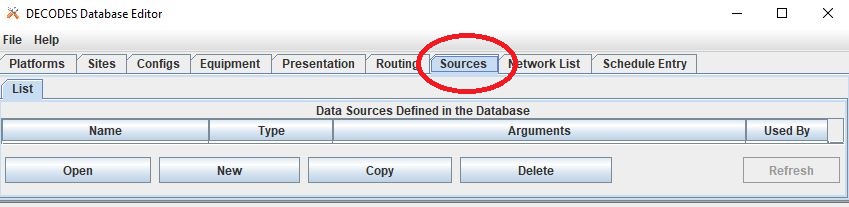
3.Sources
Once the DECODES Database Editor has been launched, navigate to the Sources tab. On the bottom of the page, click the “New”.
There are a number of types of sources. The main options are outlined below. In the event that some of the options below are not showing up, use rledit to add these in. See rledit for more information on using the reference list editor.
lrgs - retreives raw messages from a remote LRGS server over the network
file - read data from a specified file
directory - continually scan a directory and process files as they appear
web - reads data files over a web connection specified by a URL
abstractweb - reads data files over a web connection specified by a URL with parameters
socketstream - opens a socket and reads a one-way stream of data containing raw DCP messages. Some DRGS and HRIT product provide such a stream
hotbackupgroup - an ordered group of LRGS data sources, where secondary and tertiary servers are used to automatically maintain availability
roundrobingroup - contains a list of other data sources and is continually read in
Note that the names of sources cannot be renamed after they are created, so select the source name wisely.
lrgs
Users can set up a source to pull from a remote LRGS server over the network. This source can set up to connect to an LRGS or DRS system. Properties for the LRGS Data Source can be defined in the Properties section on the right hand side of the window.
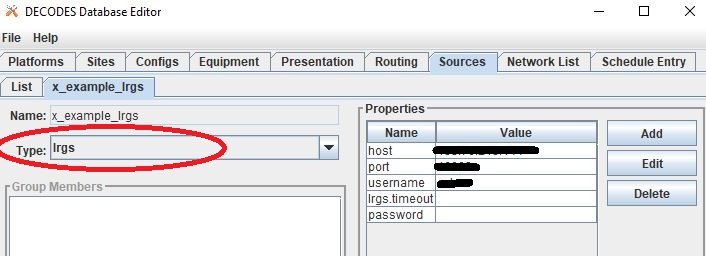
Typical information required for this type of source include:
host: the numeric
port:
username:
password:
For further information about lrgs and connection, see LRGS User Guide. For more information about the properties options see lrgs source properties.
file
Users can set up a source to pull from a file on a local server. The file mus be in a defined specified location. For example, in the image below the file “catchup.txt” is called upon. Users should add in the whole path for the file where the ‘<path>’ placeholder is specified.
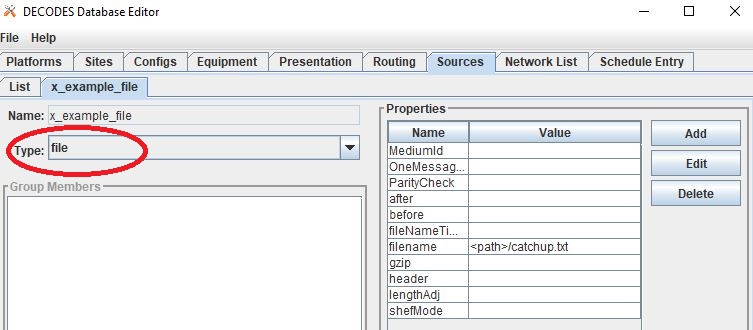
Users can specify some properties in the Properties section, such as where there is one message per file, or whether there is a header. Note that the parsing of the information in the file will be defined in the DECODING script, along with perhaps some simple properties and/or parameters.
For more information about the properties options see file and directory source properties.
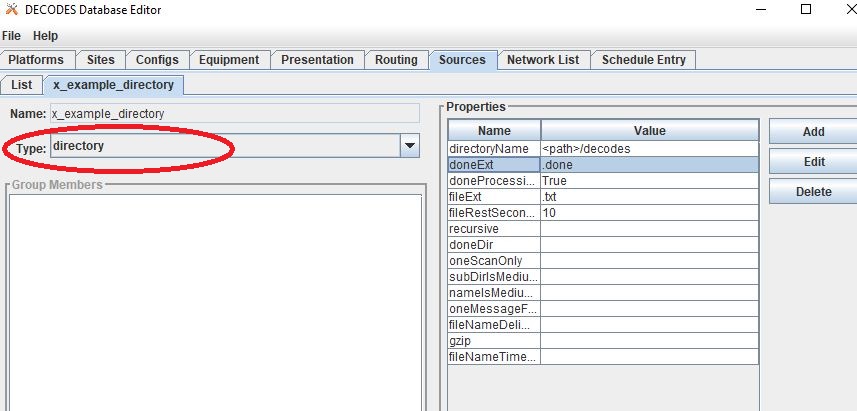
directory
Users can set up a source to pull information from a group of files that are in a specified directory. For example, in the image below the directory is called “decodes”. When setting up users should add in the whole path for the directory. Some other common parameters to define include:
fileExt: If set, only process files with a matching extension. Other files ignored.
fileRestSeconds: Don’t process until x seconds have lapsed, to present processing of a file while it’s being written.
doneProcessing: Decision about how processed file are handled. If False, files are deleted. If True, then files are renamed or moved.
doneExt: Extension to be added to files once processed (if doneProcessing set True). Do not use same extension as fileExt.
For more information about the properties options see file and directory source properties.
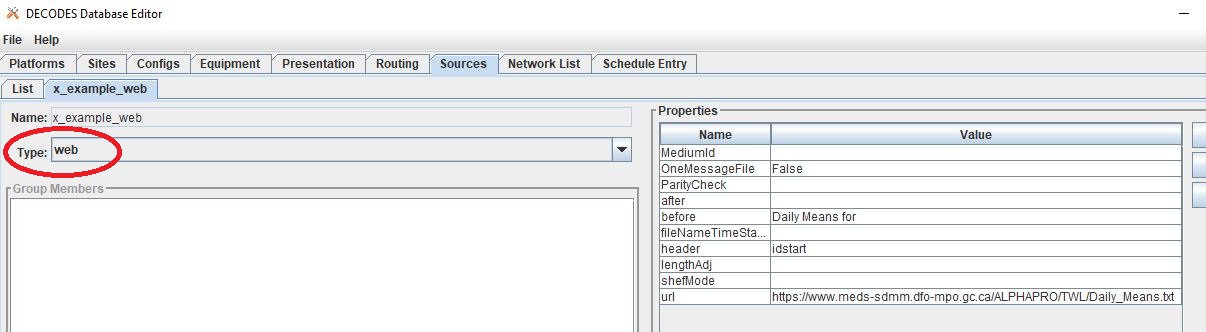
web
Users can also set up a source to retrieve or fetch information from a web page. In the example below the url points towards a web page (url) that is static. The information on the web page is updated on a regular basis. For web sources, users must define a url in the url Properties box.
Additional common parameters defined included for web sources are:
OneMessageFile: if True entire web page is assumed to contain one message
before:
header:
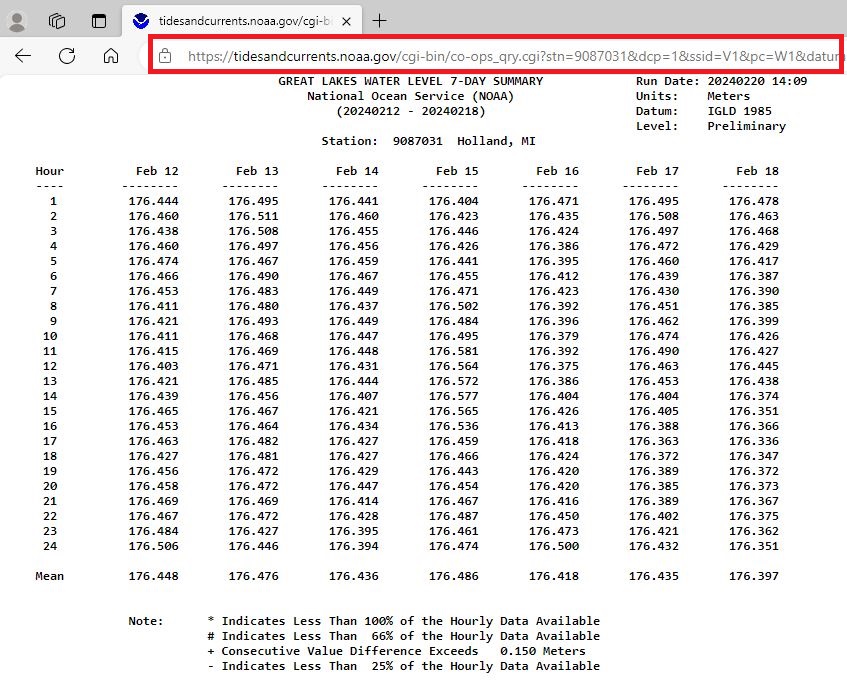
Below is a snapshot of what the URL looks like:
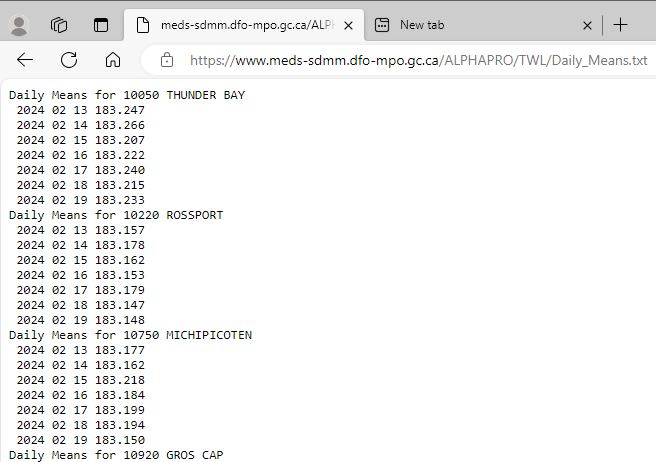
In the example above, the url includes daily levels for multiple sites or locations. Each locations’ data is separated by a header that includes a station identifier number and name.
For more information about the properties options see web and abstract web source properties.
abstractweb
Users can also set up a source that reads data directly over the web. The abstractweb source differs from the web source by including options to build a unique url with parameters such as $Date or $MediumID to specify a time window or station in the url.
If users are not seeing the option “abstractweb” in the list of the types, then see section ____ and use rledit to add it.
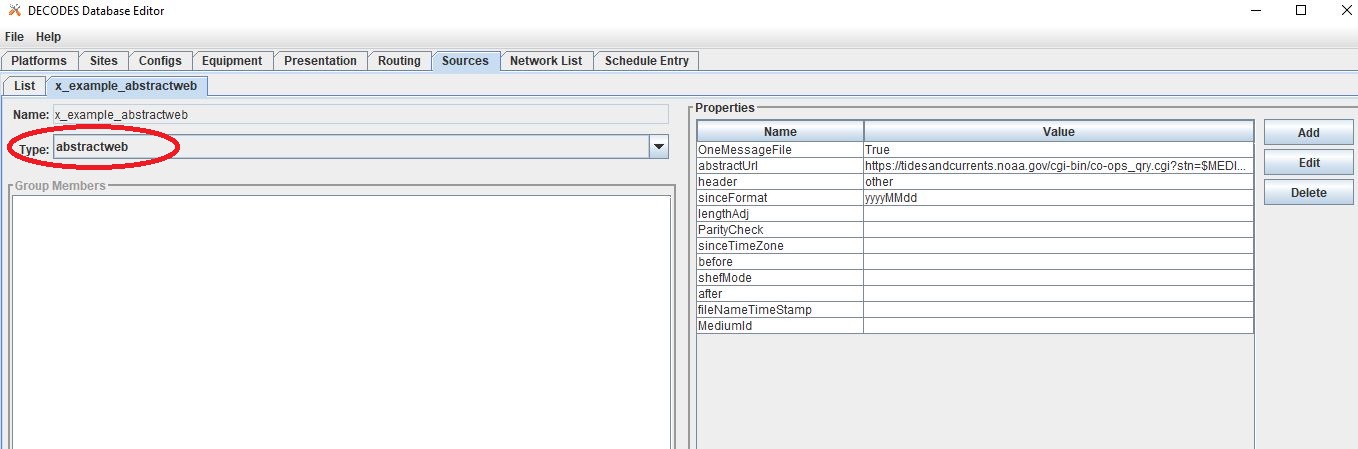
For example - Daily Water Levels from NOAA for one station (bottom of file):
With Variables: https://tidesandcurrents.noaa.gov/cgi-bin/co-ops_qry.cgi?stn=$MEDIUMID&dcp=1&ssid=V1&pc=W1&datum=NULL&unit=0&edate=$SINCE&date=1&shift=NULL&level=-1&form=0&data_type=pgs&format=View+Report
Example: https://tidesandcurrents.noaa.gov/cgi-bin/co-ops_qry.cgi?stn=9087031&dcp=1&ssid=V1&pc=W1&datum=NULL&unit=0&edate=20240218&date=1&shift=NULL&level=-1&form=0&data_type=pgs&format=View+Report
For example - Hourly Water Levels from NOAA for one station:
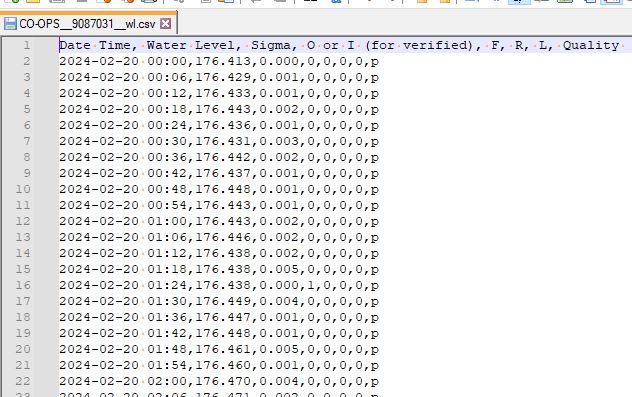
With Variables: https://api.tidesandcurrents.noaa.gov/api/prod/datagetter?begin_date=$SINCE&end_date=$UNTIL&station=$MEDIUMID&product=water_level&datum=IGLD&time_zone=gmt&units=metric&application=USACE&format=csv
Example - CSV: https://api.tidesandcurrents.noaa.gov/api/prod/datagetter?begin_date=$SINCE&end_date=$UNTIL&station=$MEDIUMID&product=water_level&datum=IGLD&time_zone=gmt&units=metric&application=USACE&format=csv
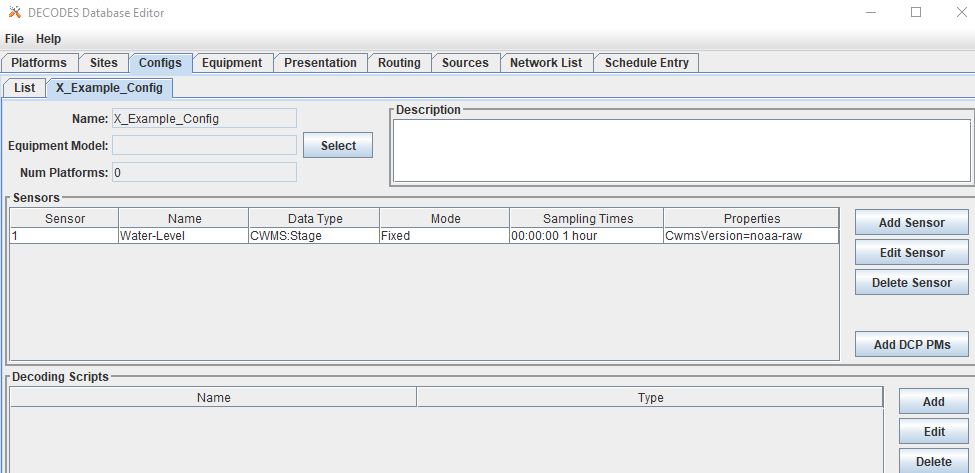
4.Configuration
The next step, after defining a source, to setting up a routing spec is to define a new configuration. To do this, navigate to the Config tab. Select “New” at the bottom of the screen.

An input window will pop up asking the user to enter a name for the new config. Like the sources, the name selected for the configuration cannot be changed once it is created. Good practice is to select a name that conveys to users some information about the DECODING stored in the configuration.
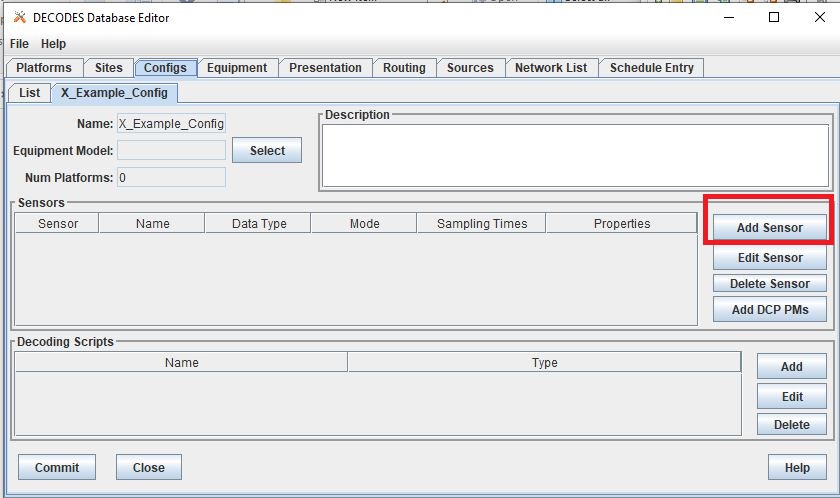
Once set up, the configuration record will contain:
a list of sensors
a DECODING script
count of number of platforms using the configuration
an equipment model (if applicable)
Sensors
Once the new configuration is opened, the parameters will need to be filled in. Add sensor information. The sensor information is applicable whether the source is an lrgs, or file, or directory or abstractweb. This is where the information is defined about what type of time series data will be the output of the DECODING script. For example, below are a few examples of what type of information could be stored in the Sensor area (ie water levels, precipitation, stage, flow, etc). Below is a brief recap of the Sensor headers:
Name: information about the variable (ie Precipitation, AirTempMax, PeakFlow, etc)
Data Type: information about param such as (Precip, Temp-Air, Stage, Flow). Users can enter either the Code or Param Type from the tables below.
Mode: information about the time series interval
Sampling Times: additional information about the sampling time interval
Properties: further information about the time series such as statcode , duration , and version.

See the table below for more information about what code or parameter should be entered above for the Data Type.
In this example in getting started, the configurations are introductory and will not include offsets or computations or transformations.
Note that if a user specifies properties in the platform section, those properties will overwrite what is defined in the configuration record.
Below is a table of the codes and the corresponding parameter types that need to be entered for the sensors.
Code |
CWMS Param Type |
PC |
Precip |
HG |
Stage |
HP |
Stage-Pool |
HT |
Stage-Tail |
VB |
Volt |
BV |
Volt |
HR |
Elev |
LF |
Stor |
QI |
Flow-In |
QR |
Flow |
TA |
Temp-Air |
TW |
Temp-Water |
US |
Speed-Wind |
UP |
Speed-Wind |
UD |
Dir-Wind |
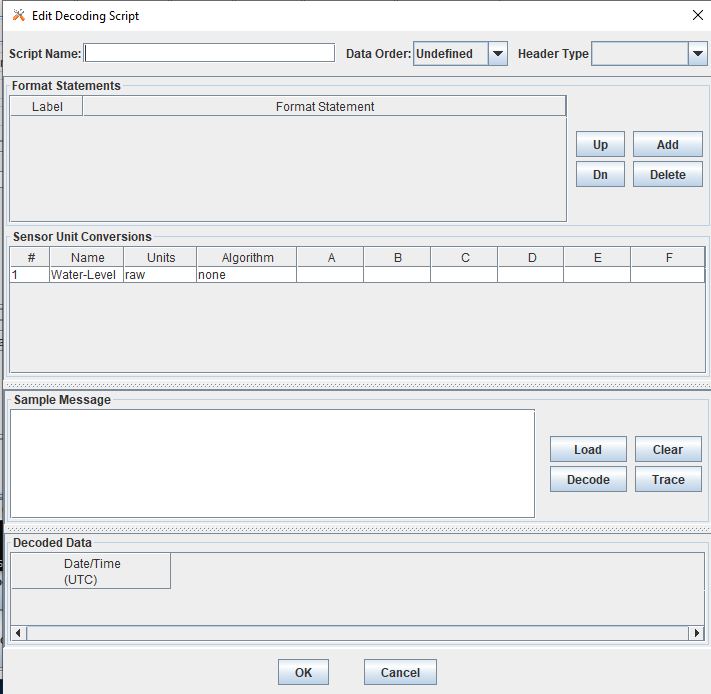
Once the sensor information is added, add a new Decoding Script.
The next section will go into further detail about how to set up a decoding script.
5.DECODING
Once the configuration and sensors are defined, then a DECODING script can be added. One can think of the DECODING script as the instructions or recipe for translating the raw lrgs messages or data retrieved from the web to human readable time series, formatted such that it can be easily entered into the database.
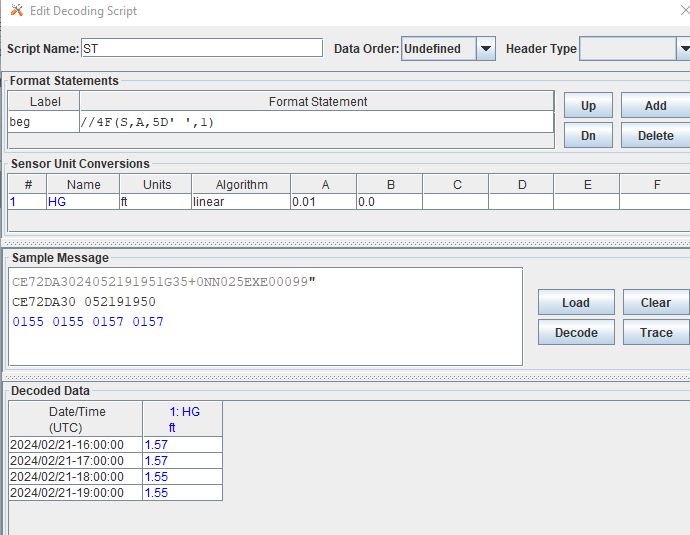
For example, see in the following window the Sample Message Box window contains a raw message, and the bottom shows the data in a time series format.
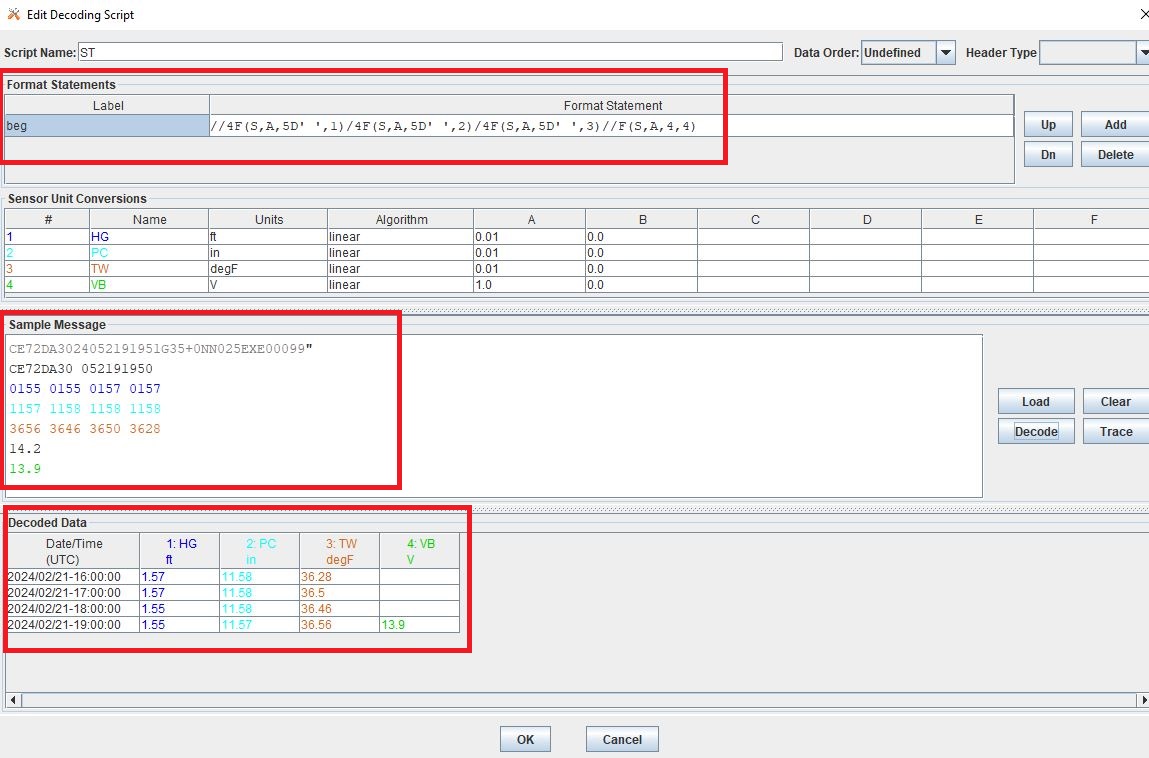
Overview of the Decoding Script Editor
In the above image there are three parts boxed in red:
Format Statements: FORTRAN-like statements to interpret and format the data
Sample Message: Box for pasting or loading retrieved messages to test DECODING
Decoded Data: Output of DECODING with color syntax
In addition to the parts highlighted above, there are three other parts that the user may use:
Sensor Line Conversions: Table for specifying units of decoded message and any simple linear coefficient conversions
Data order: A drop down menu where Ascending or Descending can be selected (default is undefined)
Header Type: A drop down menu for selecting a header type such as a medium or source type (default is blank)
In regards to using the sample message browser, note that messages can only be retrieved from an lrgs for which a connection has already been established. For USACE users, this means that messages can only be retrieved while logged onto the server.
To get started on writing DECODES statements, see DECODES Guide. DECODES statements use FORTRAN-like statements. Within a statement, the format operations are separated from each other by commas. Each statement has two parts:
a label to identify the format
a statement containing a sequence of format operations
Setting up DECODING script is likely the most challenging part of setting up a routing spec. This means that filling in the following window is likely going to be the largest time sink in getting a new routing spec set-up.
DECODING - Executing Basics
Once the statements are defined, and a message is in the Sample Message area, then DECODING can be executed for testing or debugging purposes. Click the Decode button on the right hand side.
As it is executed, the script keeps track of three things:
The currently executing format statement
The current operation within the format statement
The current position within the message data
The message header is not processed by the script. The data pointer is initialized to the first actual message byte.
The script will start with the first format statement, so position is important. This differs from previous versions of DECODES and EMIT.
Each format statement has a label. Several operations can cause decoding to jump to a new statement, identified by its label. Labels may only contain letters and digits.
Note, that sometimes an entire format statement cannot fit into one line. In these cases, a second adjacent label with the exact same name can be added and the format statement will be treated as a continuation of the first statement.
The various operations in the format statements step through the message data from beginning to end. There are operations for skipping characters and lines, and for positioning the data pointer within the message data.
Below is one example of DECODING for a specific type of messages from a csv. Typically, DECODING that is operational and parses a raw message is often more involved and complicated. Depending on how the platform is set up and what type of message is assumed, the header information may be interpreted, skipped or parsed differently. In the example below, it is assumed the header is for a GOES self-timed DCP message. This is a common type of message, especially when the source is defined as an lrgs.
For more information about getting started with DECODES see Intro to DECODES
Recall that the following information is being retreived.
Date
Value for Variable
GOES DCP Message Header
And LRGS internally formats headers into a 37-byte character string.
Sample Raw Message:
CE06021C24060212401G39+0NN017EXE00196
CE06021C24060212401G39+0NN017EXE00196
CE06021C           G  +0NN   E  00196
        24060212401 39  N 017 XE00196
       |          || | |||  || |    |
       A          BC D EFG  HI J    K
Field |
Letter and Index |
Description |
|---|---|---|
DCP Address |
A (1-8) |
8 hex digit DCP Address |
Date |
B (9-19) |
11 digit date and time in YYDDDHHMMSS (DDD=Julian Day) |
Failure Code |
C (20) |
G (good), ? (parity error), or W, D, A, B, T, U, etc |
Digital Signal Strength |
D (21-22) |
2 decimal digital signal strength (32-57) |
Digital Frequency Offset |
E (23-24) |
2 decimal frequency offset (+ or -, 0-9) |
Modulation Index |
F (25) |
1 decimal index - N (normal), L (low) or H (high) |
Data Quality Indicator |
G (26) |
1 decimal data quality - N (normal), F (fair), P (poor) |
GOES receive channel |
H (27-29) |
3 decimal digit GOES receive channel |
GOES spacecraft indicator |
I (30) |
1 character GOES spacecraft indicator E or W |
Uplink Carrier Status |
J (31-32) |
2 hex digit uplink carrier status |
Message data length |
K (33-37) |
5 decimal digit message data length |
DECODING EXAMPLES
Below is an example of when the message is formatted like a csv. The second examples shows a simple GOES DCP message with one variable.
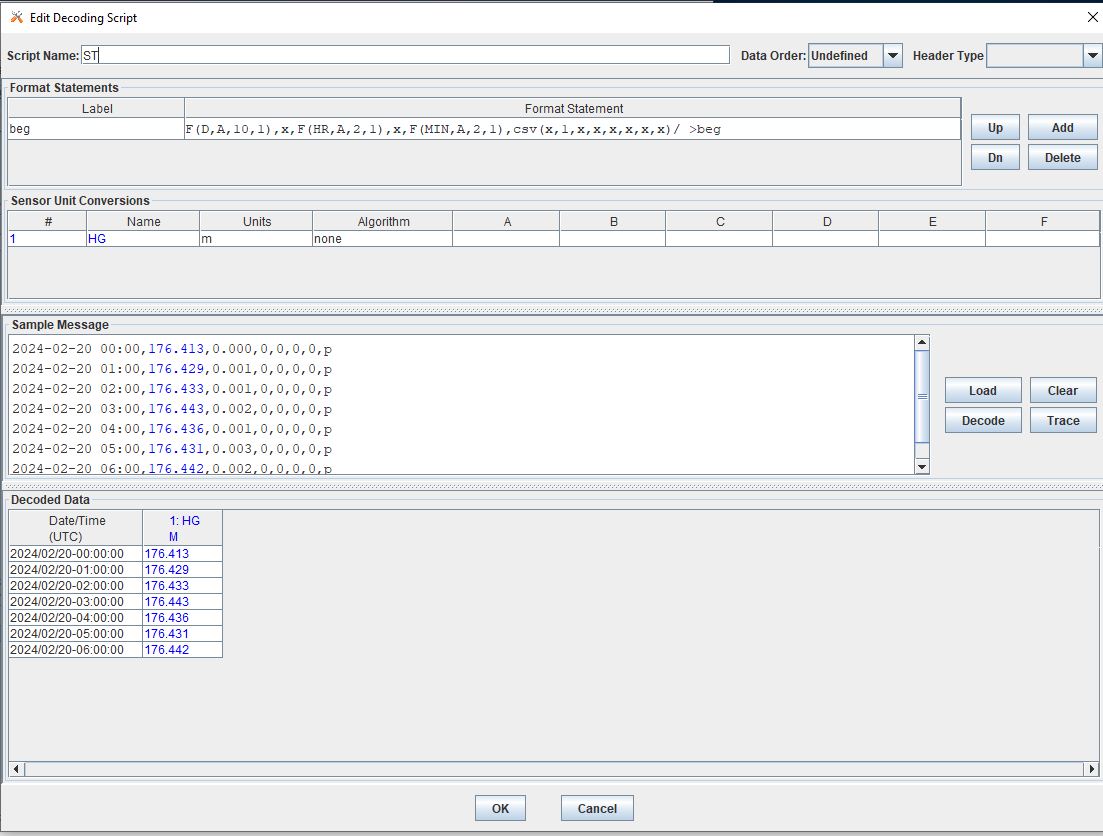
In the above message, the dates and times are actually in the message and so in the case above the DECODING has to search for the date and time. The DECODING uses a banked csv format statement to parse the message.
In the above message, the date and times are derived from the message header. Be sure to click “OK” so the script editor closes and then click “Commit” on the config page so that the DECODING script edits save.
DECODING messages requires a solid understanding of the message structure and formats, and DECODING statements and formats. Even experienced users may require significant time to set up functional DECODING scripts and statements.
Once a DECODING script is set up, then the next step is to set up a platform.
6.Platforms
To create a new platform click on the Platforms tab in the DECODES Database Editor. On the bottom of the screen click “New”.
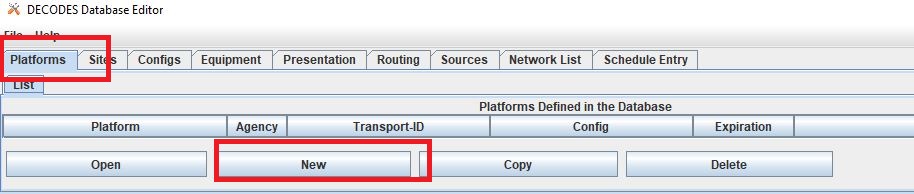
Then a new DCP window will pop up. In the window there will be a number of fields to be filled in. They are listed in the table below.
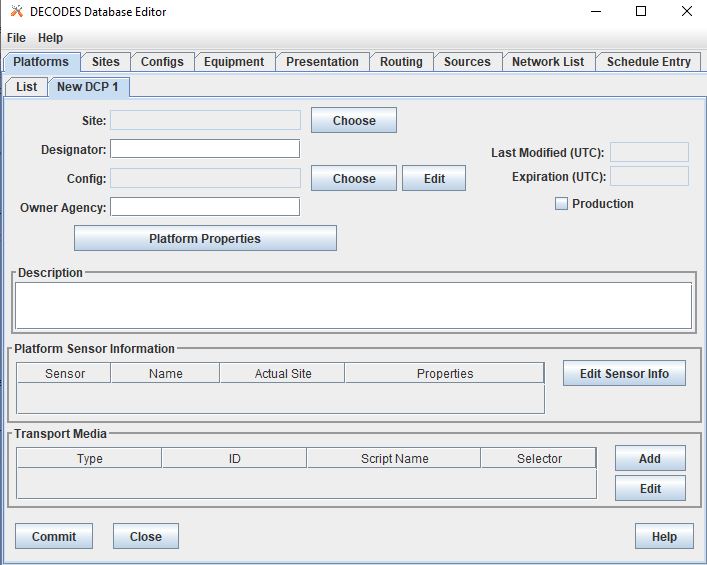
Field |
Description |
|---|---|
Site |
Location in Database |
Designator |
Optional note about the site or data type |
Config |
Select the config set up in the previous steps |
Owner Agency |
Optional note for agency platform owner |
Description |
Optional note about the platform |
Platform Sensor Information |
Sensor information will overwrite config sensor |
Transport Media |
Define medium type and transmission info |
Production Box |
Optional setting |
For the Transport Media, this box will pop up where the user can include platform media transport information. The two images below show an example of a DCP and the transmission information.

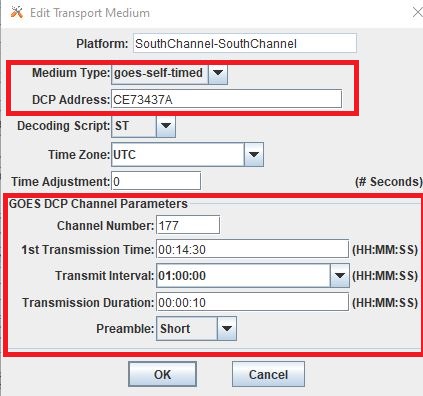
The Transport Medium window may look different depending on which Medium Type is selected. For example, when the “Medium Type” is set to “goes-self-timed”, then the bottom of the window populates with fields relevant to GOES, such as channel number, transmission time, transmission duration, and transmit interval.
IMPORTANT NOTE: Transport medium IDs can only be attributed to one platform. Therefore, if there is more than one message type or source (perhaps for different variables, or sources, or time resolutions), the DECODING script must address all sources. So, in the example above, the DCP address is the transport ID.
Be sure to click “commit” to save new platform edits.
7.Network Lists
A routing spec can be defined once at least one platform is defined. However, in the event there are multiple platforms defined that are all going to use the same source, it is helpful to create a Network List. A Network List is simply a list or group of platforms. Platforms in a list must all be of the same Medium Type.
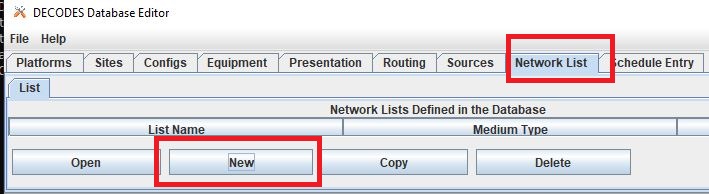
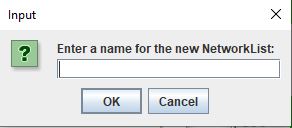
To create a new network list, navigate to the Network List tab. Click on the “New” button and then name the list. The name cannot be changed later, so give some consideration to how the list is named.

Depending on what Transport Medium Type is selected in the window will determine which platforms pop up when “Select Platforms” is clicked. A window will pop up with a list of the platforms available to select. A platform can be included in more than one list. Alternatively platforms can be manually added by clicking the “Manual Add” or the other options on the right of the screen (variable depending on Transport Medium Type). Note that more than one platform can be selected at once in the “Select Platform(s)” list by holding the “ctrl” button as platforms are selected.
After you click “Select”, be sure to click “Commit” so that all the platforms selected are saved.
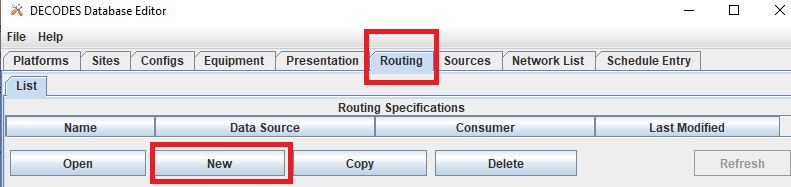
8.Routing Spec
By this point, users should now be ready to create a routing spec. Recall that the routing spec is essentially a command that specifies
where messages should be retrieved from
what messages should be retrieved from what platforms
what duration or look back time window
how the messages should be decoded
where the decoded time series should be sent or stored
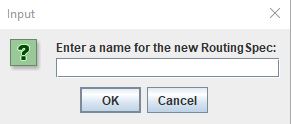
The information that will be defined in the routing spec has been set up in the previous steps. To create the routing spec, first navigate to the Routing tab. Click on the “New” button and a window will pop up for a new routing spec name. NOTE that the name of the routing spec cannot be changed after it is created, so consider the name before saving.
Once the new window comes up the user should address the following fields, at least.
Field |
Description |
|---|---|
Data Source |
Location in Database |
Destination |
consumer (pipe, database, file, etc) |
Output Format |
set output format |
Date/Time - Since/Util |
define time window for message retrieval |
Platform Selection |
Specify a platform or network list |
The Data Source will populate with a drop down menu consisting of the sources previously added in the ‘Sources’ tab. The Destination will populate with some options including but not limited to the database, file and pipe. To set up a routing spec to go into the database, select the applicable database. The Date/Time format is only applicable for sources that are not static. For example, sources of type lrgs or abstract web will require a look back time window to be defined. The longer the look back the longer the routing spec will take to run, because there will presumably be more data. It is good practice to take into consideration how frequently the source is updated, the resolution of the data, how frequently you are planning to run the routing spec, and how many platforms the routing spec will include. The Platform Selection is where the user will need to either specify a platform or network list. Recall that a network list is a group of platforms.
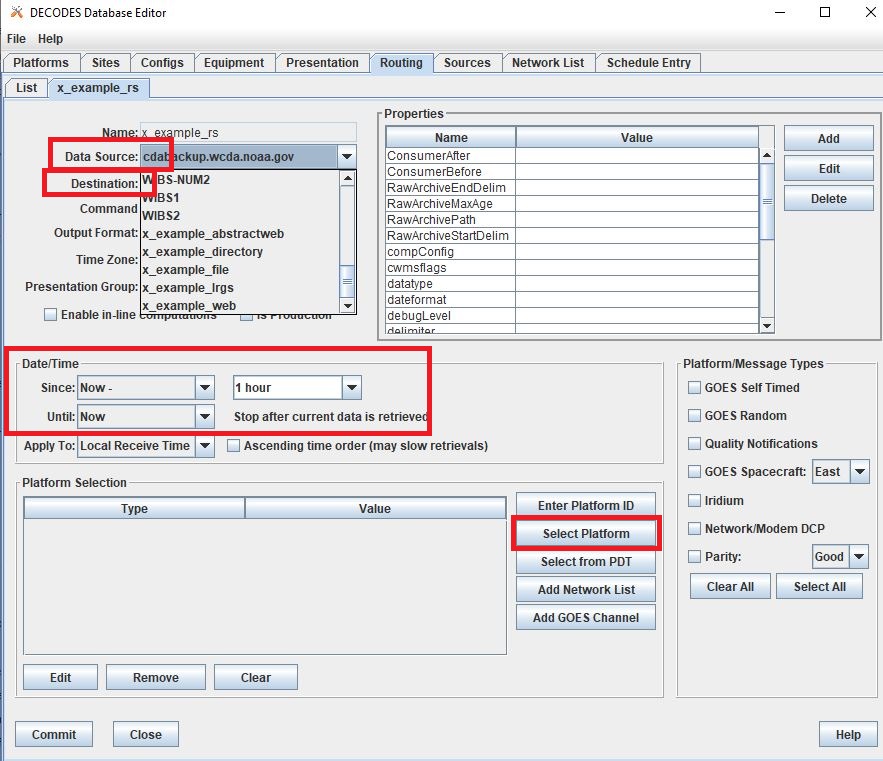
NOTE - there are some unique criteria that need to be selected given certain types of sources. For example, when the source type is a directory, then the property “oneScanOnly” must be defined as True.
TIP - It is good practice to define the Destination as pipe before putting a routing spec in operation. This allows the user to test the routing spec without potentially overwriting or accidentally populating another time series in the database.
Remember to save the changes. Now you have set up a routing spec. This means that assuming all the steps above have been completed or checked off, then a user can now run the routing spec. Routing specs can be run manually, irregardless of whether any continuous OpenDCS process is running. If the destination is a database, the database must be up and running.
How do I run or execute the Routing Spec?
Thus far, we have used the OpenDCS GUI to set up the routing spec. However, running the routing spec ‘manually’ requires running the OpenDCS command ‘rs’. In the following examples, imagine there is a routing spec named ‘mySpec’.
rs <options> mySpec
Options |
Description |
|---|---|
rs -C filename mySpec |
Computation Config File |
rs -D string mySpec |
Env-Define |
rs -E dirname mySpec |
Explicit Database Location |
rs -F mySpec |
Explicit directory-consumer folder-name |
rs -FL mySpec |
Forward javax.logging logger to application log; Default: false |
rs -L string mySpec |
host:port:user[:password] |
rs -M string mySpec |
Optional Summary File |
rs -O string mySpec |
OfficeID |
rs -P string mySpec |
Name (or path) of DECODES properties file |
rs -R mySpec |
Remove Redundant DCP Message Data; Default: false |
rs -S string mySpec |
Since Time |
rs -U string mySpec |
Until Time |
rs -Y string mySpec |
The log file time-zones Default: UTC |
rs -c mySpec |
Enable computations; Default: false |
rs -d integer mySpec |
debug-level; Default: 0 (0-) |
rs -k filename mySpec |
Optional Lock File |
rs -l filename mySpec |
log-file; Default: routing.log |
rs -m mySpec |
Do NOT apply Sensor min/max limits; Default: false |
rs -n netlist mySpec |
Netlist Name |
rs -o filename mySpec |
Status Output File |
rs -p propertyset mySpec |
name=value |
rs -s scriptname mySpec |
ScriptName |
rs -e mySpec |
(deprecated – does nothing) |
Manual Routing Specs Common Options
Troubleshooting - Use Debugger
… more content coming soon …
Backfilling - Use Since and Until
… more content coming soon …
Lockfile Significance
… more content coming soon …
9.Routing Scheduler
Now that you have set up a routing spec, you may wish to automate it. This is so that a user does not have to manually run the routing spec as described above. Depending on the system where the database is running, and where the continuous processes are going to run, the following methods can be used to automate the scheduling of the routing specs. The first method is using an appropriate system job scheduler. This is independent of the OpenDCS software. A few options are outlined below.
System Scheduler
For a Windows System the following job schedulers are options: * Windows Scheduler * Python Crond
For a Unix System the following job schedulers are options: * cron
Routing Scheduler Tool
Alternative to the options specified above, the OpenDCS software includes a Routing Scheduler. This can be used to schedule routing specs.
To create a schedule, complete the following steps.
Navigate to the Routing Tab
Create a new schedule
Select the routing spec from the drop down menu
Define the schedule
Save
Doing the above steps will not automatically start the routing scheduler. To start the routing scheduler, requires starting up an OpenDCS continuous process. The scheduler just created must be enabled for the continuous process to acknowledge it.
To start the routing scheduler, you will need to start an OpenDCS continuous process.
# start routing scheduler
nohup routsched routing-scheduler-goes

# start routing scheduler - with debugging
nohup routsched -d3 routing-scheduler-goes

# start routing scheduler - with debugging and log
nohup routsched -d3 -l routing.log routing-scheduler-goes

# start routing scheduler - with debugging and log & not not pipe output (RECOMMENDED)
nohup routsched -d3 -l routing.log -a routing-scheduler-goes > nohup.routing 2>&1 &
After reading the above section, a user should be familiar with how to set up a routing spec using the GUI and how to run and schedule the routing spec.
Once a routing spec is operationally running via some scheduler, then presumably time series are getting populated into a database. If the user wishes to set up automated computations and create dependent time series, then turn to the OpenDCS Computation Processor. For an introduction on how to set up a Computation using this tool, see the